|

LiveCycle provides the ability to create components
that use custom data types as input and output values. Creating
components that support custom data types lets you create processes
that support data types that are used within your organization or
within your workflows. For example, you can create a data type that
keeps track of account information, such as the account balance.
After you create a custom data type, you can use it within LiveCycle processes.
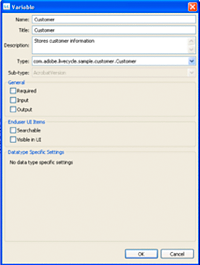
The following illustration shows the Variable dialog box that
is accessible in Workbench. Notice that the data type of the Customer variable
is com.adobe.livecycle.sample.customer.Customer,
which is an example of a custom data type.
A variable that is based on a custom data type can be used in
processes that you create in Workbench. For example, the Customer variable
shown in the previous diagram can be used in processes that involves tracking
customer information.
The bank component that is created in this section is related
to a fictional bank where a new customer profile can be created
and a new account opened for the customer. This component contains
two services: Customer service and Account service.
The Customer service contains the following operations:
createCustomer: Creates a new customer.
updateCustomer: Updates customer information.
getCustomerInfo: Retrieves information about
the customer.
deleteCustomer: Deletes the customer.
The Account service contains the following operations:
createAccount: Creates a new account.
updateAccount: Updates account information.
getAccountInfo: Retrieves information about
the account.
deleteAccount: Deletes the account.
Note: Before you create a component that uses custom
data types, it is recommended that you understand how to create
components. For information, see Creating Your First Component.
Sample filesThis section creates Java
classes and interfaces that correspond to Java files that can be
located in the sample email component located at C:\Adobe\Adobe LiveCycle
ES3\sdk\samples\Foundation\CustomComponents\Bank,
where C:\ is the LiveCycle installation location. As you
read through this section, it is recommended that you also refer
to the sample files.
Summary of stepsTo develop a component
that uses custom data types, perform the following steps:
Set up your development environment.
Create your application logic.
Define the component XML file.
Deploy the component to LiveCycle.
Test your component.
Setting up your development environmentThe first step to create a component is to create a new
Eclipse Java project. Like other Java projects, you must add JAR
files to your project’s class path on which your Java business logic
is dependent. Because application logic within this component requires
a com.adobe.idp.Document object, add the adobe-livecycle-client.jar
file to your class path. For information about LiveCycle JAR files, see Including LiveCycle Java library files
Note: The bank component does not require JAR files
other than adobe-livecycle-client.jar.
Creating your application logicDefining the customer service interfaceTo develop the bank component, you must create the customer service
interface, which defines the service’s operations, input values,
and return values. This service has four operations, all of which
must be defined in the service interface. The following Java code
example shows the customer interface that belongs to the bank component.
Notice that the name of the Java interface is CustomerService and
is located in the com.adobe.livecycle.sample.customer package.
Defining the customer service interfacepackage com.adobe.livecycle.sample.customer;
/**
* The Customer service provides methods to
* create a new Customer object, delete
* the Customer, and update the customer information. Information
* about the customer can also be retrieved.
*/
public interface CustomerService {
/**
* Create a new customer
* @param inCustomer Customer object containing information about the customer
* @return customerId unique string identifying the customer
* @exception CustomerException if any of the fields in the Customer object are missing
*/
public String createCustomer(Customer inCustomer)throws CustomerException;
/**
* Delete the customer
* @param inCustomerId unique string identifying the customer
* @exception CustomerException if customer does not exist
*/
public void deleteCustomer(String inCustomerId)throws CustomerException;
/**
* Update the customer
* @param inCustomer Customer object
* @exception CustomerException if customer does not exist
*/
public void updateCustomer(Customer inCustomer)throws CustomerException;
/**
* Get the customer information
* @param inCustomerId id of customer
* @return Customer information
* @exception CustomerException if customer does not exist
*/
public Customer getCustomerInfo(String inCustomerId)throws CustomerException;
}
Defining the account service interfaceTo develop the bank component, create the account service interface,
which defines the account service’s operations, input values, and return
values. This service has four operations, all of which must be defined
in the service interface. The following Java code example shows
the account interface that belongs to the bank component. Notice
that the name of the Java interface is AccountService and
it belongs to the com.adobe.livecycle.sample.account package.
Defining the account service interfacepackage com.adobe.livecycle.sample.account;
/**
* Adds a new account for a specific customer
*/
public interface AccountService {
/**
* Creates a new bank account
* @param accountType An enumeration of different kinds of accounts
* @param accountInfo An account information object
* @return The identifier value of the new account
* @exception AccountException if account information is missing
*/
public long createNewAccount(AccountTypes accountType, AccountInfo accountInfo) throws AccountException;
/**
* Removes the account
* @param accountId The identifier of the account
* @exception AccountException if the account is not found
*/
public void removeAccount(long accountId)throws AccountException;
/**
* Update the account information
* @param accountInfo Specifies the updated account information
* @exception AccountException if account is not found
*/
public void updateAccount(AccountInfo accountInfo)throws AccountException;
/**
* Get account information
* @param accountId The identifier of the account from which to retrieve information
* @return Ab AccountInfo object containing account information
* @exception AccountInfo if account is not found
*/
public AccountInfo getAccountInfo(long accountId)throws AccountException;
}
Defining the Customer classCreate the Customer class that implements the java.io.Serializable abstract
interface. All user-defined objects must follow the Java Bean requirement
of setter and getter methods and implement java.io.Serializable. Objects
of this type are used by the Customer service.
The Customer class exposes the following data members:
city
customerId
name
phone
state
street
zip
The following example shows the Customer class that
belongs to the com.adobe.livecycle.sample.customer package.
Defining the Customer Java Beanpackage com.adobe.livecycle.sample.customer;
/**
* The Customer object holds personal information
* about a customer. An object of this type is passed to the
* Customer service to register a new customer.
*
*/
public class Customer implements java.io.Serializable {
//Specifies the name of the customer
private String name;
//Specifies the street of the customer
private String street;
//Specifies the customer's city
private String city;
//Specifies customer's state
private String state;
//Specifies the customer's zip code
private int zip;
//Specifies the customer's phone number
private String phone;
//Specifies the customer's identifier value
private String customerId;
//Returns the customer's city
public String getCity() {
return city;
}
//Sets the customer's city
public void setCity(String city) {
this.city = city;
}
//Gets the customer's phone number
public String getPhone() {
return phone;
}
//Sets the customer's phone number
public void setPhone(String phone) {
this.phone = phone;
}
//Gets the customer's state
public String getState() {
return state;
}
//Sets the customer's state
public void setState(String state) {
this.state = state;
}
//Gets the customer's street
public String getStreet() {
return street;
}
//Sets the customer's street
public void setStreet(String street) {
this.street = street;
}
//Gets the customer's ZIP code
public int getZip() {
return zip;
}
//Sets the customer's ZIP code
public void setZip(int zip) {
this.zip = zip;
}
//Gets the customer's identifier value
public String getCustomerId() {
return customerId;
}
//Sets the customer's identifier value
public void setCustomerId(String customerId) {
this.customerId = customerId;
}
//Gets the customer's name
public String getName() {
return name;
}
//Sets the customer's name
public void setName(String name) {
this.name = name;
}
}
Defining the Account classCreate the AccountInfo class, which is
a Java Bean that implements the java.io.Serializable abstract
interface. All user-defined objects must follow the Java Bean requirement
of setter and getter methods and implement java.io.Serializable. Objects
of this type are used by the Account service.
The AccountInfo class exposes the following
data members:
accountBalance
accountId
accountOpenedDate
accountType
customerId
newAccountSignatureForm
The following example shows the AccountInfo class
that belongs to the com.adobe.livecycle.sample.account package.
package com.adobe.livecycle.sample.account;


import java.util.Date;
import com.adobe.idp.Document;

// The AccountInfo object holds bank account information for the customer
public class AccountInfo implements java.io.Serializable {

    //Specifies the date when the account was created
       private Date accountOpenedDate;

       //Specifies the identifier value of the account
       private long accountId;

       //Specifies the account balance
       private double accountBalance;

       //Specifies the account form
       private Document newAccountSignatureForm;

       //Specifies the identifier of the custom who opened the account
       private String customerId;

       //Specifies the type of account
       private String accountType;

       //Gets the type of account
       public String getAccountType() {
           return accountType;
       }

       //Sets the type of account
       public void setAccountType(String accountType) {
           this.accountType = accountType;
       }

       //Gets the customer identifier value
       public String getCustomerId() {
           return customerId;
       }

       //Sets the customer identifier value
       public void setCustomerId(String customerId) {
           this.customerId = customerId;
       }

       //Gets the account form
       public Document getNewAccountSignatureForm() {
           return newAccountSignatureForm;
       }

       //Sets the account form
       public void setNewAccountSignatureForm(Document newAccountSignatureForm) {
           this.newAccountSignatureForm = newAccountSignatureForm;
       }

       //Gets the identifier of the account
       public long getAccountId() {
           return accountId;
       }

       //Sets the identifier of the account
       public void setAccountId(long accountId) {
           this.accountId = accountId;
       }

       //Gets the date when the account was opened
       public Date getAccountOpenedDate() {
           return accountOpenedDate;
       }

       //Sets the date when the account was opened
       public void setAccountOpenedDate(Date accountOpenedDate) {
           this.accountOpenedDate = accountOpenedDate;
       }

       //Gets the balance of the account
       public double getAccountBalance() {
           return accountBalance;
       }

     //Sets the balance of the account
       public void setAccountBalance(double accountBalance) {
           this.accountBalance = accountBalance;
       }
}
Defining the Account type enumeration valuesThe bank component uses a Java enumeration value named AccountType that
specifies the different account types. This enum value is used as
an input value for the Account service’s createNewAccount operation.
The following account types are defined:
Savings
RegularChecking
MoneyMarket
InterestChecking
CertificateOfDeposit
The following Java code shows a Java enum named AccountTypes and
belongs to the com.adobe.livecycle.sample.account package.
package com.adobe.livecycle.sample.account;

/**
    * The AccountTypes enum value is used as input values for
    * operations that belong to the Account service.
    */
public enum AccountTypes {
       Savings, RegularChecking, MoneyMarket, InterestChecking,
       CertificateOfDeposit;
}
Creating user-defined exceptionsCreating user-defined exceptions is a way of distinguishing
exceptions thrown by your own services. It is optional because you
can rely on the built-in java.lang.Exception object
to be thrown from your methods. The bank component created in this
section uses two user-defined exceptions:
The following Java code creates the CustomerException.
package com.adobe.livecycle.sample.customer;

/**
    * CustomerException throws Customer service specific exceptions.
    *
    */
public class CustomerException extends Exception {
       //Constructor
       public CustomerException() {
           super();
       }

       public CustomerException(String message){
           super(message);
       }
}
The following Java code creates the AccountException.
package com.adobe.livecycle.sample.account;

/**
    * AccountException throws Account service specific exceptions.
    *
    */
public class AccountException extends Exception {
       //Constructor
       public AccountException() {
           super();
       }

       public AccountException(String message){
           super(message);
       }
}
Defining the customer service implementationYou must create the customer service’s implementation class
that extends the Customer interface. For information,
see Defining the customer service interface.
The business logic that is executed by LiveCycle when
the operation is invoked must be specified in the corresponding
methods. For example, consider the createCustomer method
that is defined in the CustomerService interface.
You must define business logic within the createCustomer method
that creates a new customer.
The customer service implementation defines application logic
for the following methods.
createCustomer: Creates a new customer.
updateCustomer: Updates customer information.
getCustomerInfo: Retrieves information about
the customer.
deleteCustomer: Deletes the customer.
The following Java code example creates the customer implementation class
named CustomerServiceImpl and implements the CustomerService interface.Defining
the customer service implementation.
package com.adobe.livecycle.sample.customer;
import java.util.HashMap;

/**
    * The Customer service creates a new Customer object, deletes
    * the Customer and updates the Customer information. Information
    * about the Customer can also be retrieved. Typically,
    * customer information is stored in a database, however
    * for demonstration purposes, customer information will be stored
    * in a HashMap.
    */
public class CustomerServiceImpl implements CustomerService {

       /**
        * Keep the customer information in memory. Normally,
        * this information would be in a database.
        */
       private static HashMap customerMap;


      //Creates a new customer
       public String createCustomer(Customer inCustomer)throws CustomerException {

           if (inCustomer == null){
               //invalid Customer object
           }
           else{
               if (customerMap == null){
                   customerMap = new HashMap();
               }
               //Validate that the Customer object has data in it.
               if (isEmpty(inCustomer.getName()))
               {
                   //throw an exception that Name is required.
                   throw new CustomerException("Customer name is required");
               }

               //Validate that the Address object is not null.
               if (isEmpty(inCustomer.getStreet()) ||
                       isEmpty(inCustomer.getCity()) || isEmpty(inCustomer.getState()))
               {
                   //throw an exception that the Address is required
                   throw new CustomerException("Customer address information is required");
               }

               //generate unique a customer id
               inCustomer.setCustomerId(inCustomer.getName() + System.currentTimeMillis());
               //add the new customer.
               customerMap.put(inCustomer.getCustomerId(), inCustomer);
           }
           return inCustomer.getCustomerId();
       }

       //Deletes the specified customer
       public void deleteCustomer(String customerId) throws CustomerException{
           if (customerMap == null){
               throw new CustomerException("No customers exist");
           }
           if (!(customerMap.containsKey(customerId)))
           {
               throw new CustomerException("The customer does not exist");
           }
           customerMap.remove(customerId);
       }

      //Retrieves customer information
       public Customer getCustomerInfo(String customerId)throws CustomerException {
           if (customerMap == null){
               throw new CustomerException("No customers exist");
           }
           if (!(customerMap.containsKey(customerId)))
           {
               throw new CustomerException("The customer does not exist");
           }
           return (Customer)customerMap.get(customerId);
       }

      //Updates customer information
       public void updateCustomer(Customer customer)throws CustomerException {
           if (customerMap == null){
               throw new CustomerException("No customers exist");
           }
           if (!(customerMap.containsKey(customer.getCustomerId())))
           {
               throw new CustomerException("The customer does not exist");
           }
           customerMap.put(customer.getCustomerId(), customer);

       }

       //Determines whether the specified string contains only non whitespace
       private boolean isEmpty(String aValue) {
           return (aValue == null || aValue.trim().length() == 0);
       }
}
Defining the account service implementationYou must create the Account service’s implementation class
that extends the Account interface. For information,
see Defining the account service interface.
The business logic that is executed by LiveCycle when
the operation is invoked must be specified in the corresponding
methods. For example, consider the createAccount method
that is defined in the AccountService interface.
You must define business logic within the createAccount method
that creates a new account.
The account service implementation defines application logic
for the following methods:
createAccount: Creates a new account.
updateAccount: Updates account information.
getAccountInfo: Retrieves information about
the account.
deleteAccount: Deletes the account.
The following Java code example creates the customer implementation class
named AccountServiceImpl and implements the AccountService interface.
package com.adobe.livecycle.sample.account;

import java.util.HashMap;

/**
    * This object implements the AccountService interface.
    * The Account Service performs operations related to a bank account
    */
public class AccountServiceImpl implements AccountService {

       /**
        * Stores all the account in memory. Usually this is
        * stored in a database.
        */
       private static HashMap accountMap;

       //Creates a new account
       public long createNewAccount(AccountTypes accountType,
               AccountInfo accountInfo) throws AccountException{


           //Allocate memory for storing the account information.
           if (accountMap == null)
           {
               accountMap = new HashMap();
           }
           //Validate the data in the AccountInfo.
           if (accountInfo == null){
               throw new AccountException("No Account Information provided");
           }

           if (accountInfo.getCustomerId() == null)
           {
               throw new AccountException("No customer id provided");
           }

           if (accountInfo.getNewAccountSignatureForm() == null){
               throw new AccountException("Please provide the account signature form");
           }

           if (accountType != null)
               accountInfo.setAccountType(accountType.toString());

           //For demonstration purposes, accountId is the current timestamp.
           accountInfo.setAccountId(System.currentTimeMillis());
           //The account id is the key to lookup the account information.
           accountMap.put(accountInfo.getAccountId(), accountInfo);
           return accountInfo.getAccountId();
       }

       //Returns information about the specified account
       public AccountInfo getAccountInfo(long accountId)throws AccountException {
           if (accountMap == null){
               throw new AccountException("No accounts exist");
           }
           if (!accountMap.containsKey(accountId))
               throw new AccountException("Account does not exist");

           return (AccountInfo)accountMap.get(accountId);
       }

       //Deletes the specified account
       public void removeAccount(long accountId)throws AccountException {
           if (accountMap == null){
               throw new AccountException("No accounts exist");
           }
           if (!accountMap.containsKey(accountId))
               throw new AccountException("Account does not exist");
           accountMap.remove(accountId);

       }

      //Updates the account
       public void updateAccount(AccountInfo accountInfo)throws AccountException {
           if (accountMap == null){
               throw new AccountException("No accounts exist");
           }
           if (!accountMap.containsKey(accountInfo.getAccountId()))
               throw new AccountException("Account does not exist");
           //Get the stored account information.
           AccountInfo storedAccount = (AccountInfo)accountMap.get(accountInfo.getAccountId());
           //Since we are only allowing the balance to be updated, set just the balance.
           storedAccount.setAccountBalance(accountInfo.getAccountBalance());
           //Save the stored account after it's been updated. All other fields
           //should remain the same.
           accountMap.put(accountInfo.getAccountId(), storedAccount);

       }

}
Defining the service’s LifeCycle implementationYou can create a LifeCycle implementation class that lets
you control the component’s behavior when it is started and stopped.
Within the LifeCycle implementation class, you can create business
logic to meet your business requirements. Adding a LifeCycle implementation
class is optional.
The LifeCycle implementation class must extend the com.adobe.idp.dsc.component.LifeCycle interface
and expose the following methods:
setComponentContext: Sets the context
of the component.
onStart: Is invoked when the service is started.
onStop: Is invoked when the component is stopped.
The following Java example shows the LifeCycle implementation
class named LifeCycleImpl that extends LifeCycle.
This implementation class writes messages to the J2EE application
server’s log file when the service is started or stopped. For information
about a component’s behavior when it is started and stopped, see “Component
States” in Developing Components for LiveCycle.
package com.adobe.livecycle.sample.bank;

import java.util.logging.Level;

import com.adobe.idp.dsc.component.ComponentContext;
import com.adobe.idp.dsc.component.LifeCycle;
import com.adobe.logging.AdobeLogger;

//Controls onStart and onStop behavior.
    public class LifeCycleImpl implements LifeCycle {
       private static final AdobeLogger logger = AdobeLogger
               .getAdobeLogger(LifeCycleImpl.class);

       private ComponentContext m_ctx;

    //Sets the component's context
       public void setComponentContext(ComponentContext aContext) {
           if (logger.isLoggable(Level.FINE)) {
               logger.log(Level.FINE, "setComponentContext: "
                       + aContext.getComponent().getComponentId());
           }
           m_ctx = aContext;
       }

       // Invoked when the component is started
       public void onStart() {
           logger.log(Level.INFO, "Called onStart: "
                   + m_ctx.getComponent().getComponentId());
       }

       //Invoked when the component is stopped
       public void onStop() {
           logger.log(Level.INFO, "Called onStop: "
                   + m_ctx.getComponent().getComponentId());
       }

}
Defining the service’s Bootstrap implementationYou can create a Bootstrap implementation class that lets
you control the component’s behavior when it is installed and uninstalled.
Within the Bootstrap implementation class, you can create business
logic to meet your business requirements. Adding a Bootstrap implementation
class is optional.
The Bootstrap implementation class must extend the com.adobe.idp.dsc.component.Bootstrap interface
and expose the following methods:
setBootstrapContext: Is invoked when
the component is installed and a BootstrapContext instance
is passed as an argument.
onInstall: Is invoked when the service is started.
onUnInstall: Is invoked when the component
is stopped.
The following Java example shows the Bootstrap implementation
class named BootstrapImpl that extends Bootstrap and
is located within the com.adobe.livecycle.sample.bank package.
package com.adobe.livecycle.sample.bank;

import java.util.logging.Level;

import com.adobe.idp.dsc.component.Bootstrap;
import com.adobe.idp.dsc.component.BootstrapContext;
import com.adobe.logging.AdobeLogger;


//Controls onInstall and onUninstall behavior.
public class BootstrapImpl implements Bootstrap{
      private static final AdobeLogger logger = AdobeLogger.getAdobeLogger(BootstrapImpl.class);

      private BootstrapContext m_ctx;

      public void setBootstrapContext(BootstrapContext aCtx) {
         logger.log(Level.INFO, "Set bootstrap context: " + aCtx.getComponent().getComponentId());
         m_ctx = aCtx;
      }

      //Invoked when the component is uninstalled
      public void onUnInstall() {
         logger.log(Level.INFO, "Called onUnInstall: " + m_ctx.getComponent().getComponentId());
      }

      //Invoked when the component is installed
      public void onInstall() {
         logger.log(Level.INFO, "Called onInstall: " + m_ctx.getComponent().getComponentId());
      }
}
Defining the component XML file for the bank componentYou must create a component XML file in order to create
a component that can be deployed to LiveCycle. A component
XML file exists for every component and provides metadata about
the component and the services contained in it.
Composite editorsWhen creating a component that uses custom data
types, you must define the component’s composite editor so that
the component can handle custom data types. Parameters that expect
primitive data types, such as a string, are supported through basic
property editors. However, input parameters that expect complex
or custom data types must implement a composite editor, which is
a property editor that enables the usage of one or more nested property editors
together as a single UI to a complex data structure and the attributes
and objects within it. Composite property editors are not created
using Java code; instead, they are configured declaratively within
the component XML file.
When creating a composite editor within
the component XML file, you must assign the fully qualified name
of the Java class that corresponds to the composite editor to the composite-type element. Likewise,
you must assign an identifier value to the composite editor by using
the composite-editor id attribute. Finally, you
must specify the data members within the Java class by using the
attribute element, as shown in the following example:
<composite-editor id="com.adobe.livecycle.sample.customer.Customer">
<composite-type>com.adobe.livecycle.sample.customer.Customer</composite-type>

<attributes>
<!-- the names in the attribute list must match the names of the fields in the
Customer object -->
    <attribute name="name" title="First and Last Name" />
    <attribute name="street" title="Street" />
    <attribute name="city" title="City" />
    <attribute name="state" title="State" />
    <attribute name="zip" title="Zip Code" />
    <attribute name="phone" title="Phone Number" />
    </attributes>
</composite-editor>
Notice that these six attributes
correspond to the data members defined within the Customer class.
For information, see Defining the Customer class.
You reference a composite editor
when you define a service operation’s input values. For example,
a Customer object must be passed as an input value
to the Customer service’s createCustomer operation.
As a result, you must reference the com.adobe.livecycle.sample.customer.Customer composite
editor when you define input values for the createCustomer operation,
as shown in the following example:
<operation name="createCustomer">
<input-parameter name="inCustomer"
    title="Customer" type="com.adobe.livecycle.sample.customer.Customer">
<!-- Use the new property-editor type we defined -->
    <property-editor editor-id="com.adobe.livecycle.sample.customer.Customer" />
    <hint>Create a new customer</hint>
</input-parameter>
Notice that the data type
of the inCustomer parameter is com.adobe.livecycle.sample.customer.Customer.
When
Workbench users enter literal values for the createCustomer operation,
they can specify a value for each field within the Customer class.
Notice that the displayed text matches the value of the title attribute
defined within the composite editor.
enum property editorYou can define enum input values for service
operations. For example, consider the Account service’s createNewAccount operation.
This operation requires an AccountTypes enum value.
To
handle an enum value as an input value, you must use an enum property editor.
Like a composite editor, you reference an enum property editor when defining
a service operation’s input values. Therefore, because the createNewAccount operation
requires an AccountTypes enum value as an input
value, you must reference a com.adobe.idp.dsc.propertyeditor.system.Enum property
editor when you define input values for the createNewAccount operation,
as shown in the following example:
<operation name="createNewAccount">
<!-- Note that the AccountTypes is a enum object -->
<input-parameter name="accountType" title="Account Type" type="com.adobe.livecycle.sample.account.AccountTypes">
<!-- The enum property editor provides a pull down menu of all the
    available strings in the AccountTypes object -->
    <property-editor editor-id="com.adobe.idp.dsc.propertyeditor.system.Enum" />
</input-parameter>
When Workbench users enter
literal values for the createNewAccount operation, they must select
a value from a drop-down list. Each value in the list corresponds
to an enum value that is defined in com.adobe.livecycle.sample.account.AccountTypes.
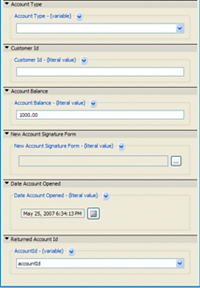
Determining the order of input valuesYou can specify the order in
which input and output values are displayed within Workbench by
using the layout element. For example, consider
the createNewAccount operation. This operation
requires an AccountInfo object, which contains
the following five field values that correspond to data members
defined within the AccountInfo class: accountId, accountOpenedDate, customerId, accountBalance, and newAccountSignatureForm.
You
can define the order in which these fields are displayed by using
the layout element, as shown in the following example:
    <!-- Using the layout element component developers can specify the
    grouping and order of their Property Editors -->
<layout>
    <section name="Account Type">
        <property ref="input/accountType" />
    </section>

    <section name="Customer Id">
        <property ref="input/accountInfo/customerId" />
    </section>

    <section name="Account Balance">
        <property ref="input/accountInfo/accountBalance" />
    </section>

    <section name="New Account Signature Form">
        <property ref="input/accountInfo/newAccountSignatureForm" />
    </section>

    <section name="Date Account Opened">
        <property ref="input/accountInfo/accountOpenedDate" />
          </section>

    <section name="Returned Account Id">
        <property ref="output/AccountId" />
    </section>
</layout>
The following illustration shows
the results of this layout.
Note: In the illustration above, accountId is a process
variable of type long.
Using the Date property editorWithin the component XML file,
you can declare a Date property editor when an input value requires
a java.util.Date value. For example, the AccountInfo class
contains a data member named accountOpenedDate that
requires a java.util.Date value. For information,
see Defining the Account class.
In this situation, define a Date
property editor within the com.adobe.livecycle.sample.account.AccountInfo composite
editor, as shown in the following example:
<composite-editor id="com.adobe.livecycle.sample.account.AccountInfo">
<composite-type>com.adobe.livecycle.sample.account.AccountInfo</composite-type>
    <attributes>
        <attribute name="accountId" title="Account Id"/>
        <attribute name="accountOpenedDate" title="Date Account Opened">
        <!-- Using the CalendarPropertyEditorComponent will automatically fill the field with today's date-->
        <property-editor editor-id= "com.adobe.idp.dsc.propertyeditor.system.CalendarPropertyEditorComponent"/>
        </attribute>
        <attribute name="customerId" title="Customer Id"/>
        <attribute name="accountBalance" title="Account Balance"/>
        <attribute name="newAccountSignatureForm" title="New Account Signature Form"/>
    </attributes>
</composite-editor>
XML elementsThe component XML file that is used for the bank
component contains the following XML elements:
component-id:
Specifies a unique identifier for the component.
version: Specifies the version of the component.
class-path: Specifies JAR files that are required
by the component. For JAR files to be used by the component, they
must be specified within this element.
bootstrap-class: Specifies the fully qualified name
of the Bootstrap implementation class.
lifecycle-class: Specifies the fully qualified name
of the LifeCycle implementation class.
editors: Specifies the editors used within
this component.
composite-editor: Specifies the identifier value for
this composite editor.
composite-type: Specifies the fully qualified name
of the Java class (custom data type) that corresponds to the composite editor.
export-packages: Specifies that the packages com.adobe.livecycle.sample.customer and com.adobe.livecycle.sample.account are exported.
For example, when invoking this service using its WSDL, these two packages
are exported. This element is located at the root level of the component
XML file.
services: Specifies the services that are part of
this component. This element can specify many service elements.
service: Specifies the name of the service.
implementation-class: Specifies the name of the implementation
class for the service.
small-icon: Specifies the small icon that is used
to display the service in the toolbar and Workbench.
large-icon: Specifies the large icon that is used
to display the service.
operations: Specifies the operations that are part
of this service. This element can contain one or many operation elements.
operation: Specifies the operation name.
input-parameter: Specifies the name and type of the
input parameter for the specified operation. An input parameter
element must exist for each parameter that corresponds to the operation.
As well, each parameter’s data type must be specified using the type attribute.
output-parameter: Specifies the return value of an operation.
The data type must be specified using the type attribute.
hint: Specifies a message that is displayed when the
user clicks the property name in the property editor.
The
following component.xml file is used for the bank component. Notice that
this component XML file contains two services named CustomerService and AccountService.
Defining the component XML file for the Bank component<component xmlns="http://adobe.com/idp/dsc/component/document">
<!-- Unique ID identifying this DSC -->
<component-id>com.adobe.livecycle.sample.bank.bankComponent</component-id>
<!-- Version -->
<version>1.0</version>
<!-- Bootstrap implementation class -->
<bootstrap-class>com.adobe.livecycle.sample.bank.BootstrapImpl</bootstrap-class>
<!-- LifeCycle implementation class -->
<lifecycle-class>com.adobe.livecycle.sample.bank.LifeCycleImpl</lifecycle-class>
<!-- When using user-defined types, use the composite editor to define the -->
<!-- panel in which users can enter the input data for the fields of the complex type-->
<editors>
<composite-editor id="com.adobe.livecycle.sample.customer.Customer">
<composite-type>com.adobe.livecycle.sample.customer.Customer</composite-type>
<attributes>
<!-- the names in the attribute list must match the names of the fields in the
Customer object -->
<attribute name="name" title="First and Last Name"/>
<attribute name="street" title="Street"/>
<attribute name="city" title="City"/>
<attribute name="state" title="State"/>
<attribute name="zip" title="Zip Code"/>
<attribute name="phone" title="Phone Number"/>
</attributes>
</composite-editor>
<composite-editor id="com.adobe.livecycle.sample.account.AccountInfo">
<composite-type>com.adobe.livecycle.sample.account.AccountInfo</composite-type>
<attributes>
<attribute name="accountId" title="Account Id"/>
<attribute name="accountOpenedDate" title="Date Account Opened">
<!-- Using the CalendarPropertyEditorComponent will automatically fill the
field with today's date-->
<property-editor editor-id=
"com.adobe.idp.dsc.propertyeditor.system.CalendarPropertyEditorComponent"/>
</attribute>
<attribute name="customerId" title="Customer Id"/>
<attribute name="accountBalance" title="Account Balance"/>
<attribute name="newAccountSignatureForm" title="New Account Signature Form"/>
</attributes>
</composite-editor>
</editors>
<export-packages>
<package version="1.0">com.adobe.livecycle.sample.customer</package>
<package version="1.0">com.adobe.livecycle.sample.account</package>
</export-packages>
<!-- Start of the Service definition -->
<services>
<!-- Unique name for the service descriptor. The value is used as the default name for deployed services -->
<service name="CustomerService">
<!-- service implementation class definition -->
<implementation-class>
com.adobe.livecycle.sample.customer.CustomerServiceImpl</implementation-class>
<!-- description -->
<description>Allows the creation, deletion and update of Customer information.</description>
<!-- You can provide your own icons for a distinct look -->
<small-icon>icons/C_CustomerService_md.gif</small-icon>
<large-icon>icons/C_CustomerService_xl.gif</large-icon>
<!-- Automatically deploys the service and starts it after installation -->
<!-- Note that category-id indicates where the service will show up in the existing categories in
the Services view in workbench -->
<auto-deploy category-id="example" major-version="1" minor-version="0"
service-id="CustomerService"/>
<operations>
<!-- method name in the interface -->
<operation name="createCustomer">
<input-parameter name="inCustomer" title="Customer"
type="com.adobe.livecycle.sample.customer.Customer">
<!-- Use the new property-editor type we defined -->
<property-editor editor-id=
"com.adobe.livecycle.sample.customer.Customer"/>
<hint>Create a new customer </hint>
</input-parameter>
<!-- The customer ID is returned from the createCustomer call-->
<output-parameter name="CustomerId" type="java.lang.String"/>
<faults>
<fault name="CustomerException" type=
"com.adobe.livecycle.sample.customer.CustomerException"/>
</faults>
<hint>Creates a new customer</hint>
</operation>
<operation name="deleteCustomer">
<input-parameter name="inCustomerId" title="Customer Identification String"
type="java.lang.String">
<hint>Delete a customer </hint>
</input-parameter>
<faults>
<fault name="CustomerException" type=
"com.adobe.livecycle.sample.customer.CustomerException"/>
</faults>
</operation>
<operation name="updateCustomer">
<input-parameter name="inCustomer" title="Customer" type=
"com.adobe.livecycle.sample.customer.Customer">
<property-editor editor-id=
"com.adobe.livecycle.sample.customer.Customer"/>
<hint>Update customer information</hint>
</input-parameter>
<faults>
<fault name="CustomerException" type=
"com.adobe.livecycle.sample.customer.CustomerException"/>
</faults>
</operation>
<operation name="getCustomerInfo">
<input-parameter name="inCustomerId" title="Customer Identification String"
type="java.lang.String">
<hint>Get customer information</hint>
</input-parameter>
<output-parameter name="Customer" type=
"com.adobe.livecycle.sample.customer.Customer">
<!-- Even though we are defining a property-editor type for our
returned value, this really does not affect the way the data is
returned visually. Users will still need to use the Xpath expression
mechanism to get each field out
of the Customer object for output -->
<property-editor editor-id=
"com.adobe.livecycle.sample.customer.Customer"/>
<hint>Returned value is a Customer</hint>
</output-parameter>
<faults>
<fault name="CustomerException" type=
"com.adobe.livecycle.sample.customer.CustomerException"/>
</faults>
</operation>
</operations>
</service>
<!-- Start of second service-->
<service name="AccountService">
<implementation-class>
com.adobe.livecycle.sample.account.AccountServiceImpl
</implementation-class>
<description>Allow a new account to be created for a given customer</description>
<small-icon>icons/C_AccountService_md.gif</small-icon>
<large-icon>icons/C_AccountService_xl.gif</large-icon>
<!-- Put this new service under the "example" category in the Services view -->
<auto-deploy category-id="example" major-version="1" minor-version="0"
service-id="AccountService"/>
<operations>
<operation name="createNewAccount">
<!-- Note that the AccountTypes is a enum object -->
<input-parameter name="accountType" title="Account Type" type=
"com.adobe.livecycle.sample.account.AccountTypes">
<!-- The enum property editor provides a pull down menu of all the
available strings in the AccountTypes object -->
<property-editor editor-id=
"com.adobe.idp.dsc.propertyeditor.system.Enum"/>
</input-parameter>
<input-parameter name="accountInfo" title="Account Information" type=
"com.adobe.livecycle.sample.account.AccountInfo">
<!-- Use the new property editor we defined for the Account
object -->
<property-editor editor-id=
"com.adobe.livecycle.sample.account.AccountInfo"/>
<hint>Create a new account </hint>
</input-parameter>
<output-parameter name="AccountId" type="long"/>
<faults>
<fault name="AccountException" type=
"com.adobe.livecycle.sample.account.AccountException"/>
</faults>
<!-- Using the layout element component developers can specify the
grouping and order of their Property Editors -->
<layout>
<section name="Account Type">
<property ref="input/accountType"/>
</section>
<section name="Customer Id">
<property ref="input/accountInfo/customerId"/>
</section>
<section name="Account Balance">
<property ref="input/accountInfo/accountBalance"/>
</section>
<section name="New Account Signature Form">
<property ref=
"input/accountInfo/newAccountSignatureForm"/>
</section>
<section name="Date Account Opened">
<property ref="input/accountInfo/accountOpenedDate"/>
</section>
<section name="Returned Account Id">
<property ref="output/AccountId"/>
</section>
</layout>
</operation>
<operation name="removeAccount">
<input-parameter name="accountId" title="Account Information Id"
type="long">
<hint>Remove the account </hint>
</input-parameter>
<faults>
<fault name="AccountException" type=
"com.adobe.livecycle.sample.account.AccountException"/>
</faults>
</operation>
<operation name="updateAccount">
<input-parameter name="accountInfo" title="Account Information"
type="com.adobe.livecycle.sample.account.AccountInfo">
<property-editor editor-id=
"com.adobe.livecycle.sample.account.AccountInfo"/>
<hint>Update the account </hint>
</input-parameter>
<faults>
<fault name="AccountException" type=
"com.adobe.livecycle.sample.account.AccountException"/>
</faults>
<!-- Using the layout element component developers can specify the
grouping and order of their Property Editors. This time only display the
accountBalance as the only field that can be updated.-->
<layout>
<section name="Account Id">
<property ref="input/accountInfo/accountId"/>
</section>
<section name="Account Balance">
<property ref="input/accountInfo/accountBalance"/>
</section>
</layout>
</operation>
<operation name="getAccountInfo">
<input-parameter name="accountId" title="Account Information Id"
type="long">
<hint>Get the account information</hint>
</input-parameter>
<!-- Alternatively you can use the AccountInfo property-editor we defined, but
that won't change the fact for output, one has to use the xpath expression to get
the individual fields out of the AccountInfo object-->
<output-parameter name="AccountInfo" type=
"com.adobe.livecycle.sample.account.AccountInfo">
<hint>The returned Account information</hint>
</output-parameter>
<faults>
<fault name="AccountException" type=
"com.adobe.livecycle.sample.account.AccountException"/>
</faults>
</operation>
</operations>
</service>
</services>
</component>
Note: The bank component
does not define configuration values.
Deploying the bank componentTo deploy the bank component to LiveCycle, you
must package your Eclipse project into a JAR file. You must ensure
that the adobe-livecycle-client.jar file and the component XML file
are located at the root of the JAR file.
The following illustration shows the Eclipse project’s content,
which is packaged into the bank component’s JAR file.
Package the email component into a JAR file named bank.jar. In
the above illustration, notice that JAVA files are listed. After
packaged into a JAR file, the corresponding CLASS files must also
be specified. Without the CLASS files, the component will not work.
Note: After you package the bank component into a
JAR file, you can deploy the component to LiveCycle. For
information, see Deploying the email component.
Testing the bank componentAfter you deploy the bank component to LiveCycle,
you can test it by creating a new process that uses it. Although
this section does not explain all the concepts involved in creating
a process, it provides the basic concepts for you to create a simple
process that uses the bank component.
The following illustration shows an example process named CreateBankAccount that
creates a new customer, creates a new account, and then emails a
message that specifies the new customer and account identifier value.
The email component created in the previous section is used to email
a message to the user. For information, see Creating Your First Component.
The following table describes the operations that are used within
this process.
Operation
|
Description
|
|---|
CreateCustomer
|
Creates a new customer.
|
CreateAccount
|
Creates a new account.
|
SetValue
|
Sets values that are used within this process
|
Send
|
Sends an email message to an email recipient.
|
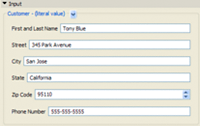
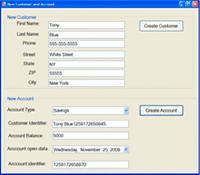
Defining values for the createCustomer operationThe following
illustration shows the property editor that corresponds to the createCustomer operation.
Notice
that these input values correspond to the fields that are located
in the Customer class. For information, see Defining the Customer class.
The createCustomer operation
returns a string value that represents the customer identifier value.
This value is stored in a string process variable named customerId.
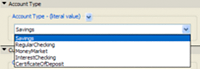
Defining values for the createAccount operationThe following illustration
shows the property editor that corresponds to the createAccount operation.
Notice
that these input values correspond to the fields that are located
in the AccountInfo class. For information, see Defining the Account class.
The customer identifier input value
is assigned the value of the customerId process
variable. The createAccount operation returns a
string value that represents the account identifier value. This
value is stored in another string process variable named accountId.
Defining values for the setValue operationThe setValue operation
assigns a string process variable named outputResult with
the value of customerId and accountID.
The following XPath expression is used to concatenate these string
values together:
    concat( "The customer ID is ", /process_data/@customerId,
    "The bank account IDs ", /process_data/@accountId)
The
following illustration shows the mapping property editor that corresponds
to the SetValue operation.
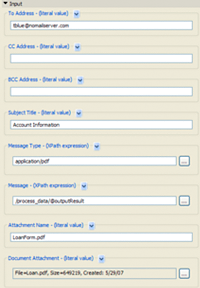
Defining values for the send operationThe send operation
(which belongs to the email component created in the previous section)
emails the value of the outputResult process variable
to the specified email recipient. For information about the send
operation, see Creating Your First Component.
The following illustration shows
the property editor that corresponds to the send operation.
To create a process that uses the bank component:Select File > New Process.
Type CreateBankAccount for the process name
and accept the default settings.
In the Services view, drag the CreateCustomer, CreateAccount, SetValue, and Send operations
onto the process diagram (these operations are shown in the sample
process introduced in this section).
Click the Properties view and confirm that default property
editors have been assigned to each parameter. Enter values in the property
editor.
Activate the process.
Note: The
process created in this section is named CreateBankAccount and
contains one operation named invoke. The application
logic to programmatically invoke this process is the same as the
application logic to invoke the SendMail process.
For information, see Invoking the SendMail process using the Java Invocation API.
Invoking the services in the Bank component using web servicesYou can invoke both the Customer service and Account service (both
services are defined in the Bank component) using web services.
This discussion describes how to create a .NET client application
that invokes both of these services. That is, the .NET application
is able to work with custom data types defined in the Bank component.
The encoding type used in the client project is MTOM. (See Invoking LiveCycle using MTOM.)
Because there are two LiveCycle services being invoked,
create two service references in your .NET client project. The first
service reference is associated with the Customer service and the
other service reference is associated with the Account service.
Information about how to create a service reference is described
in Invoking LiveCycle using MTOM.
The WSDL to create a service reference to the Customer service
is:
http://hiro-xp:8080/soap/services/CustomerService?WSDL&lc_version=9.0.1
Likewise,
the WSDL to create a service reference to the Account service is:
http://hiro-xp:8080/soap/services/AccountService?WSDL&lc_version=9.0.1
Note: Replace localhost with the IP
address of the server hosting LiveCycle.
To demonstate
how to work with custom data types using web services, this section
creates a .NET client application that invokes two operations. It creates
a new customer by invoking Customer service’s createCustomer operation.
It also invokes the Account service’s createNewAccount operation
and creates a new account. The following illustration shows the
client .NET application that invokes the Customer and Account services.
Note: This application is a #C Windows Forms Application
created in Visual Studio 2008. The name of the client project is BankComponentClientApplication.
The
following table lists the controls that are part of this client
application.
Control name
|
Description
|
|---|
textBoxFirst
|
Specifies the customer’s first name.
|
textBoxLast
|
Specifies the customer’s last name.
|
textBoxPhone
|
Specifies the customer’s phone number.
|
textBoxStreet
|
Specifies the customer’s street name.
|
textBoxState
|
Specifies the customer’s state.
|
textBoxZIP
|
Specifies the customer’s zip code.
|
textBoxCity
|
Specifies the customer’s city.
|
comboBoxAccountType
|
Specifies the type of account.
|
textBoxCustomerId
|
Specifies the customer identifier value
to which the new account belongs. This text box is populated by
the return value of the Customer service’s createCustomer operation.
|
textBoxAccountBalance
|
Specifies the account balance.
|
dateTimePicker1
|
Specifies the date on which the account
was created.
|
textBoxAccountId
|
Specifies the account’s identifier value.
This text box is populated by the return value of the Account service’s createNewAccount operation.
|
buttonCreateCustomer
|
The button that creates a new customer.
|
buttonCreateAccount
|
The button that creates a new account.
|
The following C# code example invokes the
Account and Customer services and creates a new customer and a new
account. The code to create a new customer is located in the buttonCreateCustomer_Click method.
The code to create a new account is located in the buttonCreateAccount_Click method.
Ensure that you fully qualify the service clients as shown in the
following code example.
Invoking the Account and Customer services using a .NET application???/**
* Ensure that you create a .NET project that uses
* MS Visual Studio 2008 and version 3.5 of the .NET
* framework. This is required to invoke a
* LiveCycle service using MTOM.
*
* For information, see "Invoking LiveCycle using MTOM" in Programming with LiveCycle
*/
using System;
using System.ServiceModel;
using System.IO;
using System.Collections.Generic;
using System.ComponentModel;
using System.Data;
using System.Drawing;
using System.Linq;
using System.Text;
using System.Windows.Forms;
//A reference to the Customer Service
using BankComponentClientApplication.ServiceReference1;
//A reference to the Account Service
using BankComponentClientApplication.ServiceReference2;
namespace BankComponentClientApplication
{
public partial class Form1 : Form
{
public Form1()
{
InitializeComponent();
}
//This method invokes the Customer service and creates a new customer
private void buttonCreateCustomer_Click(object sender, EventArgs e)
{
//Create a CustomerServiceClient object
BankComponentClientApplication.ServiceReference1.CustomerServiceClient custClient = new BankComponentClientApplication.ServiceReference1.CustomerServiceClient();
custClient.Endpoint.Address = new System.ServiceModel.EndpointAddress("http://hiro-xp:8080/soap/services/CustomerService?blob=mtom");
//Enable BASIC HTTP authentication
BasicHttpBinding b = (BasicHttpBinding)custClient.Endpoint.Binding;
b.MessageEncoding = WSMessageEncoding.Mtom;
custClient.ClientCredentials.UserName.UserName = "administrator";
custClient.ClientCredentials.UserName.Password = "password";
b.Security.Transport.ClientCredentialType = HttpClientCredentialType.Basic;
b.Security.Mode = BasicHttpSecurityMode.TransportCredentialOnly;
b.MaxReceivedMessageSize = 2000000;
b.MaxBufferSize = 2000000;
b.ReaderQuotas.MaxArrayLength = 2000000;
//Create a new Customer object
Customer myCustomer = new Customer();
//Populate the Customer fields with data entered into the Windows Form
myCustomer.city = textBoxCity.Text;
myCustomer.name = textBoxFirst.Text + " " + textBoxLast.Text;
myCustomer.phone = textBoxPhone.Text;
myCustomer.state = textBoxState.Text;
String myZIP = textBoxZIP.Text;
myCustomer.zip = Convert.ToInt32(myZIP);
myCustomer.street = textBoxStreet.Text;
//Invoke the LiveCycle operation named createCustomer
String custId = custClient.createCustomer(myCustomer);
//Set the Customer Id text box in the New Account Group Box
textBoxCustomerId.Text = custId;
}
//This method invokes the Account service and creates a new Account
private void buttonCreateAccount_Click(object sender, EventArgs e)
{
//Create a CustomerServiceClient object
BankComponentClientApplication.ServiceReference2.CustomerServiceClient accountClient = new BankComponentClientApplication.ServiceReference2.CustomerServiceClient();
accountClient.Endpoint.Address = new System.ServiceModel.EndpointAddress("http://hiro-xp:8080/soap/services/AccountService?blob=mtom");
//Enable BASIC HTTP authentication
BasicHttpBinding b = (BasicHttpBinding)accountClient.Endpoint.Binding;
b.MessageEncoding = WSMessageEncoding.Mtom;
accountClient.ClientCredentials.UserName.UserName = "administrator";
accountClient.ClientCredentials.UserName.Password = "password";
b.Security.Transport.ClientCredentialType = HttpClientCredentialType.Basic;
b.Security.Mode = BasicHttpSecurityMode.TransportCredentialOnly;
b.MaxReceivedMessageSize = 2000000;
b.MaxBufferSize = 2000000;
b.ReaderQuotas.MaxArrayLength = 2000000;
//Create a BLOB to store the form associated with the account
BLOB inDoc = new BLOB();
//Specify the PDF form
string path = "C:\\Adobe\Loan.pdf";
FileStream fs = new FileStream(path, FileMode.Open);
//Get the length of the file stream
int len = (int)fs.Length;
byte[] ByteArray = new byte[len];
//Populate the byte array with the contents of the FileStream object
fs.Read(ByteArray, 0, len);
inDoc.MTOM = ByteArray;
//Determine the type of Account to create
if (comboBoxAccountType.Text == "Savings")
{
//Create a AccountInfo object
AccountInfo accountInfo = new AccountInfo();
accountInfo.customerId = textBoxCustomerId.Text;
String accountBal = textBoxAccountBalance.Text;
accountInfo.accountBalance = Convert.ToDouble(accountBal);
//Get the Date information
BankComponentClientApplication.ServiceReference2.DATE myDate = new BankComponentClientApplication.ServiceReference2.DATE();
DateTime time1 = Convert.ToDateTime(dateTimePicker1.Text);
myDate.date = time1;
accountInfo.accountOpenedDate = myDate;
accountInfo.newAccountSignatureForm = inDoc;
accountInfo.accountType = "Savings";
//Invoke the LiveCycle operation named createNewAccount
long accountId = accountClient.createNewAccount(AccountTypes.Savings,accountInfo);
//Convert to a string
String accString = Convert.ToString(accountId);
textBoxAccountId.Text = accString;
}
}
private void Form1_Load(object sender, EventArgs e)
{
comboBoxAccountType.Text = "Savings";
}
}
}
|
|
|