|

To create a table from a data sourceSome
data from a data source could be shown in a table. When you connect
to a data source, the Data View palette identifies any items that
could be tables. Designer also shows which items will become rows
in the table if it finds a repeating data group.
After you connect to a data source, you can drag items from the
Data View palette onto the form design to quickly create fields
that are bound to the data source. If you drag a table item from
the Data View palette onto the form design, Designer creates a table
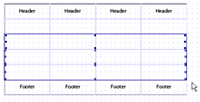
and, when you select a data file, you see a table like this one
at run time. The repeating data group in the data file has four
records.
Ensure you are connected to a data source. See Connecting to a data source.
For example, if you or your administrator
installed the samples that come with Designer, locate and open the
following schema: Purchase Order.xsd in the Data Connections dialog
box.
In the Data View palette, locate a node that could be a table.
For example, locate the following item node.
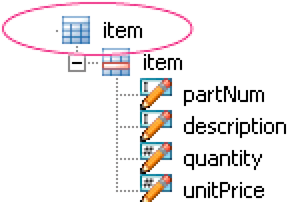 Item node represents the table Select the node and drag it onto your form design. For example,
this is what you should see after dragging the item node onto your
form.
The
Data View palette shows that the node is bound to an object.
To select
a data file, select File > Form Properties and click the Preview
tab.
For example, if you or your administrator installed
the samples that come with , locate and open the Purchase Order.xml
data file.
View the form in the Preview PDF tab.
Designer automatically
creates a table that dynamically grows, depending on the amount
of data in the data source.
To set the rows in a table to adjust to accommodate dataIf you have already created a table that has
a fixed number of columns and rows, you can convert it to one that
dynamically grows based on the amount of data from a data source.
Converting the table involves setting the subform that contains
the table to Flowed and setting the body row or rows to repeat.
Create a table. See To create a simple table.
Select the rows below the first row.
In a table whose
number of columns are fixed, but its number of rows will change
depending on how much information is in the data source, only one row
is needed. Therefore, you must delete all the rows except the first
row in the table. You can keep the footer row.
Select Table > Delete > Row.
Save
the form as Adobe Dynamic XML Form (*.pdf).
In the Hierarchy palette, select the subform that contains
the table.
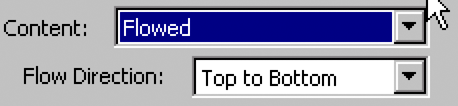
In the Object palette, click the Subform tab and select Flowed
from the Content list.
In the Hierarchy palette, select the body row (for example,
Row1).
In the Object palette, click the Binding tab and select the
Repeat Row For Each Data Item option.
Connect to a data source. See Connecting to a data source.
You must connect to a data source,
such as an XML schema, to show data in the table.
Select a data file. See To preview a form using sample data.
You must select a
data file to view and test the form with the data.
View the form in the Preview PDF tab.
|
|
|