|

You can display the same data
in multiple places by using different methods:
Set multiple fields to be global fields to display the
same data that is entered interactively.
Bind multiple fields to one node to display the same data
from a data source in the fields.
Use a script to display data that is entered into one field
in another field.
This table compares global fields, binding multiple fields to
one node, and using a script to display the data that is entered
into one field in another field.
Comparing...
|
Global fields
|
Binding
|
Script
|
|---|
What happens
|
Designer shows the same value in all fields
that have the same name.
|
Designer shows the same value in all fields
that have the same binding.
|
Designer displays the data that is entered
into one field in another field.
|
Names of the fields
|
Names must be identical.
|
Names can be different.
|
Names can be different.
|
Run-time properties (such as the current
page, number of pages, and current date/time)
|
You cannot add run-time properties to the
field.
|
You cannot add run-time properties to the
field.
|
You can add run-time properties to the field.
|
If you remove...
|
If you remove the global setting from one
field, Designer removes the setting from all other fields with the
same name.
|
If you remove the binding from one field,
the other fields keep the binding.
|
Not applicable
|
Reference to nodes
|
Global fields can refer to nodes outside
the current record.
|
Explicit data binding refers to nodes within
the current record.
|
Not applicable
|
Example of when to use
|
Use for information that is repeated in
the form, such as customer name or address.The user enters the information
once and the data automatically fills the other fields that are
set to global.
|
Use when you want a single instance of data
from a data source displayed in multiple fields.
|
Use to copy the data entered from a Contact
Name on page 1, and display it in a form letter on page 2.
|
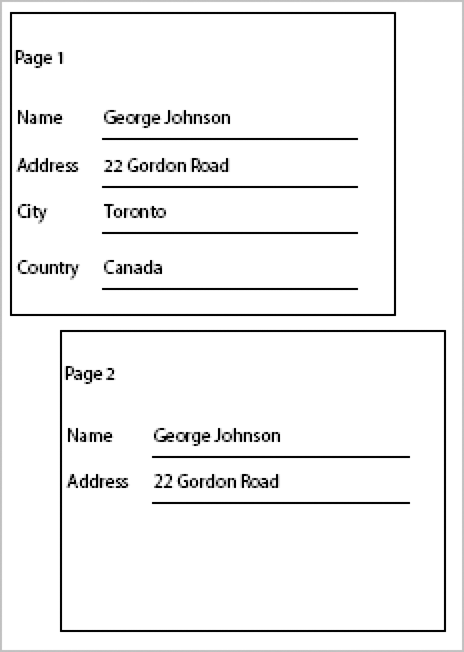
This diagram shows what happens when you set multiple fields
to be global fields. The name and address are filled in on Page
2 after the user enters the name and address on Page 1.
This diagram shows what happens when you bind multiple fields
to one node. The name and address are filled in from the data source.
This diagram shows what happens when you use a script to display
the data that is entered into one field in another field. The ContactName
in the form letter is the same as the name that is entered into
the Name field on Page 1.
Bind multiple fields to one nodeYou can bind multiple fields
to one node by doing one of the following actions:
Associate a node in the Data View palette with existing
form fields by using the drag-and-drop method.
Explicitly specify the binding node by using the Binding
tab in the Object palette for the existing form fields.
You should only bind a single instance of data to multiple fields.
You should not bind repeating data to multiple fields.
In the Data View palette, select the appropriate node
and drag it to the field on the page.
In the Binding Properties dialog box, select one of the following
options:
Update All Related Properties
Update The Following Properties Only and select the options
you want
Don’t Update Any Related Properties
Click OK. Whether you update the object’s properties or not,
the form object is now bound to the data source.
Select the same node in step 1 and repeat steps 2 and 3 for
the other fields that you want to bind to the same node.
Use a script to show the data that is entered into one field in another fieldYou
can use a script to display the data that is entered into one field
in another field. You can run this script on specific field-oriented
events that trigger in response to user actions.
For example, an interactive form may prompt a user to enter the
department name. This department name may be displayed on subsequent
pages of the form (if it is a multipage interactive form). The field
for the department name is bound to a data field, and this data
field is where the department name is recorded. To display the department
name on the other pages, the contents of the input field need to
appear on other pages. The other instances do not need to be editable, and
they may be part of another field (such as a floating field). In
this case, you use a script to copy the department name to the other
fields.
Select the first field.
If the
Script Editor is not already showing, select Window > Script
Editor.
(Optional) Click the Expand button on the palette border
until the palette is larger.
In the Show list, select a field-oriented event.
For
example, select Exit from the Show list.
In the Language list, select JavaScript and, in the Run At
list, select Client.
In the Script Source field, type the script:
For example,
type the following script:
ContactName.rawValue = this.rawValue;
ContactName
is the name of the second field from the Binding tab of the Object
palette.
Select the second field.
In the Object palette, click the Value tab and, in the Type
list, select Calculated - Read Only.
For more
information about scripting, see Scripting Basics.
|
|
|