|

You can dynamically populate a tool tip with
a value from a data source. For example, you can display a custom
tool tip for an object that is in French.
The schema you connect to could have the following defined for
a tool tip:
<form>
      <tooltip dp_tt="tooltip1"/>
</form>
The data file you point to could have the following defined for
a tool tip:
<form>
      <tooltip dp_tt="Quantité - Entrez un nombre inférieur ou égal à 100."/>
</form>
When you merge the data file with the form design, and you position
the pointer over the Quantity field, you will see the following
tool tip:
Before you perform this task, you must ensure the following settings
are in effect:
In the Object Library palette, click the Standard category
and drag an object onto the form design.
For example, insert
a Text Field object.
(Optional) In the Object palette, click the Field tab and
type a caption for the object in the Caption box.
For example,
type Quantité .
In the Accessibility palette, click the Tool Tip active label.
Select the data connection.
Note: If you
are not already connected to a data source, Default Data Binding
is the only selection in the Data Connection list.
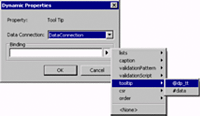
Click the triangle beside the Binding box and select a binding.
For
example, select tooltip > @dp_tt.
The
following string appears in the Binding box:
$record.tooltip.dp_tt
 You could type this string into the Items box instead
of selecting it. Click OK.
View the form in the Preview PDF tab.
For example,
in the Preview PDF tab, try positioning the pointer over the Quantity
field to see the custom tool tip.
|
|
|