|

Start the author instance. Note: Starting the LiveCycle
instance starts the author instance.
To integrate the LiveCycle instance with author instance,
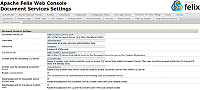
log in to http://[author_server]:[port]/lc/system/console/dsc, and
in the Document Server Settings tab, specify following information:
In the Document Server Url field, specify the URL of the
Document Server.
In the User Name field, specify the user name of an administrator.
In the Password field, specify password of the administrator.
In the CQ Server Url field, specify the URL of the CQ Server
used by the Document Server to access the Content Repository.
In the System user for accessing CQ Server field, specify
crxuserfordsc.
In the System user for accessing Document Server field, specify
dscuserforcrx.
To use custom ticket for authentication while making calls
to Document Server, select the Enable custom ticket checkbox.
To reset the password of the designated Document Server user,
select the Reset password for Document Server System User checkbox.
To
reset the password of the designated CQ Server user, select the
Reset password for CQ Server System User checkbox.
Click Configure. New roles are created on LiveCycle servers
and these roles are mapped against the respective correspondence
management groups in CRX.
To verify the new roles, login to LiveCycle Administration
console and navigate to Home > Settings > User Management
> Role Management. Ensure that following roles are listed: Correspondence Management Administrator
Correspondence Management Application Specialist
Correspondence Management Claim Adjustor
Correspondence Management Developer
Correspondence Management Form Designer
Correspondence Management Subject Matter Expert
To configure SPNEGO for the author instance, see Enabling SPNEGO authentication.
After configuring domain for SPNEGO, navigate to Home >
Settings > User Management > Role Management, and assign respective
Correspondence Management roles to definite LiveCycle users.
Login to SPNEGO enabled machine as a LiveCycle user that
has Correspondence Management role.
Now you can access Correspondence
Management UI of the author instance without providing any credentials.
Configure and start the publish instance. For detailed steps,
see Configure
the publish instance.
To configure the publish instance, perform steps 2 and 3.
If publish instance and author instance are using same LiveCycle
server, Ensure that value of System user for accessing CQ Server
and System user for accessing Document Server is different.
To configure SPNEGO for the publish instance, see Enabling SPNEGO authentication.
To verify that SPNEGO is working for publish instance, follow
step 7 and 8.
|
|
|