Learn how to resize and reshape objects in FrameMaker, resize imported graphics, and smooth and unsmooth objects.
As you refine a graphic, you can change the size and shape of objects. Reshaping possibilities are unlimited. For example, you can add a corner to a polyline or polygon, move a corner to change its shape, and smooth a polyline to create a freehand curve.
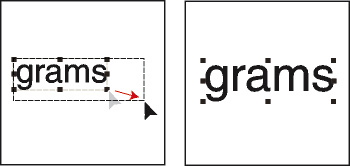
You can resize all objects, including text lines. When you resize a text frame created with the Text Frame tool, the text remains the same size. When you resize a text line created with the Line Text tool, the font height and width change proportionally.
You can change the shape of lines, polylines, polygons, curves, and arcs as follows:
Reshape a line, polyline, or polygon by moving its corners one at a time. You can also add and remove corners.
Reshape a curve by changing the position of its reshape handles (which define the curve and control its location) and its control points (which adjust the curvature). You can also add and remove reshape handles to change the number of points that define the curve.
You reshape an arc by dragging its endpoints or by changing the percentage of a circle that the arc represents.
Resize an object by dragging
Select the object and do one of the following:
To change either the width or the height, drag a side handle.
To change both the width and the height, drag a corner handle.
To increase or decrease the dimensions proportionally, Shift-drag a corner handle.
The object’s dimensions appear in the status bar as you drag.
Resize an object precisely
Select the object and choose .
Do one of the following:
To increase or decrease the height and width proportionally, enter a scale factor and click Scale. The scale factor is always relative to the object’s current size (100% means no change).
To specify the exact dimensions you want, enter the dimensions and click Scale. The dimensions shown when you display the dialog box are the object’s current (unrotated) dimensions.
Resize imported graphics
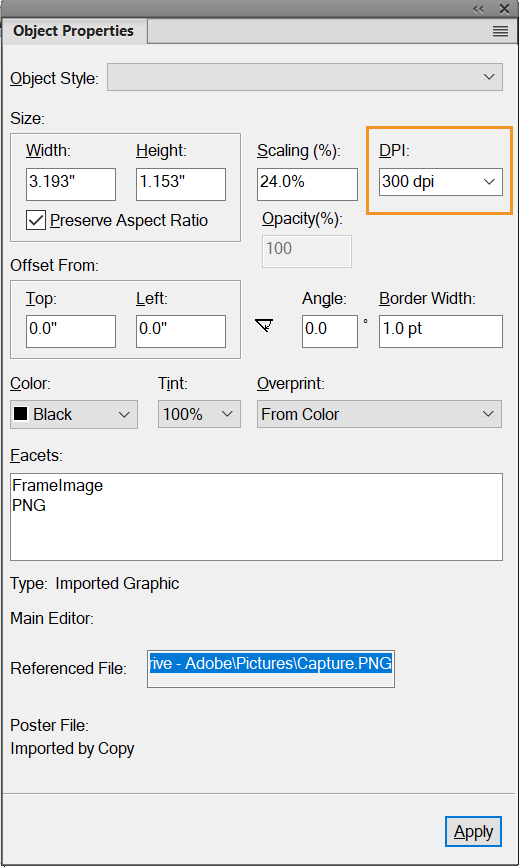
You can resize imported graphics in multiple ways. For example, you can change the width or height, DPI value, or the scaling factor from the Object Properties dialog. Or, you can use the context menu to quickly change the size of the image in proportion to the anchored frame
Do one of the following to resize an image:
Open the Object Properties dialog by clicking on the image and selecting . Or, right-click on an image and choose Object Properties from the context menu.
In the Object Properties panel, use any one of the following ways to resize an image:
Size: Set either the width or height of the image or both.
If you have selected the Preserve Aspect Ratio option, then the aspect ratio of the image is automatically preserved. Else, the image is resized as per the specified height or width values.
Scaling: Specify a scale factor in percent.
DPI: Select an option from the DPI drop-down list. You can choose from the predefined DPIs of 72, 96, 150, 300 DPIs or you can specify a value.
Shift-drag a corner handle of the bitmap. Holding down Shift while you drag maintains the width/height aspect ratio of the graphic.
Right-click on an image and choose from the following options to resize the image:
Fit to Frame: resize the image to the size of its anchored frame. This does not maintain the aspect ratio of the image.
Fit to Frame (Proportionally): resize the image to the size of its anchored frame by maintaining its aspect ratio.
The context menu also provides you quick ways of switching between selecting the image and its anchored frame.
Move a corner of a polyline or polygon
Select the object and choose . Reshape handles appear on the object, replacing the selection handles.
Drag a handle. To move the handle horizontally or vertically, Shift-drag.
Add or remove a corner or reshape handle
Select the line, polyline, polygon, or curve, and choose .
Control-click where you want to add a reshape handle (or corner), or Control-click the handle you want to remove.
Reshape a curve
Select the curve and choose . Reshape handles appear at the locations that define the curve. Control points also appear around one of the handles.
If the control points aren’t the ones you want, click the handle where you want to change the curve. Control points appear around the handle that you click—the two control points that correspond to the handle and the next closest one on each side of the handle.
Drag a handle to change the position of the curve at the handle, or drag or rotate a control point to change the curvature. When you begin to drag, a lever appears that touches the curve at the handle. You can achieve different effects by dragging along the lever or by rotating it.
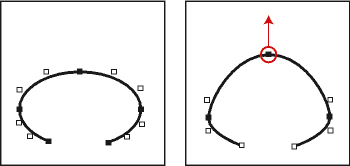
As you drag a reshape handle, the control points move as well, so the result is a smooth curve. As you drag a control point, the curvature changes on both sides of the handle, so the result is also a smooth curve.
Reshape an arc
Select the arc and choose . Reshape handles appear on the object, replacing the selection handles.
Drag a handle. As you drag, the start and end angle of the arc and the percentage of a circle that the arc represents appear in the status bar.
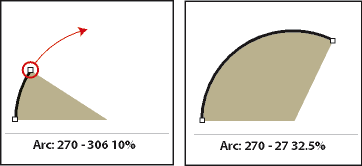
Reshape an arc precisely
Select the arc and choose .
Enter a new Start Angle and End Angle, and click Set.
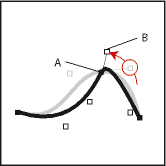
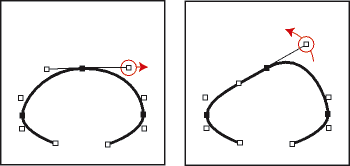
Crimp a curve
Select the curve and choose .
If the control points aren’t the ones you want, click the reshape handle where you want to change the curve.
Drag a handle or control point with the right mouse button.
Figure 9. Crimping a curve.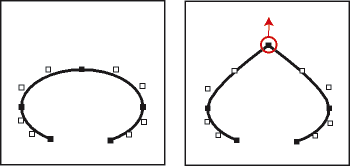
Change the corner radius of a rounded rectangle
You can define the curvature of the corners of a rounded rectangle by specifying the radius of an imaginary circle drawn in the corner of a rectangle. The longer the radius, the more curved the corners.
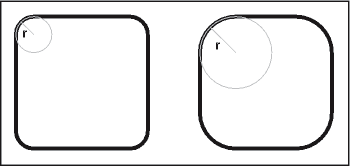
When you specify a corner radius, you also change the current drawing properties. New rounded rectangles you draw have this corner radius until you change it with the Object Properties command or until you exit FrameMaker.
Select a rounded rectangle and choose .
Enter the corner radius and click Set. The largest meaningful radius is one-half the length of the shortest rectangle side. For example, if the rectangle is 2 inches by 4 inches, the largest meaningful radius is 1 inch (one-half of 2 inches).
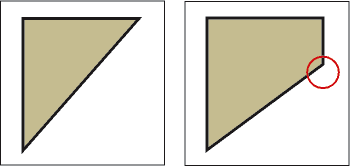
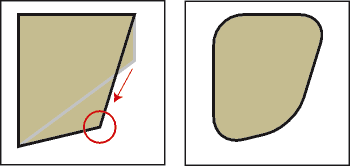
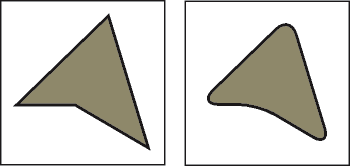
Smooth and unsmooth objects
You can smooth polylines, polygons, rectangles, and rounded rectangles. When you smooth a polyline, polygon, or rectangle, you change its angles to smooth curves. When you unsmooth a curve, you restore its angles.
Each time you smooth a rounded rectangle, you increase the curvature of its corners (its corner radius).
Do one of the following:
To smooth an object, select the object and choose . After smoothing a polygon or polyline, reshape handles and control points appear so you can reshape the curve.
To unsmooth an object, select the object and choose . If you later smooth the object, its shape is sometimes different from the original.