Learn how to position and autonumber text within table cells, set cell margins and direction of autonumbering in Adobe FrameMaker.
Introduction
When you insert a table, its cell margins—the distance between the cell edge and the cell text frame—are determined by the table style. The indent properties of text in the cell, which are measured from the cell margins, are part of the text’s paragraph style.
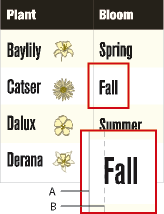
A. Left cell margins B. Paragraph’s left indent
Set default cell margins
To set the default cell margins of a table in Adobe FrameMaker, do the following:
Click in the table you want to change and choose .
In the Basic properties of the Table Designer, enter the values for the top, bottom, left, and right margins in the Default Cell Margins area.
Click Apply.
Customize cell margins or text alignment
When you change cell margins or text alignment and later apply a different style to the table, the changes are not overwritten by the new table style’s default settings.
Because cell margins and text alignment are part of a paragraph style, they aren’t normally stored as part of the table style. However, the paragraph styles of the first title paragraph and the first paragraph in the heading, body, and footing rows of each column are stored. You can customize the alignment of any of these paragraphs and then store the table style in the catalog. Future tables using that table style will have the custom settings as their defaults.
Customize cell margins
To customize the cell margins of a table in Adobe FrameMaker, do the following:
Click in the first paragraph of the cell whose margins you want to customize.
Choose to display the Paragraph Designer.
Choose Table Cell from the Properties drop-down list.
In the Cell Margin area, specify the margins you want to customize by doing one of the following:
To create a margin relative to the default cell margin, choose From Table Format Plus from the drop-down list and then enter a value.
To create a fixed margin measured from the edge of the cell, choose Custom from the drop-down list and then enter a value.
Click Apply.
Customize the vertical alignment of text in a cell
To customize the vertical alignment of text in a table cell in Adobe FrameMaker, do the following:
Click in the cell you want to customize.
Choose to display the Paragraph Designer.
Choose Table Cell from the Properties drop-down list and then choose Top, Middle, or Bottom from the Cell Vertical Alignment drop-down list.
Click Apply.
Specify the direction of autonumbering in a table
When you insert a table, the table format determines the direction of autonumbering within cells—either across rows or down columns. This property also sets the direction of autonumbering for table footnotes.
To specify the direction of autonumbering in a table in Adobe FrameMaker, do the following:
Click in the table you want to change, and choose .
In the Basic properties of the Table Designer, choose Row First or Column First from the Numbering drop-down list.
Click Apply.