Learn how to insert elements in structured documents in Adobe FrameMaker by pressing Return, by using the Elements Catalog, or with the Elements Quick Catalog, and how to set options for new elements.
Introduction
To add an element to a document, you either insert an empty element and enter contents, or wrap an element around existing contents. Before you can begin, your document must have element definitions in its Elements catalog.
If you haven’t
yet fully planned your document, consider inserting just the high-level
elements, such as <head>, <body>, <section>,
and <title> elements, and then use this structure
as an outline for developing the document content.
You can also enter all the elements in their correct order and hierarchy as you go, or concentrate on contents rather than on structure, and then validate later to correct errors.
The Elements catalog shows the elements that are available at the current location. You can change the scope of elements available at a certain position in the structure by changing the Structured Application.
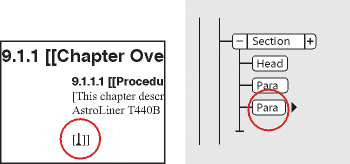
If you have turned on element boundaries, then once you insert or wrap an element, a pair of element boundaries appears in the document window, and a new element bubble appears in the Structure View.
Insert an element by pressing Return
In many cases, pressing Return inserts an element automatically. Whenever you press Return, FrameMaker checks the current element’s definition for the following conditions in the following order. If the EDD of the Structured Application defines automatic insertion of a child element, the child element is intserted automatically as well.
- One valid element
If only one child element is valid at the current location, pressing Return adds that element. For example, after you add a
<topic>, a<title>is the only element permitted as the first child element. You can also use this technique to create repeating elements, such as body paragraphs and list items.- More than one valid element
If more than one child element is valid, pressing Return highlights the Tag area to prompt you for an element. Type until the element name you want appears, and then press Return to insert the element.
- End of an element
If the insertion point is at the end of an element and no more child elements are valid, pressing Return looks for valid elements in ancestors after this location. If a valid element is found, the insertion point moves to the ancestor and the element is inserted (if only one is valid) or the Tag area is highlighted (if more than one element is valid).
- Other conditions
If none of the preceding conditions are true, no element is inserted.
Insert an element using the Elements Catalog
To insert an element using the Elements catalog, do the following:
If the document does not have element definitions, import the definitions from a structured template, EDD, or a DTD.
Specify the scope of elements available.
Click where you want to insert the element. If you’re inserting it between other elements, work in the Structure View rather than the document window.
Select an element in the Elements catalog, and click Insert. If only one element appears in the catalog, you can click Insert without selecting it.
You can also double-click an element name to insert the element.
Note: By default, the Elements catalog displays only those elements that are valid at the insertion point.If the Attributes For New Element dialog box appears, enter attribute values for the element and click Insert Element.
This dialog box appears only if the element has attributes and if an option is set in the New Element Options dialog box to prompt for attribute values when you insert new elements.
If you insert a table, a marker, a graphic, or a cross-reference, provide more information about the element in the dialog box that appears.
Add content to the elements. You can add content as you insert elements, or after you build the structure of your document.
Insert an element using the Elements Quick Catalog
Using the Elements Quick Catalog, you can select and insert multiple levels of elements. When you select an element in the Elements Quick Catalog, FrameMaker displays the elements available within the selected element.
Hit enter and use the pointer or the arrow keys (or the pointer) to select a hierarchy of elements that you want to insert. When you hit enter, if there is only one valid element at the pointer’s position, FrameMaker inserts the element.
Use the following keys to navigate through the hierarchy of elements in Quick Catalogs:
Key/Key action |
Type of navigation/action |
|---|---|
Place cursor in an element and hit enter |
Display the Quick Catalog |
→ |
Display the elements available within the selected element |
← |
Hide one level hierarchy of elements |
tab |
scroll down |
shift+tab |
scroll up |
Alphabets/combination of alphabets |
Type an alphabet or combination of alphabets
to select an element. For example, press b to
select |
The list of elements in the Quick Catalog appears according to the settings in the Set Available Elements dialog. If Show Descriptive Element Names is selected, the element tool tips in the catalog display the element descriptions.
Hierarchical element insert takes care of auto insertions for the last selected element in the hierarchy, as specified in the Element Definition Document (EDD). If there are auto insertion rules in place for elements apart from the last element, they are ignored.

A. Select a hierarchy of elements B. Elements get inserted as a group
Define options for inserting new elements
To define options for inserting new elements, do the following:
Make the appropriate document window or book window active. If a book window is active, select the documents you want to affect in the book panel.
Choose . The New Element Options dialog is displayed:
Figure 3. New Element Options Dialog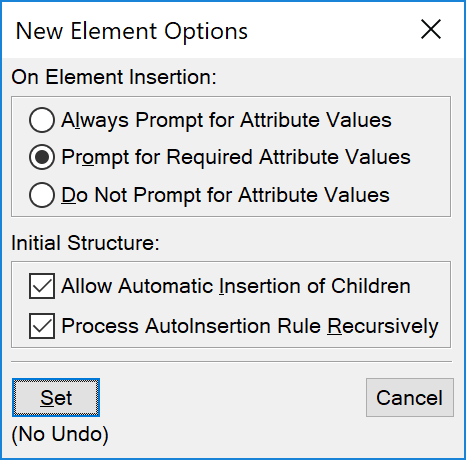
Specify how you want to be prompted for attribute values when you add new elements:
To enter all possible attribute values as you add elements, select Always Prompt for Attribute Values.
To enter only required attribute values as you add elements, select Prompt for Required Attribute Values.
To enter attribute values after adding elements, select Do Not Prompt for Attribute Values.
To allow FrameMaker to insert child elements automatically for new elements, select Allow Automatic Insertion of Children.
Click Set.