Understand how to configure the Elements catalog in Adobe FrameMaker.
In the Elements catalog, click Options to open the dialog to perform the following tasks:
- Valid Elements for Working Start to Finish
-
Displays only elements that are valid at the current insertion point in the hierarchy. The order of the elements in the panel is the same as they are defined in the Structured Application.
Choose this option if you plan to go through a document from start to finish and fill in the elements in their correct order and hierarchy.
- Valid Elements for Working in Any Order
-
Displays only elements that are valid at the current insertion point in the hierarchy.
Choose this setting if you plan to build a valid document but not necessarily by working from start to finish. This is helpful if you do not have all the information you need.
- Elements Allowed Anywhere in Parent
-
Displays all elements that are valid for the current parent.
Choose this option if you want more flexibility for filling in elements. You can insert elements that are invalid and correct the errors later.
- All Elements
-
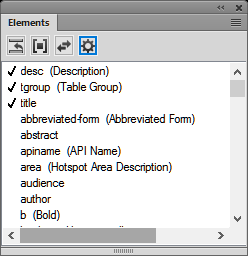
Displays all elements available in the Elements catalog defined in the Structured Application. However, the valid elements at any insertion point are preceded with a check mark.
Choose this option:
-
if you are not building a valid document
-
if you want flexibility and will correct errors later
-
if you are wrapping elements around contents
-
if you want to see what is available elsewhere in the document
Figure 1. Check mark against valid elements
-
- Customized List
-
Click Edit to open the Customized List of Available Element dialog. You can then choose the elements to show or hide. Use the Move Up and Move Down buttons to specify the order in which the elements display in the panel.
Choose this option to:
-
work with a pre-defined subset of the elements
-
display elements in a specific order
-
work with an element list that is static and not context specific
Important: This is a fixed list so the list does not also include elements valid at the current insertion point unless you have selected the elements when creating the list. -
- Show Element Description Tags
-
Displays the description of an element, in brackets, to the right of the element.
- List After Other Valid Elements
-
Depending on the options selected above, the panel may contain elements that are invalid at the specified location. Choose this option to display valid elements first, followed by invalid elements.