Learn how to work change, merge, split, wrap and unwrap, move, copy and nudge elements with Adobe FrameMaker.
Introduction
In Adobe FrameMaker, you can edit the structure of a document in many ways. You can rearrange elements, change an element from one type to another, wrap and unwrap elements, and split and merge elements.
After
changing the structure of a document, you sometimes need to edit
the document further to correct structure violations. For example,
if you split a <section> into two sections,
you might need to add an additional <title> element
for the new second <section>.
Use the Structure View to get an easy to understand view of your document’s structure, and as a guide for finding structure errors. In the Structure View you can rearrange elements and edit elements.
In the Elements catalog, you see all elements available at the current position in the document.
Choose to open the Structure View.
Choose to open the Elements catalog.
Change elements
You can change (rename) an existing element to
another element of the same type. For example, you might want to
convert a <p> element into a <note> element,
or a series of <p> elements into <li> elements
that you can include within a <ul> or <ol> element.
However,
it is not possible to convert any element to any other element.
For example, you cannot change a table cell element (<entry>)
into a paragraph element (<p>).
To rename an element, do the following:
In the Structure View, select the element that you want to change. You can select more than one element, even if the elements do not have the same tag.
Select an element in the Elements catalog and click Change.
FrameMaker changes all selected elements to the new element. However, the elements’ children are not changed, but they sometimes become invalid because the parent changed.
Merge elements
You can merge two or more elements into a single element. If you do so, FrameMaker places the contents of the second element (including any child elements) at the end of the first element.
You sometimes must edit the document after merging elements to fix structure violations.
To merge the content of two elements, do the following:
In the Structure View, select the elements you want to merge. The elements can be of different types, but they must be siblings and next to each other in their parent element.
Choose .
Merging elements with attributes retains the attributes of the the first element only.
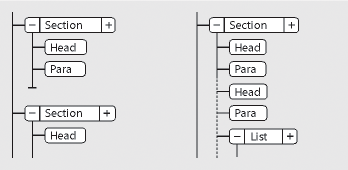
Split an element
You can split an element into two elements of the same type and at the same level. For example, you can split a long paragraph into two paragraphs, or a section element in two sections.
To split the content of an element, do the following:
In the Structure View, click between two elements where you want to split the parent element. All elements at the same level following the insertion point go into the new parent element.
Choose .
Splitting sometimes results in two elements with identical attributes. However, if the original attribute had a Unique ID attribute, the second element loses its ID value and you need to assign a new ID.
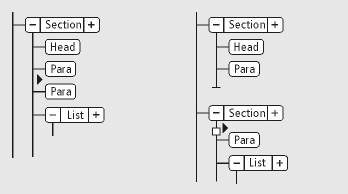
Wrap elements around existing content
You can add structure to content already in a document by wrapping a new element around the content. The content can be any part of a document, including other elements. The element’s content is formatted as specified in the element’s format rules.
After wrapping an element, you sometimes must
edit the document to correct structure errors. For example, if you
wrap <Para> elements in a <Section> element
that requires a <Head> element, you’ll need
to insert the <Head> element.
To wrap an element using the Elements catalog, do the following:
Select the contents you want to wrap in an element. If you’re selecting text, use the document window. If you’re selecting entire elements, use the Structure View.
Select an element in the Elements catalog, and click Wrap.
If the Attributes For New Element dialog box appears, enter attribute values for the element and click Insert Element.
This dialog box appears only if the element has attributes and if an option is set in the New Element Options dialog box to prompt for attribute values when you insert elements.
To wrap elements throughout a document, do the following:
In the document window, wrap text ranges, system variables, and other items that are inside paragraphs. Don’t worry about errors you see in the Structure View. You’ll correct many of these errors when you wrap the lowest levels in parent elements. You can correct the other errors when you’re finished.
Wrap paragraphs, headings, and other paragraph-level items in their elements.
In the Structure View, wrap the elements you have so far in parent elements, such as
<section>,<ol>,<ul>etc.
Wrapping helps in manually providing a structure to an existing unstructured document. When you wrap the first element in the document, the Structure View immediately changes to show a default invalid structure, as follows:
A highest-level element is added with the name
<NoName>, unless you begin by wrapping the contents in a valid highest-level element.<NoName>is a placeholder for your valid highest-level element.All tables become structured and are given default elements, such as
<TABLE>and<ROW>.Objects become elements with default names such as
<CROSSREF>,<GRAPHIC>, and<EQUATION>.Footnotes become
<FOOTNOTE>.Rubi text becomes
<RUBI>and<RUBIGRP>elements.
You can correct the structure of the document when you’re finished wrapping elements.
Unwrapping the contents of elements
Unwrapping deletes an element but leaves its contents in the same place in the document. You usually unwrap elements as part of a larger editing process.
For example,
if you plan to convert <ListItem> elements
into <Para> elements, sometimes you must unwrap
the parent <List> element first. Then use to
convert the <ListItem> elements to <Para> elements.
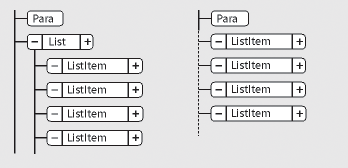
You
sometimes must edit the document after unwrapping an element. For
this example, you would change the <ListItem> elements
to valid elements or rewrap them.
Select the element with the contents you want to unwrap.
Choose .
Move or copy elements
You can move an element to another location in a document by dragging its bubble in the Structure View. When you move or copy an element, its contents, including descendants, all move along with it. This does not affect the contents of the clipboard.
You can also move or copy an element by cutting or copying it to the clipboard and pasting it in a new location, even across documents. If you paste an element from another document, sometimes the element is not defined in your document. If you don’t plan to add a definition for the element, change the element to a valid one. You cannot cut and paste elements in a book file.
Do one of the following:
To move an element, drag the bubble to the location you want.
To copy an element, hold down alt and drag the bubble to the location.
As you drag the bubble to copy, the pointer changes to a hollow, stacked up-and-down arrowhead, and a horizontal arrow moves to indicate where the copy goes if you release the mouse button.
As you drag the bubble to move, the pointer changes to a solid up-and-down arrowhead, and an arrow moves to indicate where the bubble goes if you release the mouse button.
If the element is valid in the location where the arrow points, a check mark or question mark appears in the bubble.
Nudge an element one place
Drag the element’s bubble slightly to one side or up or down. As you drag a small distance, the pointer changes to a single arrow. (If you drag too far, the arrow changes to an up-and-down arrowhead.)
Figure 4. Nudging a List one place, before and after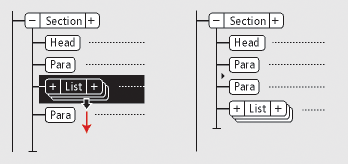
When you release, the element moves one place in the indicated direction, as follows:
Moving an element up places it right above the sibling right before it.
Moving an element down places it below the sibling after it.
Moving an element to the left makes it a sibling of its parent.
Moving an element to the right makes it a child of the sibling before it.