Understand how to define which elements are available at the insertion point in a structured document with Adobe FrameMaker.
When adding elements to a structured document, insert only elements that are valid at the current location. Valid elements have bold check marks, bold check marks and a plus sign, and question marks in the Elements catalog. If you add elements this way, you can work from the beginning of a document to the end and be sure that its structure is valid at every point along the way.
Sometimes you want to work more loosely, and in these cases you can make more elements available. For example, some draft documents must adhere strictly to a predefined structure but follow the structure only as a guideline. Or, you can plan your document to conform to a structure without having all the information to complete it from start to finish.
When more elements are available, the additional elements appear in the Elements catalog and are available if you insert elements from the keyboard. You can also list inclusions after other valid elements in the catalog.
-
Make the appropriate document window or book window active. If a book window is active, select the documents you want to affect.
-
Choose to open the Set Available Elements dialog. You can also click Options in the Elements catalog.
Figure 1. Set Available Elements dialog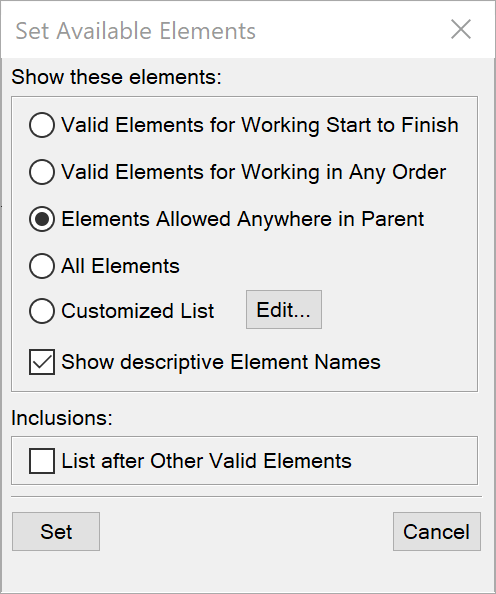
-
Select one of the following options in the Show These Elements area:
-
To show only elements that are valid for the current location, select Valid Elements for Working Start to Finish. Use this option if you plan to go through a document from start to finish and fill in the elements in their correct order and hierarchy.
-
To show elements that are valid for the current location or later in the current element, select Valid Elements for Working in Any Order. Choose this setting if you plan to build a valid document but not necessarily by working from start to finish. This is helpful if you don’t have all the information you need.
-
To show elements allowed anywhere in the current element, select Elements Allowed Anywhere in Parent. Use this setting if you want more flexibility for filling in elements. You can insert elements that are invalid and correct the errors later.
-
To show all elements defined for the document, select All Elements. Use this setting if you’re not building a valid document, if you want flexibility and will correct errors later, if you’re wrapping elements around contents, or if you want to see what’s available elsewhere in the document.
-
To show a set of elements that you specify, select Customized List. Use this setting to work with a subset of the elements, to display elements in a fixed order, or to work with a list that is static instead of context sensitive.
-
-
If you selected Customized List, click Edit and create or change a list of elements.
To move element tags between the Show and Don’t Show lists, use the arrow buttons or double-click the element tags. Transfer all of the elements from one list to another by holding down Shift as you click an arrow button. Click the Move Up and Move Down buttons to arrange the elements in the Show list in the order you want them to appear in the Elements catalog. Click Set when the list is the way you want it.
Note: A customized list of tags is always the same regardless of the location of the insertion point, so be careful to include all the tags you need. The only indication of validity is a check mark next to a tag. -
To list inclusions separately in the Elements catalog, turn on List after Other Valid Elements.
This groups the inclusions right after the other valid elements. Use this setting if you have a large number of inclusions that you rarely need.
-
Click Set.