See how you can setup DITA topics to use DITAVAL and apply conditional attributes to elements with Adobe FrameMaker.
Introduction
You can make elements in a DITA document conditional by applying condition attributes to the elements. You then define, in a DITAVAL file, the elements to exclude or include in the output based on the condition attributes.
Before you create documents with conditional content, you need to first plan the criteria for the output. For example, say that a document has content that is conditionally targeted at administrators and end users. In the document, you apply condition attributes based on the target audience of the content. You then create a DITAVAL file in which you specify the elements to include and exclude based on the attribute value defined in the document.
Applying condition attributes to elements
To allow FrameMaker to conditionally process elements in a DITA document, you need to specify the elements to include or exclude for the output. In the document, you apply one or more of the following conditional attributes to the elements that you need to conditionally process:
- audience:
Example: administrators, authors, or end users.
- platform:
Example: Windows, MAC, or Linux
- product:
Example: FrameMaker, RoboHelp, or Captivate.
- otherprops:
Use this attribute to define any other property that you need to use to enable conditional processing for the document. A few examples:
- delivery
Example: Print, PDF, or Web
- model
hatchback or sedan
You can apply multiple attributes to an element. For example, you can apply the following attributes to an element:
@audience="administrator"@platform="windows"You can also add multiple values to a single attribute. Multiple values are separated by a space. E.g., to target content for both Windows and MacOS, you can add both attribute values to the
@platformattribute:@platform="windows macos"
To apply condition attributes to an element
Select an element in the Structure View of the document.
Choose to pen the Attributes panel.
Update one or more of the following attributes:
audience
platform
product
otherprops
Specify the above condition for each of the element in the document that needs to be processed conditionally.
After you apply the attributes to the specific elements in the document, you conditionally output the content in your document depending on how you set up your DITAVAL file.
Creating a DITAVAL file to create conditional output
After setting up your content using condition attributes (audience, platform, product, and otherprops), you need to create a DITAVAL file. In a DITAVAL file, you define, based on an <attribute name> – <value> pair, the conditional processing of your document. For example, you can specify that content targeted at administrators must exclude from the output content targeted at end users or authors.
Choose to open the New XML dialog.
In the Structured Applications section, select DITA_<version>_DITAVAL and click OK.
The top element of a DITAVAL file is the
<val>element.To define conditions, you need to create
<prop>elements.Add one or more
<prop>elements:Choose to open the Elements catalog. Double-click the
<prop>element in the Elements panel.Or press ctrl+1 to display the Smart Catalog. Select
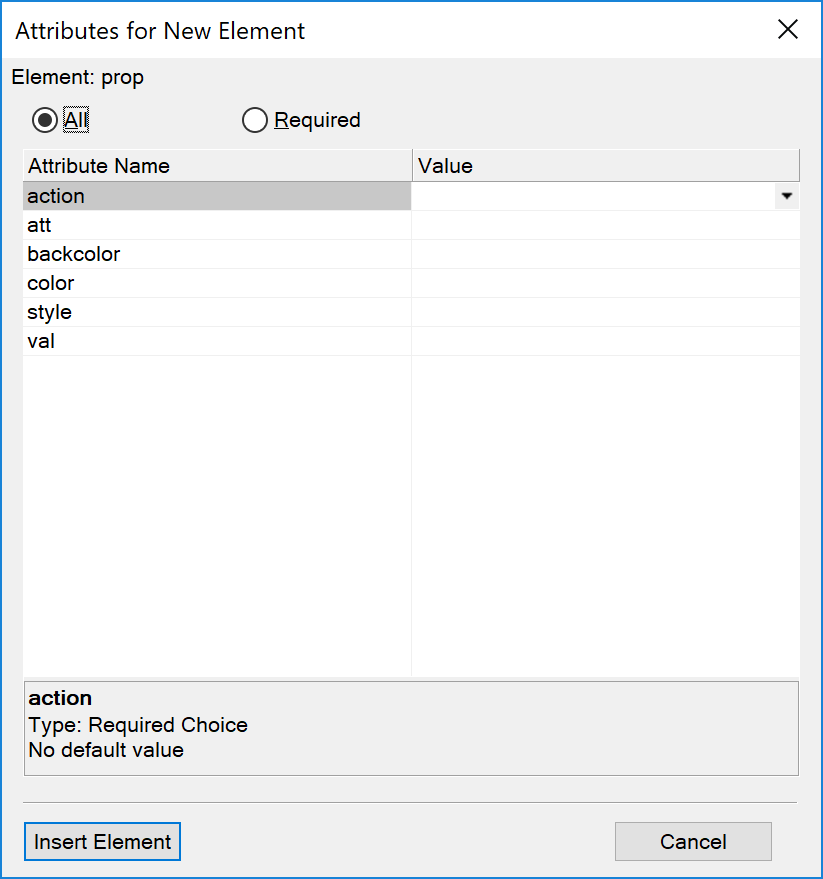
propand press Enter.The Attributes for New Element dialog is displayed.Figure 1. Attributes for New Element dialog
In the Attributes for New Element dialog, specify the following attributes:
@actionChoose to include or exclude the specified attribute (
@att, below) from the output.@attThe condition attribute name applied to the element in your document.
Enter the attribute name exactly as it is defined in the document element.
@valThe condition attribute (
@att) value as defined in the element.Enter the value exactly as you specify it for the attribute in the element.
For example, say that you apply the
@audienceattribute to an element for conditional output and you set the value asadmin.You need to enter
audiencein the@attrfield for the prop element in the DITAVAL file.Also, you need to enter
adminin the@valfield.To exclude the element with the audience attribute set to
admin, specify the@actionasexclude.
Click Insert Element and save the DITAVAL file.
Save the document with the .ditaval extension.