Cross-references

See what are cross-references and learn to use cross-reference panel in FrameMaker.

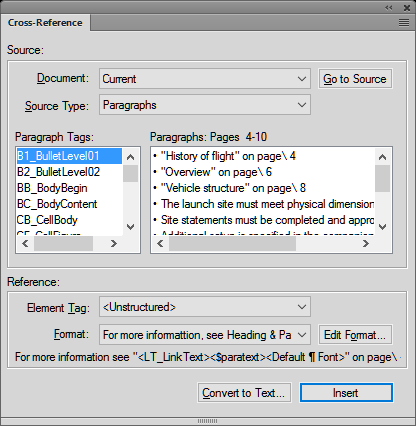
You can provide your readers with links from one document to another or from within one part of a document to another. In FrameMaker, you can create links using cross-references. Since cross-references in FrameMaker are based on markers, if the position of a cross-reference in the document changes, the link remains intact as long as the marker remains intact. For example, say you create a cross-reference to a heading in a document and then include or remove content before the heading. The cross-reference remains intact, even though the location of the destination header has changed.

To open the Cross-References panel:

Cross-References panel
Cross-References panel in FrameMaker

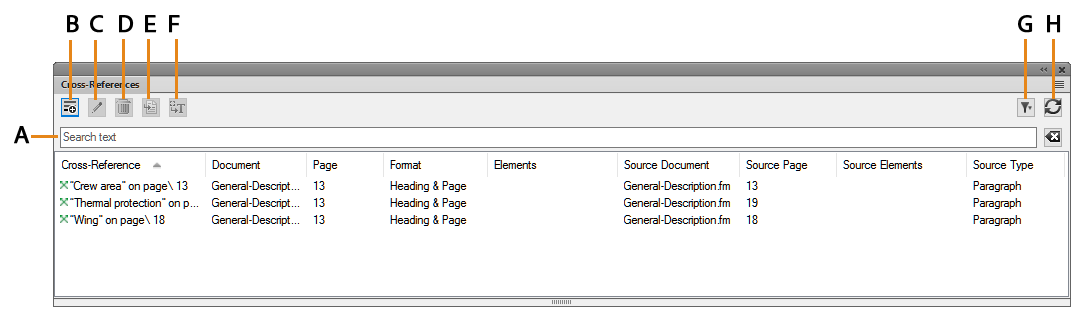
The Cross-References panel displays the list of cross-references in the current document.

To sort the list, click a column header in the list. The list is sorted by the header that you click.

To resize a column:

  1. Hover the mouse between two columns until the cursor is a bi-directional arrow.

  2. Hold down the left mouse button, drag, and release the mouse button when the column is sized as required.

Use the Cross-References panel to:

A (Search text):

Search for cross-references in the list. The SAYT (search as you type) functionality works on all the columns in the list.

B (Insert):

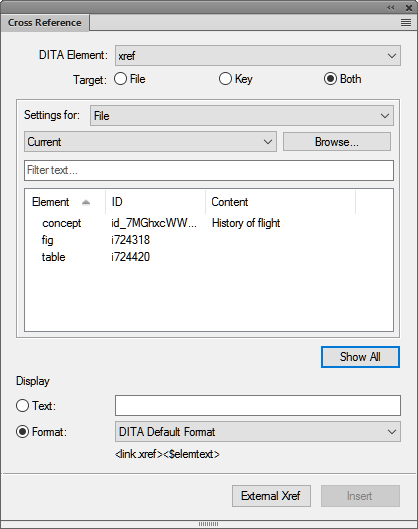
Insert a cross-reference in the document. See Insert cross-references.

C (Edit):

Open the Cross-Reference dialog to edit a cross-reference. See Editing cross-references in a document.

D (Delete):

Delete a selected cross-reference. See Deleting cross-references in a document.

E (Go to Location):

Go to the selected cross-reference in the current document.

F (Convert To Text):

Convert the selected cross-reference to editable text.

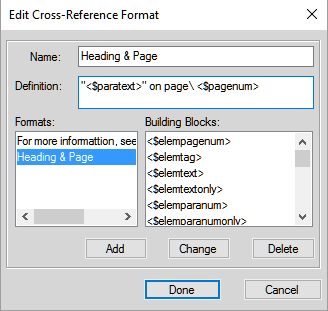
Note: The visible text of the cross-reference is converted to editable text. For example, if you choose to include the page number in the cross reference text, this will be retained as editable text. For details on cross-reference formats, see Managing cross-reference formats.
G (Filter):

Filter the cross-references on the basis of document or type of references. From the Document list, select from the following options:

  • Current

  • All Open Docs

  • Choose a document from the list

For the type of References, select from the following options:

H (Refresh):

Refresh the list of available cross-references.

Insert cross-references

Understand how to insert cross-reference in FrameMaker documents.

You can insert cross-reference in a document to point to another section of the current document or you can point to a section in another document. You can Insert cross-references in documents or Insert a cross-reference to an element in structured documents.

Cross-Reference dialog

You use the Cross-Reference dialog to insert a cross-reference in a document.

Cross-reference dialog
Inserting cross-referenceusingtheCross-References dialog

In the Cross-Reference dialog:

Document

Select the document containing the destination location for the cross-reference.

Note: If the cross-reference is pointing to location in another document, you need to open the document.
Go to Source

Navigate to the location of the cross-reference. If the cross-reference is located in another document, open the document and navigate to the selected paragraph tag.

Source Type

Choose the type of content of the destination location:

Paragraph

To Insert a cross-reference to a paragraph in a document

Cross-Reference Markers

To Insert a cross-reference to a Cross-Ref marker in a document

Elements Listed in Order / Elements Sorted by ID

To Insert a cross-reference to an element in structured documents.

You can choose to list the elements in the document by the order in which the elements appear in the document. Alternatively, you can list the elements by the unique ID applied to each element.

Source Type lists

Depending on the source type selected above, the list on the left below display the paragraph tags, cross-references, or element types in the selected document.

The list box on the right displays the specific paragraphs, cross-references, or elements.

Element Tag

Choose the element tag (for example XRef) to use for the cross-reference. For details, see Insert a cross-reference to an element in structured documents.

Format

Choose a format to display the cross-reference in the current document. For details, see Managing cross-reference formats.

Edit Format

By default, FrameMaker provides a list of cross-reference formats. Choose this option to add, edit, or delete from this list. For details, see Managing cross-reference formats.

Convert to Text

Displays the Convert Cross-Reference to Text dialog.

In this dialog, you can convert to editable text:

  • selected cross-references

  • cross-references with a specific Format

  • cross-references with a specific Element tag

  • all cross-references in the current document

Insert / Replace

Insert a cross-reference at the specific location. See Insert cross-references in documents. If you select an existing cross-reference, the Replace option is available to update the cross-reference. See Updating cross-references in a document.

Insert cross-references in documents

In documents, you can insert a cross-reference to a paragraph (for example, headings) in a document or a text inset within the document.

You can also insert a cross-reference to a word or phrase in a document. In structured document, you can also insert cross-references to elements in the structured hierarchy.

Insert a cross-reference to a paragraph in a document

  1. Place the insertion point at the location in the current document where you want to insert the cross-reference.

  2. Click Insert on the Cross-References panel.

    Alternatively, you can choose Cross-Reference from the Insert menu.

    The Cross-Reference dialog is displayed.

  3. In the Document drop-down list, select the document containing the destination paragraph.

    Important: To insert a cross-reference to another document, you need to open the destination document in FrameMaker.
  4. Select the paragraph type and the specific paragraph.

  5. From the Format list, choose the format to display the cross-reference.

    For example, the See Heading & Page format displays as:

    See “Creating cross-references” on page 1
  6. Click Insert.

If you move the paragraph from one document to another, FrameMaker uses the marker Resolve unresolved cross-references in a document.

Tip: To maintain cross-references that you move across document, you need to also move the Cross-Ref markers.
Important: If the destination paragraph exists in a separate document, you need to ensure that you have write-permissions on that document. For example, if you are using a content management system, you might be required to check-out both the source and destination documents.

Insert cross-reference to a paragraph in a text inset

If you have a document that includes a text inset reference to another document, you can insert a cross-reference to paragraphs that are contained in the text inset. If a user follows the cross-reference link in the main document, the user is directed to the text inset within the document itself.

  1. Place the insertion point at the location in the current document where you want to insert the cross-reference.

  2. Click Insert on the Cross-References panel.

    Alternatively, you can choose Cross-Reference from the Insert menu.

    The Cross-Reference dialog is displayed.

  3. In the Document drop-down list, select the document that is referenced in the text inset that contains the destination paragraph.

    Important: To insert a cross-reference to another document, you need to open the destination document in FrameMaker.
  4. Select the paragraph type and the specific paragraph.

  5. From the Format list, choose the format to display the cross-reference.

    For example, the See Heading & Page format displays:

    See “Creating cross-references” on page 1
  6. Click Insert.

If you insert a paragraph cross-reference to a text inset, the cross-reference marker is sometimes lost when the text inset is updated. To prevent the marker from being lost, first insert a cross-reference to the paragraph in the text inset’s source document.

  1. Open the source of the inset by double-clicking the inset and then clicking Open Source from the Text Inset Properties panel.

  2. Insert a cross-reference to the paragraph anywhere in the source document.

  3. Delete the cross-reference text. The marker remains.

  4. Save the source document, and then in the document that contains the text inset, update the text inset by choosing Edit > Update References.

  5. Insert a spot cross-reference, this time in the document that contains the inset. The cross-reference uses the marker in the updated inset.

Insert a cross-reference to a Cross-Ref marker in a document

You can insert a cross-reference to any location in a document by using the Cross-Ref type marker. Using the Cross-Ref marker, you can link to a word or phrase in a paragraph or to an anchored frame. You even can link to the text in a cell in a table. You can link to any location in a document where you can insert a Cross-Ref marker.

  1. Place the insertion point at the destination location and open the Marker dialog (Insert > Marker).

  2. In the Marker dialog, choose the Cross-Ref marker type.

  3. Specify a marker text and click New Marker.

    The marker text can be any name that you specify for the name. You will select this in the Cross-Reference dialog when you insert the cross-reference.

    A new marker is inserted at the destination location.

  4. Place the insertion point at the location to create the cross-reference.

    Note: The cross-reference and the marker locations can be in the same or separate documents.
  5. Open the Cross-Reference dialog.

  6. In the Source Type drop-down list, choose Cross-Reference Markers.

  7. In the Maker Type list, choose Cross-Ref.

  8. In the Cross-References Markers list, choose the marker (by name) that you created in Steps 1 through 3.

To insert the cross-reference perform the remainder of the steps as per the procedure in Insert a cross-reference to a paragraph in a document.

Important: If the destination cross-reference exists in a separate document, you need to ensure that you have write-permissions on that document. For example, if you are using a content management system, you might be required to check-out both the source and destination documents.

Insert a cross-reference to an element in structured documents

In structured document, besides cross-references to paragraphs and Cross-ref markers, you can also insert cross-references to elements in the current or other structured documents.

  1. Place the insertion point at the location in the current document where you want to insert the cross-references.

  2. Click Insert on the Cross-References panel.

    Alternatively, you can choose Cross-Reference from the Insert menu.

    The Insert Cross Reference dialog is displayed.


    InsertCrossReferencedialog in FrameMaker

  3. Select the DITA Element to use for inserting the cross-reference.

    Note: The items in this list depend on the cross-reference elements that are defined in the structured app.
  4. In the Target area, choose whether the File, Key space, or Both contains the destination element.

    Note: If you choose File, then select the file that contains the target destination. If you choose Key, then select the target Key. If you choose Both, then you need to select the source for your cross-reference in the Setting For drop-down list. You can also search for the required element by typing in the Filter Text box.
  5. Choose the target element from the list.

    The list provides information about the element type, ID, and content where the element is used.

  6. In the Display area, either provide the text for the cross-reference or choose the format from the drop-down list.

    For example, the See_Title_and_Page format displays:

    See “Creating cross-references” on page 1
  7. Click Insert.

When you insert a cross-reference to an element in a structured document, FrameMaker user the ID and IDRef attributes of the destination and source elements, respectively.

If you insert a cross-reference to an element whose ID attribute is not currently assigned a value, FrameMaker assigns a unique value to the attribute. However, if the ID attribute is not read-only, you can manually set the attribute value.

You need to ensure that the destination element has the ID attribute defined. Else, you need to use another element or the structured app definition will need to be changed.

Important: If the destination element exists in a separate document, you need to ensure that you have write-permissions on that document. For example, if you are using a content management system, you might be required to check-out both the source and destination documents.

Manage cross-references

Learn how to manage, edit, delete and update cross-references in FrameMaker, work with cross-reference formats and identify and manage unresolved cross-references.

You can edit (see Editing cross-references in a document) or delete (see Deleting cross-references in a document existing cross-references in a document. You can also, edit the cross-reference formats to change the way the cross-reference displays in the document output. For example, you can choose to only display the heading text, and not include the page number in the cross-reference. For details, see Managing cross-reference formats. You can update the cross-references in a document. For example, if the destination content is changed. See Updating cross-references in a document. Also, changes in the destination content can cause the cross-references in the current document to be broken. To identify and handle unresolved cross-references, see Managing unresolved cross-references.

Editing cross-references in a document

You can change any of the properties associated with an existing cross-reference, including the destination of the cross-reference, using the Cross-Reference dialog.

Edit the cross-reference in a document

  1. For an existing cross-reference, double-click the cross-reference in the document.

    Alternatively, open the Cross-References panel (View > Panels > Cross-References), select the cross-reference in the panel and click Edit.

    The Cross-Reference dialog is displayed.

  2. In the Cross-Reference dialog, you can update:

    • The destination document and paragraph, cross-reference, or element

    • Element Tag - If the cross-reference is an element in a structured document

    • The format of the cross-reference

      Click Edit Format to open the Edit Cross-Reference Format dialog. Use this dialog to add, edit, or delete cross-reference formats. For details, see Managing cross-reference formats.

    • Convert the cross-references in the document to text.

  3. To update the cross-reference, click Replace.

Deleting cross-references in a document

If you delete a cross-reference in a document, the cross-reference as well as the associated text is deleted. For example, if the following cross-reference is inserted in a document:

See “Creating cross-references” on page 1

If you delete the cross-reference, the cross-reference is removed from the document catalog and the text “See “Creating cross-references” on page 1” is deleted from the document.

Delete a cross-reference in a document

  1. Open the Cross-References panel (View > Panels > Cross-References).

  2. Select the cross-reference in the panel and click Delete.

You can also, select the cross-reference in the document and press the Delete key on the keyboard. However, in this case, you might inadvertently also delete any adjoining text.

Managing cross-reference formats

When you insert a cross-reference in a document, you need to select a format to associated with the document.

For example, the See Heading & Page format displays:

See “Creating cross-references” on page 1

The Format drop-down list display the available formats. You can choose any of the formats when you insert a cross-reference in a document. Alternatively, you can edit these formats or create new formats. Cross-reference formats are specific to a FrameMaker document. However, you can use the updated formats in another document, by, Importing cross-reference formats.

Edit Cross-Reference Format dialog

Use the Edit Cross-Reference Format dialog to create, edit, or delete cross-reference formats in the current document.

Edit Cross-Reference Format dialog
Edit Cross-Reference Format dialog in FrameMaker

Use the Edit Cross-Reference dialog to:

Name:

Update the name of an existing format or specify a name for a new format.

Definition:

Define the cross-reference format.

To define a format, you can enter any fixed text - for example, Figure that will display as you specify the text in the definition. You can also use the definitions Building Blocks list to display contextual information.

For example, the default Heading & Page format is defined as:

“<$paratext>” on page\ <$pagenum>

The building block parts of the definition are included in angle brackets (<>) and preceded by a dollar ($) sign. When FrameMaker encounters this nomenclature in a cross-reference format, it interprets this according to the building block definitions. In the above example, FrameMaker interprets:

<$paratext>

Paragraph text of the cross-referenced paragraph

<$pagenum>

Page number of the cross-referenced paragraph

The resulting cross-reference is displayed as:

“Inserting cross-references” on page 25

For details, see Cross-reference format building blocks.

If the definition contains characters that are not as per the building block nomenclature, these characters are displayed as they are written in the definition. Say in the above example, you defined the Heading and Page format as:

“<$paratext>” on page\ <$PageNum>

The resulting cross-reference is displayed as:

“Inserting cross-references” on page <$PageNum>
Add

Create a format. See Creating cross-reference formats.

Change

Edit an existing format. See Editing cross-reference formats.

Delete

Delete an existing format. See Deleting cross-reference formats.

Creating cross-reference formats

You can create cross-reference formats and then use these in the current document. To use the new formats in another document, see Importing cross-reference formats.

  1. In the Edit Cross-Reference Format dialog, enter a name the cross-reference in the Name field.

  2. In the Definition field, define the cross-reference format.

    To define the format, you can enter any text (letters, characters, or numbers) that display as they are in the cross-reference.

    Use the building blocks to display contextual information in the cross-reference.

    To add a building block to the definition, place the insertion point at the appropriate location and click the definition in the Building Blocks list.

    You can also, type the building block definition by including the definition in angle brackets (<>) and preceding the definition by a dollar ($) sign.

    For details, see Cross-reference format building blocks.

  3. To create a cross-reference format, click Add.

Editing cross-reference formats

You can change existing cross-reference formats and then use these in the current document. To use the updated formats in another document, see Importing cross-reference formats.

  1. In the Edit Cross-Reference Format dialog, select an existing format from the Formats list.

    Note: You can edit the name of the format in the name field.
  2. In the Definition field, edit the cross-reference format definition.

    You can enter any text (letters, characters, or numbers) that display as they are in the cross-reference.

    Use the building blocks to display contextual information in the cross-reference.

    To add a building block to the definition, place the insertion point at the appropriate location and click the definition in the Building Blocks list.

    You can also, type the building block definition by including the definition in angle brackets (<>) and preceding the definition by a dollar ($) sign.

    For details, see Cross-reference format building blocks.

  3. Click Change and to update the selected cross-reference format, click Done.

    The Update Cross-References dialog is displayed.

  4. If you update the format definition, you need to choose to update the references:

    • In the current document

    • In all open documents that are referenced by the cross-references in the current document

    • In all documents that are referenced by the cross-references in the current document

    Or click Cancel to not reflect the format changes in any cross-references.

Deleting cross-reference formats

You can choose to delete cross-reference formats that are not used in the document. You can also choose to delete cross-reference formats that are currently used. If you delete a cross-reference format that is used in the current document, you are prompted that all cross-references that use the format will be converted to editable text.

  1. In the Edit Cross-Reference Format dialog, select an existing format from the Formats list.

  2. Click Delete and to remove the selected cross-reference format from the document catalog, click Done.

    You are prompted to change all cross-references that use the deleted format to editable text.

Importing cross-reference formats

The cross-reference formats that you add or edit are available for use in the current document. To make these formats available in other documents you need to import the formats.

  1. Open the document containing the cross-reference format to be imported into other documents.

  2. Open the document into which you need to import the formats.

    Ensure that the document into which you need to import the formats is currently selected.

  3. Open Import Formats dialog (File > Import > Formats).

  4. In the Import from Document drop-down list, choose the source document and ensure that only the Cross-Reference Formats check box is checked.

    You can use the Deselect All button to first uncheck all the boxes and then check Cross-Reference Formats check box.

  5. To import the cross-reference formats, click Import.

Cross-reference format building blocks

When you add or edit cross-reference format, you can choose to use building blocks to display contextual information in the cross-reference. The following sections describe the building blocks that you can use to create cross-reference formats.

Source file information building blocks

The following building blocks provide information about the source file of the document containing the cross-reference:

Building block

Description

<$filename>

The name of the source document

<$fullfilename>

The full path of the source document

<$volnum>

The volume number of the document that includes the source paragraph

<$chapnum>

The chapter number of the document that includes the source paragraph

Source paragraph

The following building blocks provide information about the source paragraph referenced by the cross-reference:

Building block

Description

<$pagenum>

The page number of the source paragraph

<$paratext>

The text of the source paragraph, excluding its autonumber (If the character format of text in the source paragraph was changed by applying a Character Catalog format, the font family, superscript, and subscript properties are preserved in the text of the cross-reference.)

<$paratag>

The tag of the source paragraph

<$paranum>

The source paragraph’s entire autonumber, including any text in the autonumber format

<$paranumonly>

The source paragraph’s autonumber counters, including any characters between them

Paragraph preceding the source paragraph

A cross-reference to a subsection often identifies the section that contains it. For example, this cross-reference to a subheading identifies the main heading under which it is found: See “Types of Plate Boundaries” in “Plate Tectonics.” In the example, Types of Plate Boundaries is the source paragraph, and Plate Tectonics is the main heading under which the source paragraph appears.

In each of the building blocks, replace tag (in brackets) with the tag of the paragraph to which you want to refer, but don’t delete the brackets. For example, if you want to refer to the text of the preceding paragraph tagged Head1, use <$paratext[Head1]>.

Building block

Description

<$pagenum[tag]>

The page number of the preceding paragraph with the specified tag

<$paratext[tag]>

The text of the preceding paragraph with the specified tag, excluding its autonumber (If the character format of text in the source paragraph was changed by applying a Character Catalog format, the font family, superscript, and subscript properties are preserved in the text of the cross-reference.)

<$paratag[tag]>

The tag of the preceding paragraph with the specified tag

<$paranum[tag]>

The entire autonumber of the preceding paragraph with the specified tag, including any text in the autonumber format

<$paranumonly[tag]>

The autonumber counters of the preceding paragraph with the specified tag, including any characters between them

Important: Don’t use a paragraph tag that includes brackets ([ ]).
Structured document elements

Use the following building blocks to create cross-reference formats that refer to structured document elements

Building block

Description

<$elempagenum>

The page number of the source element

<$elemtext>

The text of the source element (up to the first paragraph break), excluding its autonumber, but including any prefix and suffix specified in the element definition

<$elemtextonly>

The text of the source element (up to the first paragraph break), excluding its autonumber and any prefix and suffix specified in the element definition

<$elemtag>

The tag of the source element

<$elemparanum>

The entire autonumber of the source element’s first paragraph (or of the paragraph containing the source element), including any text in the autonumber format

<$elemparanumonly>

The autonumber counters of the source element’s first paragraph (or of the paragraph containing the source element), including any characters between the counters

<$attribute[name]>

The value of the attribute with the specified name (or, if no value is specified, the default value)

Updating cross-references in a document

If the source content of cross-references is updated, you need to update the cross-references in the current document. For example, if you create a paragraph cross-reference to a heading and then change the heading text, you will need to update the cross-reference in the document containing the cross-reference.

The cross-references in the document are updated every time the document is opened. Alternatively, you can manually update the references in an already opened document. Also, you can prevent FrameMaker from updating the cross-references in a document every time it is opened.

Update the cross-references in a document

  1. From the Edit menu, choose Update References.

  2. In the Update References dialog, check All Cross-References and click Update.

If FrameMaker cannot resolve the cross-references, the Update Unresolved cross-references dialog box appears. For details on unresolved cross-references, see Managing unresolved cross-references.

Suppress automatic cross-reference updating

By default, FrameMaker updates the cross-references in a document every time the document is opened. However, if a document contains a large number of cross-references, the validation for the cross-references in the document can cause a sufficient delay in the document load time.

To stop FrameMaker from updating cross-references when a document is opened:

  1. Choose Edit > Update References.

  2. In the Update References dialog, open the Commands drop-down in the upper right corner and select Suppress Automatic Updating.

  3. In the Suppress Automatic Reference Updating dialog, check Suppress Automatic Updating of All Cross-References and click Set.

Managing unresolved cross-references

If the source of a cross-reference is changed and FrameMaker is unable to update the reference in the destination, FrameMaker reports the cross-reference as unresolved. This can happen, for example, if the source document or content is deleted.

FrameMaker reports a cross-reference as unresolved if:

  • The marker or source of the cross-reference has been moved to a different file, or the file itself has been moved or renamed.

  • The source has been deleted, or if the source is a paragraph or Cross-Ref marker, the marker indicating the source has been deleted.

  • The file containing the marker is currently open by another user.

  • The value for the source element ID attribute or the cross-reference ID Reference attribute (@IDRef) has been changed or deleted.

Identify unresolved cross-references in a document

You can view the list of unresolved cross-references in a document in the:

  1. Open the Cross-References panel (View > Panel > Cross-References).

  2. In the References drop-down list, choose Unresolved Cross-References.

The list displays the unresolved cross-references. Use the Update References dialog to Resolve unresolved cross-references in a document.

You can also generate a list of unresolved cross-references in a document:

  1. Choose Insert > List Of > References.

  2. Choose to create the list as standalone index of references or include the index in a new book.

  3. Move the Unresolved Cross-Refs to the Include References list and click Set.

The generated list includes the page number of each unresolved cross-reference and indicates whether each missing source is internal (in the current document) or external (in a different document). The list includes additional information – for example, the tag and text of the source paragraph (unstructured documents), or the ID, element tag, and text of the source element (structured documents). For Cross-Ref marker cross-references, the list includes the marker text.

Note: The tag and text are not always accurate because they are not updated after you initially insert the cross-reference.

Resolve unresolved cross-references in a document

To resolve unresolved external cross-references in a document:

  1. Open the Update References dialog (Edit > Update References).

  2. Click the Commands drop-down list and select Update Unresolved Cross-References.

    Update Unresolved Cross-References dialog is displayed.

  3. In the Total of Unresolved cross-references scroll list, select the file that previously contained the source of the unresolved cross-reference. The text below the scroll list indicates how many cross-references to the selected file are unresolved.

  4. Navigate to and select the alternate document containing the cross-reference.

  5. To resolve cross-references to any other file listed in the Total of Unresolved cross-references scroll list, repeat steps 3 and 4. Then click Done.

To resolve cross-references to Cross-Ref markers, you need to re-create the Cross-Ref marker and the cross-reference. For details, see Insert a cross-reference to a Cross-Ref marker in a document.

Similarly, to resolve cross-references to elements in structured documents, you need to re-create the cross-reference. For details, see Insert a cross-reference to an element in structured documents.