Conditional text

Understand what conditional text is and work with conditional tags in Adobe FrameMaker.

Sometimes you author different types of content for different output formats using the same FrameMaker document. This document can contain conditional tags and conditional graphics for each type of output. For example, to create both a PDF print version and an HTML Help version of a document, mark the different content for each using conditional tags.

You can also use conditional tags to include comments to yourself or your reviewers. You can hide the comments before you print the final copy.

Conditional tags differ from one version of a document to another. Unconditional text is common to all versions.

Conditional text is content that you can show or hide, depending on the condition or conditions applied to a book or an individual document. You can write in one document, and then use conditional text to create multiple outputs.

You can specify conditional tags in FrameMaker at the book level or an individual chapter level. If there is a condition that applies to all chapters in a book, then you can easily apply that condition to all chapters with a single click. See Applying conditional tags at the book level.

While the conditional text in a document differs from one output of the document to another, the unconditional text is common to all output.

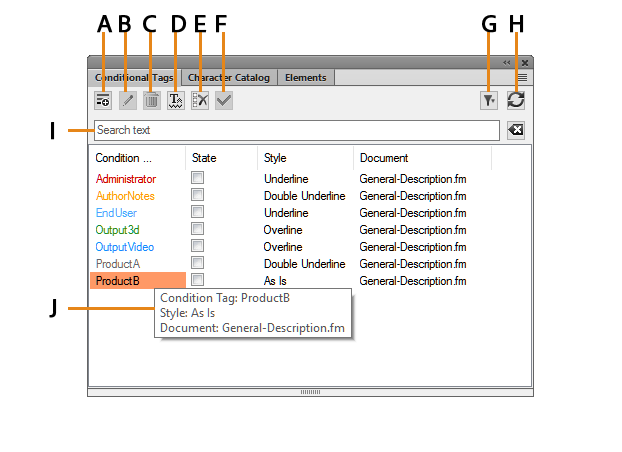
You can make any unit of text conditional, from a single character to entire sections. Anchored frames, images, tables, cross-references, footnotes, markers, and table rows and columns can be made conditional.

Note: The conditional tag state for a table row or column overrides any conditional tags that are applied to the text in the individual cells in the column.
Two versions of a datasheet: Conditional tags can be used to create two datasheets in one document. The text and graphics common to both datasheets are unconditional. The text and graphics that appear in only one datasheet are assigned a conditional tag that identifies the datasheet.
Applying conditional formatting in FrameMaker

A. The image and the first paragraph contain both conditional and unconditional information. B. Unconditional text.

Manage conditional tags

Adobe FrameMaker lets you manage conditional tags with the help of several options. Understand these options to handle conditional text in your documents.

Create conditional text in FrameMaker by creating and applying conditional tags.

Use the Conditional Tags panel to work with conditional text in your documents. From this panel, you can add, modify, delete, apply, or remove conditional tags in a document.

This section covers the following topics:

Conditional Tags panel

To open the Conditional Tags panel:

  • Choose View > Panels > Conditional Tags.

  • Alternatively, choose Insert > Conditional Tags.

Figure 1. Conditional Tags panel
Conditional Tags panel in FrameMaker

The Conditional Tags panel displays the list of conditional tags in the current document.

To sort the list of conditional tags, click a column header in the list. The list is sorted by the header that you click.

To resize a column:

  1. Hover the mouse between two columns until the cursor is a bi-directional arrow.

  2. Hold down the left mouse button, drag, and release the mouse button when the column is sized as required.

Use the Conditional Tags panel to:

A (Create New Tag):

Open the Add/Edit Condition Tag dialog to create a tag. See Creating and editing conditional tags.

B (Edit):

Open the Add/Edit Condition Tag dialog to edit a selected tag. See Creating and editing conditional tags.

C (Delete):

Delete a selected tag. See Deleting conditional tags.

D (Show/Hide):

Open the Show/Hide Conditional Text.

E (Uncheck All):

Remove all conditional tags applied to the selected text.

F (Apply):

Select text in a document, change the state (applied or not applied) of one or more tags, and then click Apply. See Apply conditional tags.

G (Filter):

Select from the list of open documents to display the conditional tags available in that document.

Note: You can create and use conditional tags only at a document level. However, you can import tags from one document to another. For details, see Importing conditional tags and expressions.
H (Refresh):

Refresh the list of available tags.

I (Search text):

Search for a conditional tag in the list. The SAYT (search as you type) functionality works on all the columns in the list.

J (Tooltip):

Hover the mouse over an item in the list to see details about the tag.

Creating and editing conditional tags

To apply conditions to the text in a document, you need to create conditional tags first. You then need to apply the tags to the text in the document.

To create a conditional tag:

  1. In the Conditional Tags panel, click Create New Tag.

    The Add Conditional Tag dialog opens.

    Figure 2. Add Conditional Tag dialog
    Add Conditional Tag dialog in FrameMaker

  2. In the Tag Name field, enter the name of the tag.

  3. Specify conditional indicators:

    When you apply a tag to text in a document, you can use conditional indicators as visual cues. For example, when you apply a tag to a paragraph of text, you can specify that the paragraph of text displays underlined or the text color is red.

    Conditional indicators also are visual cues for other authors who have not necessarily created the document or applied the conditions to the text. With the help of these visual indicators, authors can quickly identify the conditions applied to various types of content.

    In addition to the visual cues, the Location list in the Edit Conditional Tag panel lists all pages where a condition is used.

    Note: The conditional indicators that you specify for a conditional tag displays in your PDF output. To ensure that the indicators do not display in the PDF output, uncheck the Show Condition Indicators option in the Show/Hide Conditional Text dialog.
    Style:

    Apply styles such as underline, strikethrough, or change bar to the conditionally applied text.

    Color:

    Apply text color to the conditionally applied text.

    Background

    Apply background color to the conditionally applied text.

  4. Click OK.

The newly created conditional tag in the Conditional Tags panel shows the defined style, text color, and background color. It also displays the document in which the tag is created.

Tip: If you add or edit a conditional tag and the changes are not immediately visible in the panel, click Refresh on the panel.

To edit a conditional tag:

  1. Select a tag in the Conditional Tags panel and click the Edit button.

    The Edit Condition Tag dialog displays the selected conditional tag properties. The dialog also lists the pages where the selected condition is applied.

  2. Update the properties of the tag and click OK.

Important: If you change the name of a tag and click OK, a new tag is created.

If you change the conditional indicator properties on an existing tag, these are immediately reflected in the document content. For example, if you change the Color indicator on the PrintOnly tag from blue to green, the text on which this tag is applied changes to green.

Importing conditional tags and expressions

You can import conditional tags and expressions from one document to another.

In a team of authors, you can create one document that defines all the tags and conditional expressions that the team can use. All the authors in the team can then import and use those tags and conditional expressions. For more information on conditional expressions, see Show/hide conditional text using conditional expressions.

To import conditional tags and expressions:

  1. Open the source and the target documents and go to the target document.

  2. Choose File > Import > Formats.

  3. In the Import from Document list, choose the source document.

  4. Click Deselect All and select Conditional Text Settings.

  5. To import the tags and expressions, click Import.

The conditional tags and expressions defined in the source document are imported into the target document.

Important: If the target document defines a conditional expression with the same name as an expression in the source document, the target document expression is overridden.

How to check if a tag is used in a document

The Edit Conditional Tag panel contains the locations where the selected condition has been used. You can double-click on any item in the list to open the conditionalized content.

Figure 3. Edit Conditional Tag panel

In addition to the Edit Conditional Tag panel, you can also find a conditional tag using the Find/Change dialog.

Use the Find/Change dialog to check if a tag is applied to text in the document:

  1. Open the Find/Change dialog.

  2. In the Find drop-down list, select Conditional Text.

    The Find Conditional Text dialog appears.

    Figure 4. Find Conditional Text dialog
    Find Conditional Text dialog in FrameMaker
  3. Move the condition that you want to search for in the In list.

  4. Click Set.

  5. In the Find/Change dialog, click Find.

    You will be able to search if the selected condition is used in your document.

List conditional tags in a document

To generate a report of all conditional tags applied to text in the document:

  1. Choose Insert > List Of > References.

  2. From the prompt, choose how to create the report.

  3. Add Condition Tags to the Include References list and click Set to generate the report.

Identifying the state of conditionalized text

The conditional tag State checkbox in the Conditional Tag panel has two functions:

  1. The State checkbox allows you to apply or remove conditional tags from text in a document.

  2. If you select text, the checkbox indicates the current state of the text. This implies that if you select a piece of text to which one or more tags is applied, the State checkboxes appear checked for the corresponding tags.

However, the checkboxes also have an As Is state. This state indicates that one or more tags are applied to part of the text. For example, if a tag is applied to a sentence and you select the entire paragraph, the tag displays the As Is state. Similarly, if you select two paragraphs to which two different tags are applied, both the tags display the As Is state.

Figure 5. Conditional tag intermediate state
Identifying the state of conditionalized text in the Conditional tag dialog

Apply conditional tags

Learn how to apply conditional tags and the various objects where you can apply conditional text in Adobe FrameMaker.

After you have created conditional tags, you apply these tags to conditionalize text in your document. For example, if an image applies only to the print output of a document, apply the PrintOnly tag.

Also, you can specify the conditional tag at a book level without the need to apply conditions or expressions to individual chapters.

Applying conditional tags to text

  1. Select the text on which to apply the tag.

    The following table details the FrameMaker elements that you need to select to apply conditional tags to the corresponding types of FrameMaker content:

    To apply a tag to the following content

    Select

    Text in a text frame, table cell, or footnote

    Text

    Anchored frame and its contents

    Frame border or anchor symbol

    Table

    Table anchor symbol

    Table row

    Whole row

    Cross-Reference or variable

    Cross-reference or variable text

    Footnote

    Footnote reference (the number in the main text)

    Marker

    Marker symbol

    Note: To make a graphic, image, or picture conditional, you need to add these in an anchored frame and then apply a conditional tag to the anchored frame.
  2. Open the Conditional Tags panel.

    The State column in the list of tags grid displays the state of the tag (applied or not applied) with respect to the current selected text.

  3. To apply a tag to the selected text, click to select the State checkbox.

    Note: As soon as you click the State checkbox, an asterisk displays to the right of the checkbox. This indicates that you have changed the tag state of the selected text but you have not applied (or saved) the changes.
  4. To apply the tag to the text, click Apply in the Conditional Tags panel.

If you have defined conditional indicators for the tag, the applied text reflects these indicators. For example, if you apply the tag to a paragraph of text and text color for the tag is defined as red, the text color of the applied text immediately changes to red.

You can apply multiple tags to a piece of text by selecting the text and selecting the tags in the Conditional Tags panel. You can also select text to which a tag is applied and then apply more tags to the text.

Some tips and details for using the Smart Catalog:

  • You can use the Smart Catalog keyboard shortcut to apply a conditional tag.

  • Press ctrl+4 to display the Smart Catalog to apply a conditional tag.

  • From the Smart Catalog select the tag to apply.

  • The state of the tag is updated in the Conditional Tags panel.

Applying conditional tags to tables

FrameMaker gives you visual indicators to identify and distinguish between the various conditional tags applied to tables.

If you choose the Color conditional indicator when you create the conditional tag, the table border is displayed with a hash of the selected color.

If you choose the Background conditional indicator when you create the conditional tag, the table border is displayed with a solid border of the selected color.

If you do not select either the Color or Background indicators, the table border is displayed with a black colored hash.

Applying conditional tags to anchored frames

FrameMaker gives you visual indicators to identify and distinguish between the various conditional tags applied to anchored frames.

If you choose the Color or Background conditional indicators when you create the conditional tag, the anchored frame border is displayed with a hash of the selected color.

If you do not select either the Color or Background indicators, the anchored frame border is displayed with a black colored border.

Applying multiple conditional tags

You can apply any number of tags to a single piece of text in structured or unstructured documents. You can also overlap tags across text.

If you apply multiple tags on the same text in a document, the following conditions hold:

Conditional indicators behavior:

If each tag has different conditional indicators, FrameMaker attempts to combine the indicators. For example, if you apply two tags with Color set to blue and yellow to a paragraph of text, the resultant text displays in green.

Show tag precedence:

The show tag takes precedence. If multiple tags are applied to a piece of text, and at least one tag is marked as show, the text will display.

If you apply multiple tags on overlapping text in a document, the following conditions hold:

Apply Show tag to a large piece of text and Hide tag to its subset:

If you apply a Show tag on a large piece of text and a Hide tag on a subset of text, all the text displays. The reason for this behavior is based on the Show tag precedence. Take the following unstructured document example:

If you apply a Show tag to a paragraph of text (a large piece of text), each sentence (subset) inherits the Show tag. So, if you apply a Hide tag on one sentence, that sentence now has a Show tag and a Hide tag applied. The paragraph displays because it has a Show tag applied. Also, based on the Show tag precedence, the sentence displays along with the paragraph.

Apply Hide tag to a large piece of text and Show tag to its subset:

If you apply a Hide tag on a large piece of text and a Show tag on a subset of text, only the subset displays. The reason for this behavior is based on the Show tag precedence. Take the following structured document example:

If you apply a Hide tag to an ordered list (<ol>), each list item (<li>) inherits the Hide tag. So, if you apply a Show tag on one list item, that item now has a Show tag and a Hide tag applied. The other list items do not display because each of them has inherited the ordered list Hide tag. However, based on the Show tag precedence, the list item on which the Show tag is applied displays.

Applying conditional tags at the book level

To apply one or more conditions that are common across chapters in your book:

Note: Your .book file can be a mix of both structured (.xml) and unstructured (.fm) files. However, you cannot apply conditions at the book level for .ditamap and .bookmap files.
  1. Select the .book file.

  2. Choose View > Show/Hide Conditional Text.

  3. Select the condition(s) that you want to apply to all files in the book.

  4. Select the Update Book After Apply option.

  5. Click Apply and click OK on the alert dialog.

  6. Click Update on the Update Book dialog.

    The selected condition(s) are applied to all files in the book.

Applying conditional tags in structured documents

In a structured FrameMaker document, elements are arranged hierarchically. FrameMaker allows you to apply conditional tags to any element in the document hierarchy. For example, you can apply a conditional tag to the definition list (<dl>) or any element contained within the list.

You need to take care not to break the structure of the document. If you apply a conditional tag to a mandatory child element and mark the tag as hidden, the document structure breaks. FrameMaker does not prevent you from doing this; however, the Structure View will indicate the break in the document.

Figure 6. Broken structure when the dt tag is marked as hidden
Broken structure in the Structure View when the dt tag is marked as hidden

Apply conditional tags to elements in a structured document

To apply a conditional tag to an element, by default, you need to select the entire element (in the Structure View panel). Then apply the conditional tag with the Conditional Tags panel or by using ctrl+4. However, if you set (or add) the following maker.ini flag, you can apply a tag to an element by placing the cursor anywhere within the element:

ApplyCondTillElementBoundaries=On

Processing Instructions for Conditional Tags

When you apply conditional tags to a structured document, the processing instructions to handle the tags are defined in the Structured Application. For details, see the Specifying conditional text output section of the FrameMaker Structure Application Developer’sReference.

Processing instructions for conditional tags applied to table columns

When you apply conditional tags to the columns in a table, FrameMaker adds processing instructions to enable round-tripping in the XML.

For example, the following processing instruction indicates that the condition ConditionCol1, is applied to the first column of the table:

<?Fm TableColumnCond start=0 end=0 ConditionCol1?>

The following processing instruction indicates that the condition ConditionCol1, is applied to the first column of the table:

<?Fm TableColumnCond start=1 end=2 ConditionCol2?>

Copying conditions across text

Understand how to copy conditional tags from one piece of content to other pieces of content.

You can copy the conditions applied to one piece of text to other pieces of text. For example, say two conditional tags are applied to one paragraph of text. You can use the special Copy & Paste functionality to apply both these tags to another piece of text.

To copy conditions across text:

  1. Select the text from which to copy the condition or conditions.

    Note: To check that you have selected the text correctly, ensure that the State checkbox in the Conditional Tags panel displays as checked.
  2. Choose Edit > Copy Special > Conditional Text Settings.

  3. Select the text to which to apply the tags.

  4. Choose Edit > Paste.

Removing conditional tags

Learn how to apply conditional tags. Understand the various objects where you can apply conditional text in Adobe FrameMaker.

Removing conditional tags from text

If you need to make a specific piece of text unconditional, you can remove the conditional tags applied to that text. In this case, FrameMaker does not delete the tags from the document catalog. This implies that you can apply the tags to other text in the document. To delete conditional tags from a document, see Deleting conditional tags.

  1. Select the text from which you want to remove the applied conditional tag.

  2. Open the Conditional Tags panel and deselect the State checkbox for the required Conditional Tag.

    Note: As soon as you click the State checkbox, an asterisk displays to the right of the checkbox. This indicates that you have changed the tag state of the selected text, but you have not applied (or saved) the changes.
  3. Click Apply in the Conditional Tags panel.

If you have defined conditional indicators (such as style, color, or background) for the conditional tag, the indicators are removed from the text from which you remove the tag.

Some tips and details for using the Smart Catalog:

  • You can use the Smart Catalog keyboard shortcut to a remove conditional tag.

  • Press ctrl+5 to display the Smart Catalog to remove a conditional tag.

  • The state of the tag is updated in the Conditional Tags panel.

  • From the Smart Catalog, select the tag to remove.

Removing all conditional tags from text

You can choose to remove all conditional tags that are applied to a piece of text in a document.

  1. Select the text from which to remove all the tags.

  2. Click Uncheck All in the Conditional Tags panel.

    Note: As soon as you click Uncheck All, an asterisk displays to the right of the checkbox for each conditional tag applied to the text. This indicates that you have changed the tags state of the selected text, but you have not applied (or saved) the changes.
  3. To remove all the tags from the text, click Apply in the Conditional Tags panel.

If you have defined conditional indicators (such as style, color, or background color) for the tags, the indicators are removed from the text from which you remove the tags.

Tip: Press ctrl+6 to remove all conditional tags from the selected text. The state of the tags is updated in the Conditional Tags panel.

Deleting conditional tags

See how you can show and hide conditional text and indicators in Adobe FrameMaker through conditional text dialog.

You can delete a conditional tag if it is no longer required to be applied.

  1. Select a tag and click Delete in the Conditional Tags panel.

  2. Click OK to confirm the delete operation.

  3. If the tag is used in a document, you are prompted to choose how to resolve the content to which the tag is applied.

    You can choose to set the content as unconditional, or you can choose to delete the content.

Important: When you delete a tag, it will be deleted from the document catalog. It will no longer be available for use in the document. If you need to remove a condition from content, do not delete the applied tag or tags.

Show or hide conditional text

See how you can show and hide conditional text and indicators in Adobe FrameMaker through conditional text dialog.

Conditional text in FrameMaker allows you to apply conditions to text. Once you have applied conditions, you can then decide, based on the applied conditions, the text to show or hide.

When you apply a tag to text in a document, the text is marked as conditional. If you have defined Conditional Indicators (such as style, color, or background color), the text on which the tags are applied is conditionally formatted based on the indicators. However, all text displays in FrameMaker. You still need to specify the text to show and text to hide based on the applied tags.

To show or hide conditional text, use the Show/Hide Conditional Text dialog.

Show/Hide Conditional Text dialog

After applying conditional tags to the text in a document, you use the Show/Hide Conditional Text dialog to set up and define the text to show or hide.

Figure 7. Show/Hide Conditional Text dialog
Show/Hide Conditional Text dialog in FrameMaker

Show All:

Default. All text in the document is displayed (unconditionally) irrespective of the conditions applied.

Note: The Show All option ensures that all text is displayed. However, the conditionalized text displays with the specified conditional indicators.
Show as per Condition:

Select this option and move conditional tags between the Show and Hide tag lists to specify the tagged text to show or hide, respectively.

Show if all Conditions Applied:

Select this option to ensure that any tagged text in the document displays only if all conditional tags selected in the Show list are applied to that text.

Show as per Expression

Select this option and choose a conditional expression that defines the show and hide conditions.

Show Conditional Indicators:

When you define conditional indicators for the conditional text in a document, by default, the text displays and outputs (PDF) with the indicators. You can choose to turn off this option.

Figure 8. Condition indicators (strikethrough and underline) identify two conditions.
Condition indicators identifying two conditions

Apply Show/Hide settings to Nested Books

If you have nested books in your main book file, then select this option to ensure that the conditional tags are applied to all nested books.

Update Book after Apply

Select this option to apply conditional tags to all files in your book.

Show/hide conditional text using conditional tags

  1. Open the Show/Hide Conditional Text.

  2. To show or hide text in the document using conditional tags, select Show as per Condition.

  3. Use the arrows to move tags between the Show and Hide conditional tag lists.

    For example, to show only text tagged as print; ensure the PrintOnly tag is in the Show list. Move all other tags to the Hide list.

    To show text tagged as PrintOnly and MobileOnly; ensure only these tags are in the Show list.

  4. To show and hide the conditionalized text depending on the list to which you add them, click Apply.

The conditional text is hidden or displayed.

If conditional indicators are applied to tags in the Show list, the corresponding tagged text displays with the specified indicators. You can choose to remove the indicators by unchecking the Show Conditional Indicators option in Show/Hide Conditional Text.

Important: If you plan to generate a PDF output of a document on which conditional text is applied, you need to turn off this option. If you keep the Show Conditional Indicators option on, the PDF output will display with the indicators.

Show/hide conditional text using conditional expressions

Using conditional tags, you can show or hide text depending on the tags you place in the Show and Hide tag lists, respectively. This means that any tag in the Show list causes the corresponding tagged text to display. However, consider the following example:

A document defines the Comment, PrintOnly, and MobileOnly conditional tags. Paragraphs in the document are tagged with different combinations of these tags:

  • Paragraph one is tagged as PrintOnly.

  • Paragraph two is tagged as PrintOnly and MobileOnly.

  • Paragraph three is tagged PrintOnly and Comment.

You need to set up the document to display only text tagged as PrintOnly and MobileOnly. If you move the PrintOnly and MobileOnly tags to the Show list, all three paragraphs display since all have either one of these tags associated. To handle this, you create conditional expressions that allow you to combine multiple tags with the and, or, and not operators.

In the above example, the expression “PrintOnlyandMobileOnly” ensures that only text with both PrintOnly and MobileOnly tags is included.

To create a conditional expression:

  1. In the Show/Hide Conditional Text dialog, click Build Expression.

    In the Manage Conditional Expression dialog, you can create or edit conditional expressions.

  2. To create an expression, enter a name for the expression.

    You build an expression using the available tags in combination with the and, or, and not operators.

  3. In the above example, click the PrintOnly tag and click the arrow to add the tag to the expression box at the insertion point.

    Alternatively, you can double-click the PrintOnly tag.

  4. Click and to add the operator after the PrintOnly tag.

  5. Click the MobileOnly tag and click the arrow to add the tag to the expression.

  6. Click Save.

    The conditional expression displays in the list.

  7. On the Show/Hide Conditional Text dialog, select Show as per Expression.

  8. From the Build Expression list, choose the required expression and click Apply.

The text is displayed based on the conditional expression.

Conditional expression might require grouping of sub-expressions in brackets. Take the example of a document with the following tags:

Platforms:

Win, Mac, and Unix

Versions:

Version 1.0, Version 2.0, and Version 3.0

Output:

PDF, HTML, EPUB, and RTF

To display text tagged as Win or Mac with all versions except Version 1.0 and output PDF or HTML, create the following expression:

Figure 9. Using parentheses to simplify conditional expressions
Using parentheses to simplify conditional expressions

When you create conditional expressions:

  • Tag names display in green text.

  • Tag names must be included in double-quotes.

    If you select a tag name from the Condition Tag list, the name displays in double-quotes. However, you can also enter the tag name manually. In this case, ensure that you enter the name in double-quotes.

  • Misspelled tag names are underlined with a red squiggly.

  • And, or, and not operators display in blue text.

  • Syntax errors display with a yellow background.

  • The Save button is disabled if there are errors in the expression.

Finalizing conditional documents

Learn how to finalize conditional documents in Adobe FrameMaker.

Before you produce a finished version of a conditional document, follow these guidelines:

FAQ and troubleshooting

Learn to troubleshoot conditional text in Adobe FrameMaker. Also, check the frequently asked questions on conditional text.

I have applied conditional tags to the text, but all of the text is being displayed.

You need to use the Show/Hide Conditional Text panel to specify the text to show or hide. For details, see Show/Hide Conditional Text dialog.

Can I apply two conditional tags to the same sentence?

You can apply any number of tags to text.

The tables cannot be tagged as conditional text.

You can apply conditional tags to a whole table, rows in a table, or columns in a table. For details, see Apply conditional tags.

I want to use the same conditional setting across all my books. How can I reuse the settings from one book to another?

You can import conditional tags and expressions from one document into another. For details, see Importing conditional tags and expressions.

Why does nothing happen when I change the state in the conditional text panel?

After you change the state of a tag in the Conditional Tag panel, you need to click Apply to apply the updates to the document text. For details, see Apply conditional tags.

How do I avoid unresolved cross-references?

Sometimes you insert a cross-reference to a paragraph, and the first word in the paragraph is conditional. The Cross-Ref marker that FrameMaker inserts is also conditional (with the conditional tag settings of the first word). The marker is hidden when you hide the conditions of the first word. As a result, the cross-reference is sometimes unresolved if the conditional tag settings of the cross-reference and of the cross-reference marker differ.

To avoid this situation, select just the Cross-Ref marker at the beginning of the source paragraph, and make it unconditional. Then the marker is always visible. The cross-reference is resolved no matter which version is visible.