Understand how to measure object size and position in FrameMaker.
As you arrange and resize objects in an illustration, you may want to know an object’s dimensions and exact position.
The size of an object is the size of the rectangle that encloses its path. The position is the distance from the top and left edges of the page or graphic frame.

Measure an object
Do one of the following:
Select the object and choose . The width and height of the object appear in the Size area of the Object Properties dialog box.
With Snap off, select the object, point on one of its handles, and hold down the mouse button. The dimensions appear in the status bar. If you move the mouse by mistake and resize the object, immediately choose .
View the position of an object
Select the object.
Choose . For all objects except equations and text lines, the distance from the upper left corner of the page or graphic frame to the object’s topmost and left-most point appears in the Offset From area. For equations and text lines, the distance from the upper left corner of the page or graphic frame to the alignment point at the baseline of the text line or equation appears in the Alignment Point Offset From area.
View the position of an object as you move it
Look in the status bar. The distance between the object and the upper-left corner of the page or graphic frame appears in the status bar. When rulers are visible, guidelines in the rulers also show the position of the object.
Measure any distance on the page
Point where you want to start measuring.
Shift+Control-drag to force a selection border to appear, but don’t release the mouse button.
When the selection border encompasses the area you want to measure, look in the status bar for the dimensions.
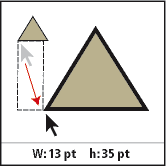
In the example, the important dimension is the height (35 points between the bases of the triangles).