Filter by attribute

See how you can filter the elements in a DITA topic in FrameMaker by attribute values.

You can filter the elements in a DITA topic by the attribute values. You can write a single topic, and set the required attributes to the conditional elements. You can then use the filter by attribute feature to filter elements based on the attribute values.

For example, in a specifications topic, you can set the product attribute to framemaker and robohelp on elements in the topic. Also, if the topic contains conditional content based on output, set the audience attribute to print (for PDF output) and web (for Web output). You then produce different output, based on the filters that you apply on the product and audience attributes.

Apply filtering attributes

Learn to apply filter attributes in a DITA topic in FrameMaker.

You can make elements in a DITA topic conditional by applying values to the attribute of the elements. You then create a filter in which you define the rules to include and exclude content based on the element attribute values.

Before you create topics with conditional content, you need to first plan the criteria for the output. For example, say that a topic has content that is conditionally targeted at administrators and end users. In the topic, you apply attribute values based on the target audience of the content (see Create filters). You then create a filter in FrameMaker in which you specify the elements to include and exclude based on the attribute value defined in the topic (see Create filters).

Set attribute values for elements

To allow FrameMaker to conditionally process elements in a DITA topic, you need to specify the elements to include or exclude from the output based on the attribute values. For example, you can set the audience attribute values for the content (elements) to admin, end_user, and author depending on the target audience.

You can set a value to any attribute in the elements in a DITA topic. You can then filter the content based on the specified attribute values.

Important: You can apply a filter to any element in a DITA topic. This implies that if you apply a filter that hides a mandatory element (such as Title), the structure of the topic will be broken.

To apply attributes to an element

  1. Select the element in the topic.

    You can select the element in the Structure View or in the Document view.

  2. Open the Attributes pod (Element > Edit Attributes) and enter the value for the specific element attribute.

You do not need to apply attributes to every element in your topic. You only need to apply attributes to elements that need to be conditionally filtered.

Tip: In the Attributes pod, choose the Required and Specified option to filter the attribute list to display the attributes that you have defined.
Keyboard shortcut to apply an attribute

You can use the Smart Catalog shortcut to apply attribute values to an element:

  1. Press Ctrl + 7 to display the Smart Catalog to set one or more attribute values for the current element.

  2. From the Smart Catalog select the required attribute.

    The Attributes pod displays with the attribute selected.

  3. Enter the attribute value.

    Note: With the attribute selected in the Attributes pod, you do not need to select the attribute. You can simply type to enter the attribute value.

Create filters

Know how you can create filters in FrameMaker, understand the various guidelines to create filter rules.

After setting up your content using attribute values to create conditional content, you create filters based on the content to show and hide. For example, you can filter your content to target administrators and authors and exclude end-users by creating the following filter:

(audience="admin" or audience="author")

Create a filter

  1. Choose View > Filter by Attribute.

    The Manage Attribute Expressions dialog appears.

    Manage Attribute Expressions dialog
    Manage Attribute Expressions dialog in FrameMaker

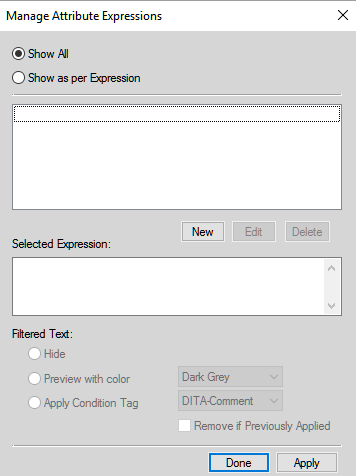
    Use this dialog to create, edit, delete and apply filters to DITA topics.

  2. To create a filter, click New.

    The Build Expression dialog appears.

    Build Expression dialog
    Build Expression dialog in FrameMaker

  3. In the Expression Tag text box, enter a name for the filter.

  4. In the Attributes list, choose an attribute to create the filter.

  5. In the New Value text box, enter a value for the selected attribute, and then click Add. Repeat this step to add the values that are assigned to the selected attribute in the topic. For details, see Set attribute values for elements.

  6. Select the type of rule Equal, Any, or Contains Only and click Add Rule.

    Equal:

    Filter content that is assigned the values in the Defined Values list for the selected attribute. Evaluates to true if any of the attribute values matches the specified value.

    For example, if the selected attribute is audience and the values in the Defined Values list are admin and authors, the rule defined is:

    (audience="admin" or audience="author")
    Any:

    Filter content for any value of the selected attribute. Evaluates to true if any of the attribute values contains the specified value.

    For example, if the selected attribute is audience, the rule defined is:

    (audience #ANY)
    Contains Only:

    Filter content with the only attribute values that are defined in the list. Evaluates to true if any of the attribute values only contains all of the specified values.

    For example, the following rule filters content that is tagged with the admin and end_user values:

    (audience # "admin", "end_user")

    This syntax is used as a shortcut to using the OR operator. The above example can also be defined using the OR operator:

    (audience = "admin" OR audience="end_user")
  7. Click OK.

  8. Click Done on the Manage Attribute Expressions dialog.

Important: The options described in the above steps are tools that enable you to create rules. However, you can enter the rule in the Expression text box.

Guidelines for creating filter rules

When you create a filter rule, you can choose to use the Add Rule button or you can enter the rule in the Expression box manually. When you choose to save a rule, FrameMaker checks the rule syntax. You cannot save a rule with an incorrect syntax.

Case of attribute name-value

The name of an attribute in a rule is case-sensitive. However, the value of the attribute is case-insensitive.

Correct:

(audience=”ADMIN” OR audience="end_user")

The above rule will filter content that is tagged with the attribute value ADMIN, Admin, or admin.

Incorrect:

(audience=”admin” OR Audience="end_user")

The attribute name must be defined with the same case as defined in the Attributes pod.

Attribute value

The value of an attribute must be enclosed within double-quote and cannot be empty.

Incorrect:

(audience="")

Do not use this rule to filter elements having any value for attribute. Instead, use the ANY operator described above.

Use of parenthesis

Each attribute name-value pair must be included within parenthesis.

Include only the same attribute within the same parenthesis.

Correct:

(audience="admin" OR audience="end_user" OR audience="author")

Incorrect:

(audience=”admin” AND product=”framemaker”)

Only the same attributes can be included in the same parenthesis.

Incorrect:

audience="admin" OR audience="end_user" OR audience="author"

The name-value pairs must be included in parenthesis. Even a single name-value pair must be included in parenthesis.

Use of AND operator

The AND operator cannot be used to filter the same attribute. It can only be used to filter different attributes.

Incorrect:

(audience="admin" AND audience="end_user")

Correct:

(audience="admin" OR audience="end_user") AND (product="framemaker")

Use of NOT operator

The NOT operator must be included before the opening parenthesis of an attribute name-value group.

Incorrect:

(audience="admin") AND (NOT product="framemaker")

Correct:

(audience="admin") AND NOT (product="framemaker")

Correct:

NOT (product="framemaker")

Use of ANY operator

To filter the content tagged with any value of an attribute.

Correct:

(audience #ANY)

The above rule includes all content tagged with the audience attribute irrespective of the value of the attribute.

Correct:

NOT (audience #ANY)

The above rule excludes all content tagged with the audience attribute irrespective of the value of the attribute.

Manage filters

Know how to manage filters in FrameMaker. Understand the manage attribute expressions dialog.

Use the Manage Attribute Expressions dialog for:

Edit filters

You can edit the name and definition of a filter. You can edit a filter that is currently applied to a topic. However, you will need to re-apply the filter to the topic. For details, see Set attributes.

To edit a filter

  1. In the Manage Attribute Expression dialog (View > Filter by Attribute), select the expression and click Edit.

    The Build Expression dialog is displayed.

  2. In the Build Expression dialog, edit the name and, or the rule of the filter.

  3. Click OK to save the changes.

Delete filters

If you delete a filter, the definition of the filter is removed from the topic catalog and can no longer be used in the topic. Also, if a delete filter that is currently applied to the topic, the filter is removed from the content in the topic. Since you can only apply one filter to a topic at a time, if you delete the currently applied filter, the topic displays all content. For details on applying filters to a topic, see Set attributes.

  1. In the Manage Attribute Expression dialog (View > Filter by Attribute), select the expression.

  2. Click Delete.

If the filter is not currently applied to the topic, you are prompted to confirm to delete operation.

If the filter is currently applied to the topic, you are prompted with the corresponding message. If you confirm the delete operation the filter is removed from the content.

Import filters

The filters in a topic are available for use in the topic where they are created. You can make these filters available to other topics by importing the definitions into other topics.

To import a filter

  1. Open the topic containing the filters that you need to make available in one or more other topics.

  2. Open the topic into which to import the filters from the source topic.

    If you are working in a FrameMaker book, you can multi-select the topics in the book into which to import the filters from the source topic.

  3. From the File menu, choose Import > Formats.

  4. In the Import Formats dialog, select the source document in the Import from Document drop-down.

  5. In Import and Update section, click Deselect All, check Filter by Attribute, and click Import.

When you import filters from one topic to another, besides the filters, the filter condition (Show All or Show as per Expression) is also imported. For details, see Set attributes.

If the destination topics contain filters with the same names as the source topic, these filters are overwritten.

After you import the filters from one topic to another, you will need to apply the filters to the destination topic content.

Set attributes

Understand how to set attributes or conditional tags after creating filters for a topic in FrameMaker.

After you create the filters in a topic, you can use these filters to show or hide content based on applied attributes. To filter content in a topic, you apply attribute values to the elements in the content (Set attribute values for elements). You then create filters based on the attributes applied to the content (Create filters). To show or hide the content based on the filters, you need to apply the specific filter to the content.

Important: An element that is not tagged with any attribute is unconditional. This implies that the content within elements that are not tagged is shown irrespective of the filter applied to the topic. The benefit of this functionality is that you do not need to tag every element in a topic. Elements that are not tagged with any attribute are not effected by any filter.

For example, say you apply the audience attribute (with values: admin, author, and end_user) to different parts of the content. You then create multiple filters:

(audience="admin" or audience="author")

Filter content targeted at administrators and authors.

(audience #ANY)

Filter content targeted at administrators, authors, and end users.

This means that you will apply a different filter depending on the required output.

At any point, you can apply only one filter to a topic. This means that you can create any number of filters and then depending on the required output, you apply the appropriate filter.

Apply a filter

  1. Open the Manage Attribute Expressions dialog (View > Filter by Attribute).

  2. To filter the content, choose Show as per Expression and select the required expression.

    For example, the following expression filters content that is tagged with the audience attribute set to admin or author:

    (audience="admin" or audience="author")

    This implies that any element tagged with the audience attribute set to any other value is excluded. However, if an element is not tagged with the audience attribute, it is not excluded.

    In the Filtered Text group, you choose how to filter the content:

    Hide

    Hide content as per the filter expression.

    Preview with color

    Display the font color of text as per filter expression with the selected color. Use this option for review purposes.

    Note: Use this option for content that is text-based. For example, if you apply this option to a table element, the font color of text in the table is not applied.
    Apply Condition Tag

    Apply a conditional tag to the filtered content.

    From the drop-down list, choose the conditional tag. The selected conditional tag is then applied to the filtered content.

    For example, say the audience attribute of conditional elements in a topic are tagged as admin, author, and end_user. If you apply the following filter to a topic:

    (audience="admin" or audience="author")

    The filter excludes elements tagged as end_user. If you choose the Apply Condition Tag option, the selected conditional tag is applied to the excluded elements. For details on how to apply conditional tags and show / hide content using conditional text, see Conditional text.

  3. Click Apply.

FAQ and troubleshooting

See the common FAQ’s and troubleshooting tips for attributes and filters in FrameMaker.

I set an attribute for an element and then applied a filter that excluded the element based on the attribute. However, the element is still visible:

If you make changes in the content or the filter expression, you will need to apply the filter to the topic. For example, if you apply a filter to the topic and then tag an element with an attribute that is included in the filter, the filter is not immediately applied to the updated content. You need to apply the filter to the topic.

I applied a filter to a topic and the structure of the topic is now broken:

You need to take care not to break the structure of the topic. If the filter that you apply to a topic causes a mandatory element to be hidden, the topic structure is broken. FrameMaker does not prevent you from doing this; however, the Structure View will indicate the break in the topic.

Broken structure caused because the dt tag is hidden by the applied filter
Document structure beaks because a tag is hidden by the applied filter

What happens if I apply different attributes to child and parent elements in a topic?

If a filter causes a parent element to be hidden then the child elements are hidden, irrespective of the attributes applied to the child elements. However, if a filter causes a parent to be shown and a child to be hidden, the child is hidden.


April 29, 2020

Legal Notices | Online Privacy Policy