Copy and arrange objects
Cut, copy, or paste an object by using the clipboard
1)Select the object and choose Edit > Cut, or Edit > Copy.
2)Do one of the following:
•To paste the object on a page, click in the margin of the page.
•To paste the object in an existing graphic frame, click the frame’s border to select the frame.
•To paste the object in text, click in the text where you want to paste the object.
3)Choose Edit > Paste. When you paste the object in a graphic frame or on a page that is the same size as the one from which you copied or cut the object, FrameMaker XML Author puts the object in the same relative location. Otherwise, FrameMaker XML Author centers the object.
When you paste an object into text, FrameMaker XML Author creates an anchored frame to hold the object, and centers the object in the frame. An anchor symbol  appears at the insertion point when text symbols are visible.
Copy an object by dragging
1)Select the object.
2)Point on the object (not on a handle), and Alt-drag the duplicate of the object, or right-drag the object and then choose Copy Here from the menu. To constrain the duplicate’s movement to either a horizontal or vertical direction, hold down Shift while you drag.
Delete an object
1)Select the object and press Delete.
Move an object
1)Select the object.
2)Do one of the following:
•Drag in the direction you want to move the object.
•To move the object horizontally or vertically, Shift-drag.
•To move an object into a graphic frame, drag it until the pointer is in the frame.
•To move an object out of a graphic frame, drag it until the pointer is outside the frame. As you drag, the frame’s border may temporarily crop the object.
When you drag the object, the status bar shows the distance from the upper-left corner of the object to the upper-left corner of the page (or frame, if the object is in a graphic frame). When rulers are visible, lines in the rulers show you the object’s position. If the snap grid is on, objects snap to the invisible grid as you drag them.
tip: If your screen does not redraw properly when moving an object, press Ctrl+l (lowercase L) to redraw the screen.
•To move an object in small increments, hold down Alt and press an arrow key to move 1 point, or hold down Alt+Shift and press an arrow key to move 6 points. However, do not use an arrow key on the numeric keypad.
The preceding distances assume a 100% zoom setting. The actual distance moved depends on the current zoom setting, so you can do finer work when you’re zoomed in closer. For example, at 200% zoom, the distance is halved. At 50% zoom, the distance is doubled.
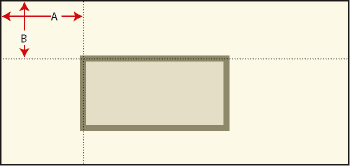
•To specify the exact position of an object, select the object, choose Graphics > Object Properties, do one of the following and apply the changes:
–For all objects except text lines and equations, specify the offset from the top and left edges of the page or graphic frame in the Offset From area.
A. Offset from left B.Offset from top
–For text lines and equations, specify the offset in the Alignment Point Offset area.
Left-aligned text line
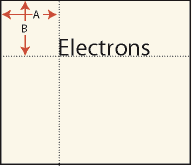
A.
Offset from left
B.
Offset from top
Align text lines
When you create a text line, it is left aligned on its alignment point (where you clicked). You can change the alignment to centered or right aligned. FrameMaker XML Author then maintains the text line’s alignment when you insert text.
1)Select the text line and choose Graphics > Object Properties.
2)Choose a new alignment from the Alignment pop-up menu and click Align.
Make lines intersect cleanly
Lines intersect cleanly when they are the same thickness, meet at right angles, and use a projecting cap; lines don’t intersect cleanly when they use a projecting cap but don’t intersect at right angles. Notice the different intersections created by using the three line cap styles.
1)Do one of the following:
•If the lines don’t meet at a right angle, try a round cap for both lines.
•If the lines aren’t the same thickness, try a butt cap for the thinner line when the lines meet at their endpoints and for the stem of a T when they meet in a T.
For information on changing the line cap style, see Change the line end style.