Add links to related content
The topic, task, concept, and reference types define a related-links element that you can use to add links to related content.
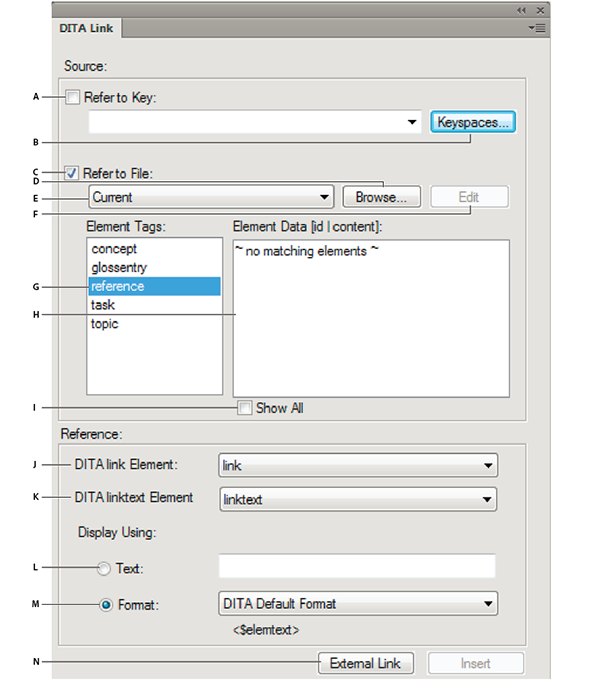
DITA Link dialog
Use the DITA Link dialog to insert direct and indirect link to DITA content.
Dita Link dialog
Use the DITA Link dialog to:
A (Refer to Key):
Check this option to create a link using indirect referencing and choose a key from the drop-down list. See Create a DITA link.
B (Keyspaces):
Open the DITA Keyspace Manager dialog. In this dialog, you Create a keyspace and Set the default keyspace for the current topic.
C (Refer to File):
Check this option to create a link using direct referencing. See Create a DITA link.
D (Browse):
Browse for a DITA topic containing the reusable elements.
E (DITA topic list):
Select a DITA topic from the list of currently opened topics for direct references.
F (Edit):
Open the source DITA topic in FrameMaker to edit.
G (Element Tags):
Select an element tag to list the elements of that tag in the Element Data list.
H (Element Data):
Select an element to include as a link. The link element defines a relationship to another topic.
I (Show All):
Show all elements of the element type. The Element Data list also displays elements that are not assigned unique identifiers. You can select to create a link of elements that are not currently assigned a unique ID. In this case, FrameMaker assigns a unique ID to the element in the source topic.
J (DITA link Element):
Choose the link element to use. By default, the element is link.
See the specifications on link.
K (DITA linktext Element):
Choose the element that provides the literal label or line of text for a link. By default, the element is linktext.
See the specifications on linktext.
L (Text)
Specify the link text to display as literal text,
M (Format)
Or, choose Format and select a format from the drop-down list:
DITA Default Format
Display the title of the reference topic.
See_Title_and_Page
Display See <topic title> on <page number>.
Title_and_Page
Display <topic title> on <page>
N (External Link)
Insert a link to an external (non-DITA) resource. In the DITA External Link dialog, enter the external link in the Link Target (href) field. Optionally, you can specify a link text. Else, the link entered in the Link Target (href) field is used for the link text.
Create a DITA link
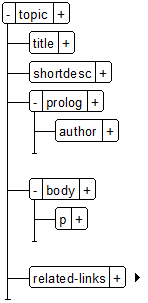
1)If you are inserting the first link in the related-links element, place the insertion point to the right of the related-links element.
Place insertion point to the right of related-links element
2)From the Elements pod (Element > Element Catalog), insert the link element.
The DITA Link dialog is displayed.
3)Choose a link target.
You can choose to add a link as a direct or indirect reference to the target content. For details, see DITA referencing.
To add an indirect link, you need to use DITA key-references. For more details on key-references, see Using keyspaces to manage DITA key references.
a)Click Refer to Key and click Keyspaces.
b)In the DITA Keyspace Manager dialog, select the key in the Defined Keys list and click OK.
To add a direct link, you choose the DITA topic (.xml file) to which you want to create the link:
a)Check Refer to File and choose the file containing the reference topic.
You can select a reference topic from the current topic, any currently opened topic, or use the browse button to select an unopened topic.
b)In the Element Tags list, select the topic type to reference.
c)In the Element Data list, select the topic to reference.
4)Choose the link element to use.
5)Choose the element to display the link text.
6)In the Display Using section, specify the text or format to display in the link.
7)Click Insert.