Working with elements
The elements in a structured document depend on the structured application on which the document is based. When you create a structured document, the element catalog for the document is populated with the elements defined in the application.
Elements catalog
You use the Elements catalog to view and work with the elements defined in the associated structured application.
To open the Elements catalog for the current document, choose Element > Element Catalog.
Element pod
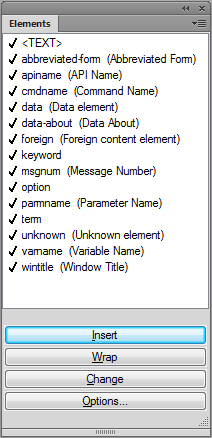
To maintain the structure of the document, the Elements catalog displays only valid elements. This implies that the catalog displays only elements
•defined in the associated structured application
•valid at the current location
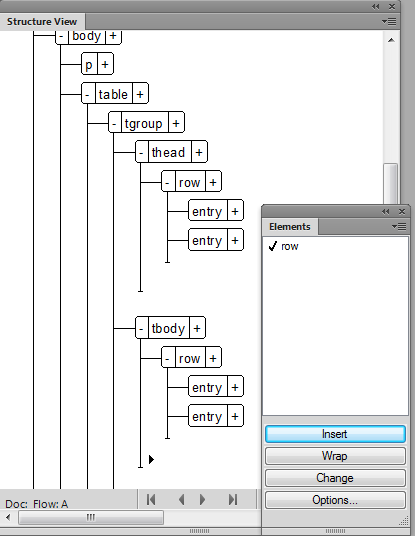
For example, say a structured application defines a table element that contains row elements. The row element is displayed in the Elements catalog only if the insertion point is placed at the appropriate location in the table element.
Elements catalog displaying valid row element
Use the Elements catalog to:
Insert
Insert an element into the document hierarchy. See Insert an element.
Wrap
You can change the format of content within an existing element. For example, you can set one or more words in the paragraph to bold. Since structured documents are element-based, the structured application needs to enclose the word or words within an appropriate element. See Wrap an element
Change
You can choose to change the enclosing element in the hierarchy. For example, you can change a paragraph (p) to a note (Note). See Change an element.
Options
You can customize the display of elements in the Elements catalog based on the options in the Set Available Elements dialog. See Configure the Elements catalog.
Insert an element
1)Place the insertion point at a location in the document hierarchy.
2)Select the required element in the pod.
3)Click Insert to insert the element in the document hierarchy.
4)If the Attributes for New Element dialog is displayed, specify the required attributes and click Insert Element.
You can also click Insert Element and specify any attributes later. For details on attributes of elements in a document, see Working with attributes.
note: Double-click an element in the dialog as a shortcut to insert.
If the element is text-based (paragraph or note), you can start typing into the document. FrameMaker ensures that the text is inserted within the element boundaries.
If the element is image-based, the file selection dialog box is displayed.
If the element is table-based, the Insert Table dialog box is displayed.
note: The file selection or Insert Table dialog boxes display only if the functionality to display the dialog boxes is implemented in the structured application on which the current document is based.
To change how FrameMaker functions when you insert an element into the hierarchy, use the options in the New Element Options dialog (Element > New Element Options):
Always Prompt for Attribute Values
Display the Attributes for New Element dialog every time you insert an element into the document.
Prompt for Required Attribute Values
Display the dialog only if the associated structured application specifies mandatory attribute values for an element. If you do not specify the values, the structure of the document is broken. However, you can specify the values later.
Do Not Prompt for Attribute Values
Does not display the dialog when a new element is inserted in the hierarchy.
Allow Automatic Insertion of Children
If an element contains child elements, insert the child elements when the parent element is inserted.
The child elements inserted along with the parent depends on the rules defined in the associated structured application. For example, in a DITA topic, if you insert an ordered list (ol) element, one list item (li) element is also inserted. If you disable this option, an empty ordered list element is inserted.
Process AutoInsertion Rule Recursively
If an element contains descendant elements (child elements that also contain children), insert all the descendant elements when the parent element is inserted.
The descendent elements inserted along with the parent depends on the rules defined in the associated structured application. For example, in a DITA topic, if you insert an ordered list (ol) element, one list item (li) element is also inserted. Inside the list item element, a paragraph element is inserted. If you disable this option, an ordered list element is inserted along with the list item element.
Keyboard shortcut to insert an element
1)Press Ctrl + 1 to display the Smart Catalog of valid elements.
2)From the Smart Catalog select the required element and press Enter.
Wrap an element
1)Select the content and click the element in the dialog.
2)Click Wrap to enclose the selected content within the element boundaries.
note: If you are sure that the selected element in the dialog is a format-based element, such as bold or italic, the double-click shortcut will work. However, if the element is not format-based, FrameMaker will try to insert the element (for example a table) at the selected location. You can verify the validity of the document structured in the Structure View.
Keyboard shortcut to wrap an element
1)Select the element in the document to apply a format.
2)Press Ctrl + 2 to display the Smart Catalog of valid elements.
3)From the Smart Catalog select the required element and press Enter.
Change an element
1)Select the element in the Structure View pod that you want to change.
2)Select the element in the Elements catalog to which you want to change and click Change.
note: FrameMaker will make the best effort to change the element.
Keyboard shortcut to change an element
1)Select the element in the document to change.
2)Press Ctrl + 3 to display the Smart Catalog of valid elements.
3)From the Smart Catalog select the required element and press Enter.
Configure the Elements catalog
Click Options to open the dialog to:
Valid Elements for Working Start to Finish
Displays only elements that are valid at the current insertion point in the hierarchy. The order of the elements in the pod is the same as they are defined in the structured application.
Choose this option if you plan to go through a document from start to finish and fill in the elements in their correct order and hierarchy.
Valid Elements for Working in Any Order
Displays only elements that are valid at the current insertion point in the hierarchy.
Choose this setting if you plan to build a valid document but not necessarily by working from start to finish. This is helpful if you do not have all the information you need.
Elements Allowed Anywhere in Parent
Displays all elements that are valid for the current parent.
Choose this option if you want more flexibility for filling in elements. You can insert elements that are invalid and correct the errors later.
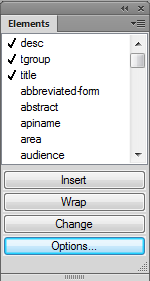
All Elements
Displays all elements available in the element catalog defined in the structured application. However, the valid elements at any insertion point are preceded with a check mark.
Choose this option if you:
a)are not building a valid document
b)want flexibility and will correct errors later
c)are wrapping elements around contents
d)want to see what is available elsewhere in the document
Check mark against valid elements
Customized List
Click Edit to open the Customized List of Available Element dialog. You can then choose the elements to show or hide. Use the Move Up and Move Down buttons to specify the order in which the elements display in the pod.
Choose this option to:
•work with a pre-defined subset of the elements
•display elements in a specific order
•work with an element list that is static and not context specific
important: This is a fixed list so the list does not also include elements valid at the current insertion point unless you have selected the elements when creating the list.
Show Element Description Tags
Displays the description of an element, in brackets, to the right of the element.
List After Other Valid Elements
Depending on the options selected above, the pod may contain elements that are invalid at the specified location. Choose this option to display valid elements first, followed by invalid elements.
Manage elements
When working with elements in a document, you use the Elements catalog to insert, wrap, and change the elements. However, you can also, merge multiple elements in a document, you can split a single element into multiple elements, and unwrap elements in a document.
Merge elements
You can merge multiple similar and contiguous elements in a document. For example, you can merge two or more p tags to include the contents into one p tag. You can merge multiple lists (ordered or unordered) to include the elements of the different lists into one list.
1)To select multiple similar elements in the Structure View pod, click the first element then keeping the Shift key pressed, click the other elements that you want to merge.
note: The elements that you want to merge must be contiguous (placed next to each other in the document hierarchy).
2)From the Element menu, choose Merge.
Alternatively, you can right-click the selection and choose Merge from the pop-up menu.
The multiple elements are merged into a single element of the same type.
Split an element
You can split a single element into two elements. For example, if a list contains multiple list items, you can split the list into two lists. The list items in the two new lists depends on the item you selected to split the list. Also, if a paragraph of text contains a piece of text that is wrapped in an element, you can split the paragraph at the wrapped element.
1)Select the element at which point you want to split the parent.
For example, select the list item at the point where you want to split a list.
Or select the wrapping element at the point where you want to split a paragraph.
2)From the Element menu, choose Split.
Alternatively, you can right-click the selection and choose Merge from the pop-up menu.
The parent element is split at the selected child element.
note: You cannot split the contents of a table. Also you need to ensure that the splitting of an element does not break the structure of the document.
Unwrap element text
If you can wrapped text inside an element (Wrap an element), you can choose to remove the text from with the wrapping element.
1)Select the element that wraps text in a document.
2)From the Element menu, choose Unwrap.
Alternatively, you can right-click the selection and choose Unwrap from the pop-up menu.
The wrapping element is removed from the text.
Banner text
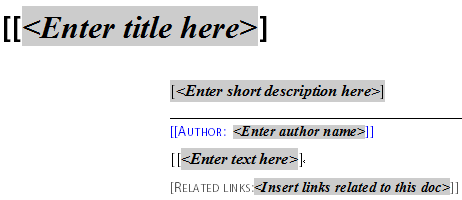
Banner text in a document acts as a visual cue to working with the element in a document. For example, the following document based on the DITA topic structured application, displays banner text:
Banner text indicates what you should enter in various elements
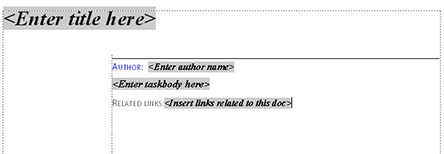
When you place the cursor on the banner text, the entire text is selected, you can then start typing and the banner text is replaced.
Show or hide banner text
You can choose to display or hide the banner text in a document. By default, the banner text is displayed.
To show or hide the banner text, from the View menu, choose Element Banner Text.
Remove banner text on delete
If you select the banner text in an element and press the Delete key, the banner text is removed. However, if you do not type any text in place of the banner text, as soon as you move to another element, the deleted banner text is displayed in the element.
You can choose to override this default behavior and ensure that the banner text, if deleted, does not reappear. The banner text will not reappear even if you close and reopen the document.
To ensure that the banner text remains deleted, you need to set the RedisplayBannerTextForemptyElements flag in the maker.ini file to OFF.
Banner text settings
Besides the RedisplayBannerTextForemptyElements flag described above, you can also configure banner text using the following settings in the maker.ini file:
|
Property |
Description |
|---|---|
|
BannerTextFontFamily |
Font family of banner text |
|
BannerTextFontWeight |
Font weight of the banner text |
|
BannerTextFontAngle |
Angle of the banner text, |
|
BannerTextFontVariation |
Any variation of the font width |
|
BannerTextBKcolor |
Banner text background color |
Element boundaries
When you are working on a structured document in the WYSIWYG view, you can use the element boundaries as visual cues. An element boundary marks the beginning and end of an element in the WYSIWYG view. You can then use these boundaries as a visual cue to place the insertion point or select the text within a boundary. If you want to insert another element before or after an element in the document, you can place the insertion point before or after the opening or closing boundary of the element and Insert an element.
To place element boundaries as square brackets around the content, choose View > Element Boundaries.
Document with element boundaries in WYSIWYG view
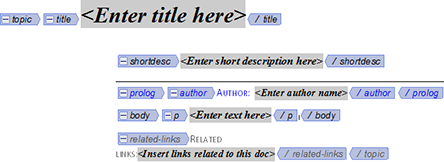
To display the tag names of the element in the element boundaries, choose View > Element Boundaries (as Tags).
Document with element boundaries with tags in WYSIWYG view
Create output with banner text and element boundaries
Banner text and element boundaries are part of the WYSIWYG view of a FrameMaker document but are not included as part of the document content. For example, if you are working in an XML document, the banner text and element boundaries are not available in the XML View.
Save as PDF
Since banner text and element boundaries are part of the WYSIWYG view, they are included in the PDF output, if you use the Save As PDF functionality of FrameMaker.
Multi-Channel Publishing
Since banner text and element boundaries are not part of the document content, they are not included in any of the Multi-Channel publishing output formats.