Quick Element Toolbar
The Quick Element Toolbar contains commands that allow users to quickly insert (list, table, image) and wrap (bold, insert) commonly used elements in a structured authoring document.
The toolbar is supported for Structured FrameMaker and XML Author (not supported for the code view). It is specific to a structured workspace-view combination. The icons in the toolbar are enabled / disabled based on the current context (cursor position) of the application.
See the video, Quick Element Toolbar.
Using the Quick Element Toolbar
The out-of-the-box functionality provided by FrameMaker supports the DITA element structure. To use this toolbar, you will need to create a DITA document.
1)Create a new DITA topic.
From the File menu, choose New -> XML.
2)In the New XML dialog, go to the DITA tab, select Topic, and click OK.
3)To display the Quick Element Toolbar, from the View menu, choose Toolbars -> Quick Element Toolbar.
Quick Element Toolbar
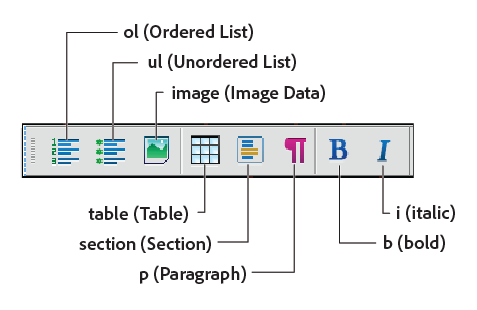
4)As you place the document insertion point at a section in the document, the relevant options in the toolbar are enabled.
This functionality is the same as the elements that are displayed (or hidden) in the Elements catalog.
5)If you hover the mouse pointer over a button on the toolbar, the tooltip displays the name and description of the element as it displays in the Elements catalog.
6)To insert an element (example: ol, ul, table) in the document, place the insertion point at the relevant point in the document and choose the element on the Quick Element Toolbar.
7)To wrap an element (example: bold, italic) in the document, select the element and click the element on the Quick Element Toolbar.
Customization
The out-of-the-box functionality provided by FrameMaker supports the DITA element structure. However, you can customize the toolbar to associate the commands with any custom structured application.
You can customize the commands in the Quick Element Toolbar by adding commands associated with other elements from the Element catalog of the structured application. For example, you can add a command to insert a ph (phrase) element in the current document.
Each FrameMaker view-workspace combination has an associated Quick Element Toolbar configuration XML file (quick_element.xml). Each configuration file contains the information that associates the toolbar with one or more structured applications. The file also contains information that associates toolbar commands with the corresponding elements in the Elements catalog.
Configuration XML file locations
The following table lists the locations for the quick_element.xml for the corresponding FrameMaker mode / view:
|
FrameMaker Mode - View |
Quick Element Toolbar config file location |
|---|---|
|
Structured FrameMaker - Author view |
fminit\WorkSpaces\Structured\AuthorView\toolbars |
|
Structured FrameMaker - WYSIWYG view |
fminit\WorkSpaces\Structured\WYSIWYGView\toolbars |
|
Structured FrameMaker - Simplified XML view |
fminit\WorkSpaces\Structured\FormView\toolbars |
|
FrameMaker XML Author - Author view |
fminit\WorkSpaces\XMLAuthor\AuthorView\toolbars |
|
FrameMaker XML Author - WYSIWYG view |
fminit\WorkSpaces\XMLAuthor\WYSIWYGView\toolbars |
|
FrameMaker XML Author - Simplified XML view |
fminit\WorkSpaces\XMLAuthor\FormView\toolbars |
important: To make changes to the Quick Element Toolbar, you can edit the corresponding configuration files for each workspace-view. Alternatively, you can make changes only to the toolbar in a specific view.
Create a Quick Element Toolbar
The following steps include associating a new toolbar with a custom structure application. It also includes associating the commands in the toolbar with elements in the Element catalog of the structured application.
1)Open the quick_element.xml file in a text or XML editor.
note: To include the toolbar in all the views, you will need to update the quick_element.xml files in all the above locations.
The XML file contains one STRUCTURED_APPLICATION node for each structured application.
This node contains one ELEMENT node for each command in the Quick Element Toolbar.
2)To create a toolbar for the custom application, you can simply duplicate one of the existing STRUCTURED_APPLICATION nodes.
3)Set the app_name attribute to the name of the custom application.
<STRUCTURED_APPLICATION app_name="<Custom app name>">
From the Element catalog for the custom application, choose the elements for which you want to create commands in the custom application Quick Element Toolbar.
For each element, create one ELEMENT node in the STRUCTURED_APPLICATION node.
4)Set the elemTag attribute to the new command.
For example, to add a command to insert the ph (phrase) element:
<ELEMENT elemTag="ph">
5)You also need to associate each command to an icon. The steps to set the icon for a command is described in the Customize icons section.