Build a structured application
To enable XML import and export for structured proposals, you need to set up a structured application, which lists the components of the structured authoring environment.
First, you need to create a document type definition (DTD) that matches the EDD.
Create a DTD
1)Open the proposal_edd.fm file in structured FrameMaker.
2)Select StructureTools > Save As DTD. Specify the filename (proposal.dtd) and where you want to save the file, and then click Save.
3)In the Use Structured Application dialog box, leave the default selection, <No Application>, and click Continue.
4)In the Select Type dialog box, select XML and then click OK. The DTD file is written out to the location you specified.
You also need a structured template that contains formatting and EDD information.
Create a structured template
1)Open the structured_proposal.fm file.
2)Delete all content from the file. A structured template must be empty.
3)Save the file as proposal_template.fm.
Now, you are ready to configure the structured application.
Configure the structured application
1)Select StructureTools > Edit Application Definitions. This command opens the structapps.fm file - in which application definitions are stored— from the following location:
%appdata%\Adobe\FrameMaker\<version>\
note: Like the EDD, the application definition file is itself structured.
2)Insert an XMLApplication element as a child of the StructuredSetup element.
3)Type Proposal for the application name.
4)Insert a DTD element and specify the following as the DTD element text:
$STRUCTDIR/proposal/proposal.dtd
5)Insert a Template element and specify the following as the Template element text:
$STRUCTDIR/proposal/proposal_template.fm
6)Select File > Save to save the structapps.fm file.
7)Select StructureTools > Read Application Definitions to update FrameMaker with the new application definition.
note: To verify that the application is installed correctly, select StructureTools > Set Structured Application to display the Set Structured Application dialog box. If you set up the applications definitions correctly, Proposal appears in the drop-down list object.
Finally, you need to copy the application files into the directory where the structured application definition expects them.
Copy the application files
1)Locate your FrameMaker installation folder using the file explorer, and navigate to the Structure\xml folder.
2)In the xml folder, create a proposal folder.
3)Copy the proposal.dtd and proposal_template.fm files into the proposal folder.
Build structure files
Decide whether to use an existing standard or create your own structure.
Create structure files without using an existing standard
1)In FrameMaker, create an EDD that matches your structure requirements.
2)Test the EDD to verify that the structure definitions are correct.
3)Add formatting to the EDD, and test the EDD to verify that the formatting works correctly.
4)Create a DTD from the EDD.
You now have the two structure definition files you need—one for FrameMaker (EDD) and one for XML (DTD).
Use an existing standard
1)Obtain a copy of the standard files, and modify the provided DTD or schema file to match your requirements.
2)Open the completed structure file in FrameMaker to create an EDD, and add formatting to the EDD.
note: FrameMaker includes several variations of DocBook as sample structured applications. If you plan to create DocBook-based structure, consider modifying one of the provided applications.
Once you have your structure definitions, you need to set up the structured application.
Set up the structured application
1)Open the structapps.fm file (select StructureTools > Edit Application Definitions).
2)Add a new application definition to the file with pointers to your EDD and DTD/schema files.
After setting up the application, you’ll want to fine-tune the import/export settings.
Using the Structured Application Designer
The Structured Application Designer allows you to create a structured application using a graphical wizard.
To launch the structured application designer, click StructureTools > Structured Application Designer. The Structured Application Designer is displayed as follows:
Structured Application Designer
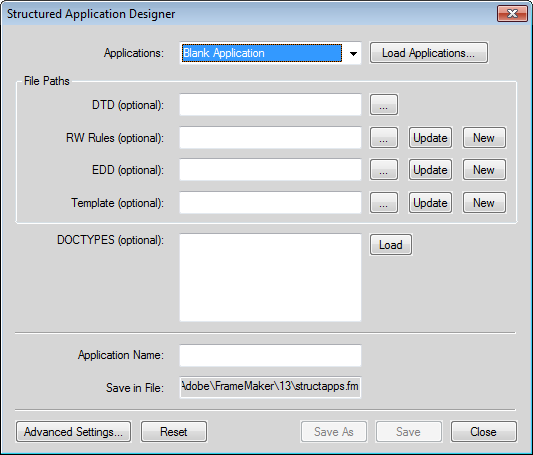
1)Select a base application on which the new application is based. To load a new set of base applications, click Load Applications... and select the relevant structured application file. The list of applications is automatically populated from the selected structured application file.
2)Optionally, enter the DTD, the read/write Rule file, the EDD, and the template files, along with any document type specifications.
3)Enter the name for the new application.
4)By default, the application is saved in the structapps.fm file in your application directory. To change the filename, click Save As and select or enter a new filename.
5)Optionally, to set advanced settings, click Advanced Settings... and make your desired selections.
To create a read/write Rule file, based on an existing DTD, specify the DTD and click New from the RW Rules section. The read/write Rule File Maker is then displayed.
note: If you do not specify a DTD, an empty read/write Rule File is created. You can then add rules using the read/write Rule File Maker.
•To update an existing read/write Rule file, select the file and click Update. Make your changes in the read/write Rule File Maker.
•To generate a new EDD, select the DTD and click new from the EDD section. All elements are loaded in the EDD interface. From the EDD interface, you can select Element Paragraph Format Tags for every element.
•Click Import Format settings to import format settings from another EDD.
•Click Save to save your changes or Reset to roll back to the last saved state.
•To update an EDD, select the EDD and click Update.
•To generate a new template, select the corresponding EDD file and click New from the Template section.
Fine-tune the import/export settings
1)Set up a read/write rules file with the necessary mappings, and set up XSL transformation files with any additional changes.
2)Add a reference in the structured application definition to the read/write rules file and the XSL transformation files.
3)Add any other required configuration settings, such as handling of conditional text and external cross-references, in the structured application definition.
Using the read/write Rule File Maker
FrameMaker includes a powerful read/write Rule File Maker that helps you author rules easily. This helps simplify rule generation, since you have all the settings at one place, and do not have to remember any rule syntax.
To launch the read/write Rule File Maker, click StructureTools > New Read/Write Rules. Select the Launch Rule File Maker option and click OK.
note: Optionally, you can specify the DTD to be used when creating the rules.
The Rule File Maker dialog is displayed as follows:
Rule File Maker
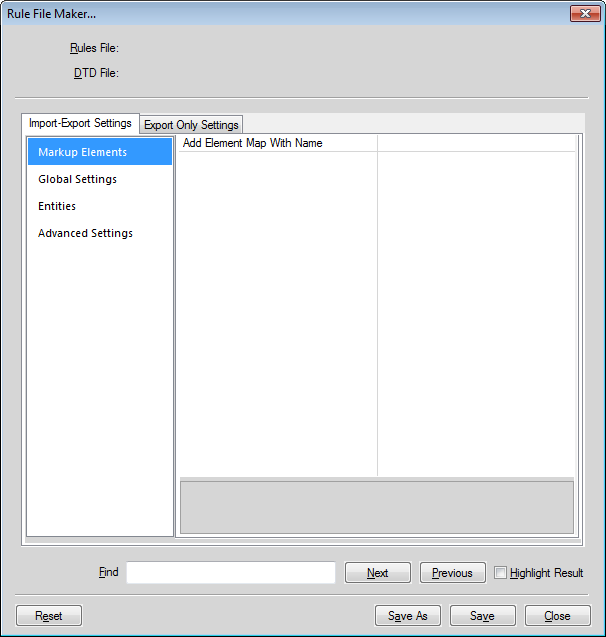
The Rule File Maker has two basic sections:
•Import-Export Settings: These settings are applicable for the reading and writing operation.
•Export-Only Settings: These settings are not covered in the Import - Export Settings and are only applicable for the writing operation.
The Import-Export Settings section is divided into four sections:
1)Markup Elements: Allows editing of all markups present in the specified DTD. To see a list of all elements, select ‘select from DTD’ from the value drop-down. FrameMaker, then displays a list of elements. You can select multiple elements from the list and click OK to insert the selected elements into the read/write Rule File Maker.
2)Global Settings: Displays the list of settings that are applied to ALL elements globally.
3)Entities: Displays the list of all entities that are present in the DTD.
4)Advanced Settings: Contains advanced settings for Books and Character Maps.
The Export Only Settings section is divided into three sections:
1)FM Objects: Lists the type of FM Objects present. In addition, each FM Object category lists the markups mapped as that object. For example, if you map markup M1 to the Table FM Object in the Import-Export Settings section, the Table list in the Export Only Settings section displays the markup M1.
2)Global Settings: Displays the list of settings that are applied to ALL elements globally.
3)Advanced Settings: Contains advanced settings for SGML, DITA, Variables, and Character Maps.
When saving the rules, FrameMaker saves only the elements and the rules that have been modified (modified elements have their values marked in bold, on the right pane). Default behaviors are not saved.