Insert cross-references
You can insert cross-reference in a document to point to another section of the current document or you can point to a section in another document. You can Insert cross-references in documents or Insert a cross-reference to an element in structured documents.
Cross-Reference dialog
You use the Cross-Reference dialog to insert a cross-reference in a document.
Cross-reference dialog
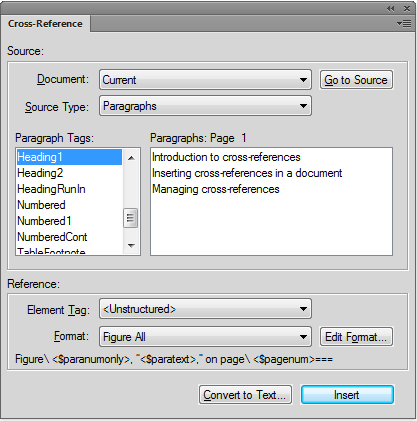
In the Cross-Reference dialog
Document
Select the document containing the destination location for the cross-reference.
note: If the cross-reference is pointing to location in another document, you need to open the document.
Go to Source
Navigate to the location of the cross-reference. If the cross-reference is located in another document, open the document and navigate to the selected paragraph tag.
Source Type
Choose the type of content of the destination location:
Paragraph
To Insert a cross-reference to a paragraph in a document
Cross-Reference Markers
To Insert a cross-reference to a Cross-Ref marker in a document
Elements Listed in Order / Elements Sorted by ID
To Insert a cross-reference to an element in structured documents.
You can choose to list the elements in the document by the order in which the elements appear in the document. Alternatively, you can list the elements by the unique ID applied to each element.
Source Type lists
Depending on the source type selected above, the list on the left below display the paragraph tags, cross-references, or element types in the selected document.
The list box on the right displays the specific paragraphs, cross-references, or elements.
Element Tag
Choose the element tag (for example XRef) to use for the cross-reference. For details, see Insert a cross-reference to an element in structured documents.
Format
Choose a format to display the cross-reference in the current document. For details, see Managing cross-reference formats.
Edit Format
By default, FrameMaker provides a list of cross-reference formats. Choose this option to add, edit, or delete from this list. For details, see Managing cross-reference formats.
Convert to Text
Displays the Convert Cross-Reference to Text dialog.
In this dialog, you can convert to editable text:
•selected cross-references
•cross-references with a specific Format
•cross-references with a specific Element tag
•all cross-references in the current document
Insert / Replace
Insert a cross-reference at the specific location. See Insert cross-references in documents. If you select an existing cross-reference, the Replace option is available to update the cross-reference. See Updating cross-references in a document.
Insert cross-references in documents
In documents, you can insert a cross-reference to a paragraph (for example, headings) in a document or a text inset within the document. You can also insert a cross-reference to a word or phrase in a document. In structured document, you can also insert cross-references to elements in the structured hierarchy.
Insert a cross-reference to a paragraph in a document
1)Place the insertion point at the location in the current document where you want to insert the cross-reference.
2)Click Insert on the Cross-References pod.
Alternatively, you can choose Cross-Reference from the Special menu.
The Cross-Reference dialog is displayed.
3)In the Document drop-down list, select the document containing the destination paragraph.
important: To insert a cross-reference to another document, you need to open the destination document in FrameMaker.
4)Select the paragraph type and the specific paragraph.
5)From the Format list, choose the format to display the cross-reference.
For example, the See Heading & Page format displays as:
See “Creating cross-references” on page 1
6)Click Insert.
If you move the paragraph from one document to another, FrameMaker uses the marker Resolve unresolved cross-references in a document.
tip: To maintain cross-references that you move across document, you need to also move the Cross-Ref markers.
important: If the destination paragraph exists in a separate document, you need to ensure that you have write-permissions on that document. For example, if you are using a content management system, you might be required to check-out both the source and destination documents.
Insert cross-reference to a paragraph in a text inset
If you have a document that includes a text inset reference to another document, you can insert a cross-reference to paragraphs that are contained in the text inset. If a user follows the cross-reference link in the main document, the user is directed to the text inset within the document itself.
1)Place the insertion point at the location in the current document where you want to insert the cross-reference.
2)Click Insert on the Cross-References pod.
Alternatively, you can choose Cross-Reference from the Special menu.
The Cross-Reference dialog is displayed.
3)In the Document drop-down list, select the document that is referenced in the text inset that contains the destination paragraph.
important: To insert a cross-reference to another document, you need to open the destination document in FrameMaker.
4)Select the paragraph type and the specific paragraph.
5)From the Format list, choose the format to display the cross-reference.
For example, the See Heading & Page format displays:
See “Creating cross-references” on page 1
6)Click Insert.
If you insert a paragraph cross-reference to a text inset, the cross-reference marker is sometimes lost when the text inset is updated. To prevent the marker from being lost, first insert a cross-reference to the paragraph in the text inset’s source document.
1)Open the source of the inset by double-clicking the inset and then clicking Open Source from the Text Inset Properties pod.
2)Insert a cross-reference to the paragraph anywhere in the source document.
3)Delete the cross-reference text. The marker remains.
4)Save the source document, and then in the document that contains the text inset, update the text inset by choosing Edit > Update References.
5)Insert a spot cross-reference, this time in the document that contains the inset. The cross-reference uses the marker in the updated inset.
Insert a cross-reference to a Cross-Ref marker in a document
You can insert a cross-reference to any location in a document by using the Cross-Ref type marker. Using the Cross-Ref marker, you can link to a word or phrase in a paragraph or to an anchored frame. You even can link to the text in a cell in a table. You can link to any location in a document where you can insert a Cross-Ref marker.
1)Place the insertion point at the destination location and open the Marker dialog (Special > Marker).
2)In the Marker dialog, choose the Cross-Ref marker type.
3)Specify a marker text and click New Marker.
The marker text can be any name that you specify for the name. You will select this in the Cross-Reference dialog when you insert the cross-reference.
A new marker is inserted at the destination location.
4)Place the insertion point at the location to create the cross-reference.
note: The cross-reference and the marker locations can be in the same or separate documents.
5)Open the Cross-Reference dialog.
6)In the Source Type drop-down list, choose Cross-Reference Markers.
7)In the Maker Type list, choose Cross-Ref.
8)In the Cross-References Markers list, choose the marker (by name) that you created in Steps 1 through 3.
To insert the cross-reference perform the remainder of the steps as per the procedure in Insert a cross-reference to a paragraph in a document.
important: If the destination cross-reference exists in a separate document, you need to ensure that you have write-permissions on that document. For example, if you are using a content management system, you might be required to check-out both the source and destination documents.
Insert a cross-reference to an element in structured documents
In structured document, besides cross-references to paragraphs and Cross-ref markers, you can also insert cross-references to elements in the current or other structured documents.
1)Place the insertion point at the location in the current document where you want to insert the cross-references.
2)Click Insert on the Cross-References pod.
Alternatively, you can choose Cross-Reference from the Special menu.
The Cross-Reference dialog is displayed.
3)Select the document containing the destination element.
4)In the Source Type drop-down list, choose Elements Listed in Order or Elements Sorted by ID to view the list of elements in the destination document.
note: If you have specified the ID attribute values for element, use the Elements Sorted by ID. This option displays the elements with defined ID attributes at the top of the list.
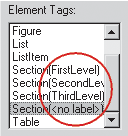
5)Choose the element tag (for example, Para or Section) and the specific Element.
Some elements use context labels to provide information about the element’s location in the structure. For example, if Section elements can be nested within other Section elements, the labels identify whether the elements are first-, second-, or third-level sections.
Context labels
6)In the Element_Tag drop-down list, choose the type of cross-reference element to insert at the current location.
note: The items in this list depend on the cross-reference elements that are defined in the structured app.
7)From the Format list, choose the format to display the cross-reference.
For example, the See Heading & Page format displays:
See “Creating cross-references” on page 1
8)Click Insert.
When you insert a cross-reference to an element in a structured document, FrameMaker user the ID and IDRef attributes of the destination and source elements, respectively.
If you insert a cross-reference to an element whose ID attribute is not currently assigned a value, FrameMaker assigns a unique value to the attribute. However, if the ID attribute is not read-only, you can manually set the attribute value.
You need to ensure that the destination element has the ID attribute defined. Else, you need to use another element or the structured app definition will need to be changed.
important: If the destination element exists in a separate document, you need to ensure that you have write-permissions on that document. For example, if you are using a content management system, you might be required to check-out both the source and destination documents.