Lists and autonumbering
You create numbered and bulleted lists by using paragraph formats that have an autonumber format defined. As you add autonumbered paragraphs to your document, FrameMaker numbers them appropriately and renumbers existing autonumbered paragraphs if necessary.
Autonumbered paragraphs are numbered consecutively in a text flow. If your document contains several text flows, autonumbered paragraphs in each flow are independent of the others.
You define autonumbering in the Numbering properties of the Paragraph Designer. An autonumber format does not have to specify paragraph numbering. When used without building blocks, it is handy for inserting automatic text or symbols. An autonumber format can include a series label, a counter, tabs, and any additional text you need.
Series label
Series labels identify different types of autonumber series within the same text flow. For example, to number figures independently of tables or headings, you specify a different series for each formatting item ((headings, figures, and tables).
On the other hand, table and figure numbers must all be in the same series to be based on section numbers.
Counter
A counter is a placeholder (building block) that FrameMaker replaces with a number or letter in the autonumber. For example, the counter <n+> increments the paragraph’s number by 1; if the paragraph is the second in a series, FrameMaker replaces <n+> with the number 2. You can use multiple counters in a format.
You can also add chapter <$chapnum> and volume <$volnum> building blocks in a format.
Tabs, text, and punctuation
An autonumber format can also include tabs, text, bullets, spaces, or punctuation.
Format text as numbered lists
Creating a numbered list sometimes involves formatting the first item in the list with a paragraph format that resets the counter to 1, and then formatting the remaining items with a different format that increments the counter. For example, perhaps you apply a Step1 format to the first item in a list and then StepNext to the rest. The template also sometimes defines formats that let you apply a single format to all items in a numbered list.
1)Display the Numbering properties of the Paragraph Designer and enter a series label in the Autonumber Format box if you need more than one autonumber series in the document.
A series label consists of any single printable character followed by a colon (for example, S:). If you use a series label, it must appear at the beginning of the format.
2)Enter any text you want to have appear automatically with the autonumber format. You can enter tabs or counters from the Building Blocks scroll list. When you select an item, it appears at the insertion point in the Autonumber Format box.
3)Select a Character Format for the autonumber in the Character Format scroll list. If you don’t specify a format, the autonumber appears in the paragraph’s default font.
4)Choose a position for the autonumber from the Position pop-up menu. Autonumbers at the end of paragraphs are rare except in equation formats.
5)Click Apply To Selection.
6)If you inserted a tab (\t) in step 2, set a corresponding tab stop for the paragraph format.
Format text as bulleted lists
In addition to the regular bullet symbol found in all text fonts, you can use any character in any installed font, including a dingbat font such as Zapf Dingbats®.
1)Click in a single paragraph or select adjacent paragraphs that you want to make into a bulleted list.
2)Display the Numbering properties of the Paragraph Designer and click the bullet and tab symbols (\b and \t) in the Building Blocks scroll list.
3)Click Apply To Selection.
4)If you inserted a tab (\t) in step 1, set a corresponding tab stop for the paragraph format.
Specify a special bullet symbol
Before specifying a special bullet symbol, create a character format that uses the font of the bullet symbol you want to use. For example, to use 9-point Zapf Dingbats, create a character format using that font. Give the format a descriptive name such as BulletFont.
1)Display the Numbering properties of the Paragraph Designer and enter the character corresponding to the bullet symbol you want in the Autonumber Format box.
For example, if you want a Zapf Dingbats square bullet, enter a lowercase n, which appears as ■ in that font. To find the character that corresponds to the bullet symbol you want, see the character set for that font.
2)Click the tab symbol (\t) in the Building Blocks scroll list or enter spaces.
note: You sometimes must use special codes to enter characters such as nonbreaking spaces or em spaces.
3)In the Character Format scroll list, click the bullet character format that you created.
4)Click Apply To Selection.
Remove autonumbering or a bullet from a paragraph
1)Turn off Autonumber Format in the Numbering properties of the Paragraph Designer. Click the option twice to turn off the setting; clicking it only once changes it to As Is.
2)Click Apply To Selection.
Counters in autonumber formats
A counter consists of angle brackets (< >) that surround a display style and an increment value. The Custom Autonumbering feature supports the Unicode text encoding standard.
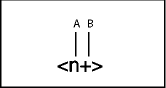
A. Display style B. Increment value
To indicate the display style, use a counter with one of the following letters.
|
For this numbering style |
Use |
|---|---|
|
Numeric (1, 2, 3, …) |
n |
|
Lowercase Roman (i, ii, iii, iv, …) |
r |
|
Uppercase Roman (I, II, III, IV, …) |
R |
|
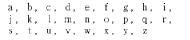
Lowercase alphabetic (a, b, c, …, aa) |
a |
|
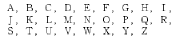
Uppercase alphabetic (A, B, C, …, AA) |
A |
To indicate how an autonumber is incremented, use a counter with an increment value, as shown in the following examples.
|
To |
Use |
|---|---|
|
Keep the value the same |
<n> |
|
Set the value to 1 or to any other number you enter after the equal sign |
<n=1> |
|
Increase the value of the counter by 1 |
<n+> |
|
Keep the value the same but not display it |
< > |
|
Reset to zero (or any other number) but not display it |
< =0> |
By default, each counter is initially set to zero. The counter can maintain its current value, be incremented by 1, or be reset to a different value. For example, use <n=1> in the format that resets numbering to 1 at the beginning of a new set of numbered steps.
To keep the value the same but not display it, place a blank space between the angle brackets. If you leave out the blank space, the angle brackets appear as part of the autonumber format.
Base autonumbering on book component numbers
You can insert <$volnum>, <$chapnum>, <$sectionnum>, or <$subsectionnum> building blocks in paragraph formats. The book component numbers are determined by the settings in the Numbering Properties dialog box.
|
Example |
Autonumber format |
|---|---|
|
Volume 3 Chapter 3 |
Volume <$volnum> Chapter <$chapnum> |
The following table illustrates how you can combine the chapter building block with other building blocks:
|
Example |
Autonumber format |
|---|---|
|
Section 1.1 Section 1.1.1 Figure 1-1 Table 1-1 |
S:Section <$chapnum>.<n+><=0> S:Section <$chapnum>.<n>.<n+> F:Figure <$chapnum>-<n+> T:Table <$chapnum>-<n+> |
Base autonumbering on section numbers
Table and figure numbers must all be in the same series for autonumbering in sections, as shown in the following table:
|
Section number |
Figure number |
Table number |
|---|---|---|
|
Section 1 1.1 1.2 |
Figure 1-1 Figure 1-2 |
Table 1-1 Table 1-2 |
|
Section 2 2.1 2.2 |
Figure 2-1 Figure 2-2 |
Table 2-1 Table 2-2 |
To achieve this type of numbering, construct autonumber formats in a single series using the same series label for each format. The following table shows possible autonumber formats. The formats are presented in a table so that you can clearly see the position of each counter in the string. Counter position determines how the counter is incremented.
|
Paragraph format |
Autonumber format |
|
|||
|---|---|---|---|---|---|
|
SectionTitle |
H:Section |
<$chapnum> |
< =0> |
< =0> |
< =0> |
|
Head1 |
H: |
<$chapnum> |
.<n+> |
< > |
< > |
|
FigureTitle |
H:Figure |
<$chapnum> |
< > |
-<n+> |
< > |
|
TableTitle |
H:Table |
<$chapnum> |
< > |
< > |
-<n+> |
Whenever a paragraph tagged SectionTitle occurs, the section number is incremented by 1, and the remaining counter values are reset to zero. Each <n+> counter in the remaining formats refer to a different type of item, so they’re incremented independently.
The < > counters keep FrameMaker from resetting values back to zero.
Use multiple counters in an autonumber format
An autonumber format can contain more than one counter. For example, perhaps autonumbers for a series of section and subsection titles each contain two counters.
|
These counters |
In this format |
Would appear as |
|---|---|---|
|
<$chapnum>.<n=0> |
Head1 |
1.0 |
|
<$chapnum>.<n+> |
Head2 |
1.1 |
|
<$chapnum>.<n+> |
Head2 |
1.2 |
|
<$chapnum>.<n=0> |
Head1 |
2.0 |
The counters in each format are independent of each other. The position of a counter in the string determines how it’s displayed and incremented. When incrementing a counter, FrameMaker bases its value on the corresponding counter in the previous autonumber paragraph in the same flow.
The following example shows multiple counters in section titles and subtitles. The counter before the period is incremented independently from the counter after the period.
|
Example |
Autonumber format |
Tag |
|---|---|---|
|
1.0 Getting started 1.1 Installing 1.2 Backing up 1.2.1 Errors 1.3 Entering data |
<n+>.<n=0>\t <n>.<n+>\t <n>.<n+>\t <n>.<n>.<n+>\t <n>.<n+>\t |
Head1 Head2 Head2 Head3 Head2 |
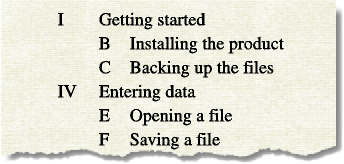
The following example demonstrates outline style autonumber formats.
|
Example |
Autonumber format |
Tag |
|---|---|---|
|
I Getting started A Installing B Backing up II Entering data A Opening a file B Saving a file |
<R+>< =0>\t < ><A+>\t < ><A+>\t <R+>< =0>\t < ><A+>\t < ><A+>\t |
Head1 Head2 Head2 Head1 Head2 Head2 |
The autonumber in the heading Opening a file is reset to A; the second counter in the previous paragraph’s format resets the numbering to zero without displaying it, so <A+> increments the counter to 1 or A.
The < > counter in the Head2 format keeps the value of the first counter the same but doesn’t display it. If the < > counter is not in that position, the <A+> in the Head2 format refers to the first counter (not the second), and FrameMaker produces the following result:
Incorrect outline style autonumber format
Reset a series
Some numbering series—such as a list of numbered steps—start at 1 every time they are used. You can reset such a series in two ways.
The first example shows how to restart series numbering by using the <n=1> building block for the first step in the series, and then using <n+> for subsequent steps.
|
Example |
Autonumber format |
Tag |
|---|---|---|
|
Step 1. Unpack it. Step 2. Back it up. Step 3. Run setup. Step 1. Save your file. |
S:Step <n=1>.\t S:Step <n+>.\t S:Step <n+>.\t S:Step <n=1>.\t |
Step1 StepNext StepNext Step1 |
The second example shows another way to reset the counter so that you don’t have to use a unique format to start a numbered list. Instead, a paragraph that introduces the list uses a format that resets the counter.
|
Example |
Autonumber format |
Tag |
|---|---|---|
|
To install the software: Step 1. Unpack it. Step 2. Back it up. Step 3. Run setup. |
S:< =0> S:Step <n+>.\t S:Step <n+>.\t S:Step <n+>.\t |
StepIntro Step Step Step |
The < =0> counter in the StepIntro format resets the S series to zero but doesn’t display the number.
If a counter is incremented, any omitted counters in the series to the right of it are reset to zero. For example, the following autonumber formats are equivalent:
S:<n+>< =0>\t
S:<n+>\t
About Japanese numbering options
The following counters in autonumber formats are allowed in Japanese text and with Japanese fonts.
|
Building block |
Meaning |
|
Characters, in this order |
|---|---|---|---|
|
<zenkaku a> |
Fixed-width lowercase Roman alphabet |
|
|
|
<zenkaku A> |
Fixed-width uppercase Roman alphabet |
|
|
|
<zenkaku n> |
Fixed-width Arabic numbers |
|

|
|
<kanji kazu> |
Standard kanji numbering, where double-digit numbers are made up from the traditional kanji characters for ten, one hundred, and so on |
|

|
|
<kanji n> |
Numbers used for street addresses, phone numbers, postal codes, and so on, where double-digit numbers are made up from the kanji characters for zero through nine |
|

|
|
<daiji> |
Numbers used in financial or banking contexts made up of old-style kanji numerals |
|

|
|
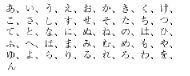
<hira gojuon> |
Hiragana characters in the standard order |
|
|
|
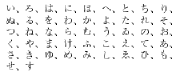
<kata gojuon> |
Katakana characters in the standard order |
|
|
|
<hira iroha> |
Hiragana characters in the literary order (rare) |
|
|
|
<kata iroha> |
Katakana characters in the literary order (rare) |
|

|
About RTL numbering options
The following counters in autonumber formats are allowed in RTL languages such as Arabic, Hebrew, and Farsi. For details on the formats, see Counters in autonumber formats.
For the Farsi language script
•<Farsi n>
•<Farsi n=1>
•<Farsi n+>
•<Farsi a>
•<Farsi a=1>
•<Farsi a+>
For the Hebrew language script
•<Hebrew n>
•<Hebrew n=1>
•<Hebrew n+>
•<Hebrew a>
•<Hebrew a=1>
•<Hebrew a+>
For the Arabic language script
•<Alif Ba Ta n>
•<Alif Ba Ta n=1>
•<Alif Ba Ta n+>
•<Abjad n>
•<Abjad n=1>
•<Abjad n+>
•<Indic n>
•<Indic n=1>
•<Indic n+>