Configure publish settings
When you publish content, the style settings such as heading and body, are defined by the FrameMaker template that is associated with the published document. Also, the output format settings such as the favicon and the search options are defined for each output format. However, the publishing solution provides a number of options to customize the style mapping and output format settings for the publish output.
You can customize the output settings from the Publish dialog, which is accessible from the main menu (File > Publish).
To customize the output settings:
1)Open the Publish dialog (File > Publish) and click Settings.
In the Settings drop-down list, choose:
Edit
To edit the style and output format settings.
New
To create new output settings.
Open
To browse for an existing setting file.
Import ISF File
To import RoboHelp specific settings into the current settings. For details, see Use the RoboHelp settings (isf) file.
2)Choose Edit.
In the Publish Settings dialog, the Style Mapping tab provides the options to customize the mapping of source FrameMaker styles and the styles for the selected output. By default, the style mapping is obtained from the associated FrameMaker template.
In the Style Mapping tab, you can customize:
•Paragraph Styles
•Character Styles
•Table Styles
•Cross Reference styles
•Image Settings
•General Settings
3)The FrameMaker template for the selected document defines the default styles for the publish output.
a)To use the styles from any other FrameMaker template, click the Select button adjacent to the Use Template label.
important: Ensure that the template is currently selected.
b)In the Manage Publish Settings Template dialog, select the alternate FrameMaker template.
tip: If you print a book that contains multiple documents, choose the template in this option to ensure that all the documents use the same style mapping.
note: The template that you select is used by the publish process. This means that the styles and settings of the FrameMaker source remains unchanged. The FrameMaker source continues to use the previously assigned template.
4)Use the options in the Manage CSS drop-down list to export or import the styles used for style mapping to or from an external style sheet (.css file).
The file defines a set of CSS styles that map to the output styles as defined in the Styles option in the Publish Settings dialog.
important: The styles that you have customized in the Publish Settings dialog are defined as overriding styles at the end of the .css file. Each overriding style is defined with a FM_ prefix. The Output Style displayed is appended with an asterisk (*) to indicate a customization to the selected style.
5)To configure Outputs settings, go to the Outputs tab. This tab provides options to customize settings for the following output formats:
•Responsive HTML5
•Mobile App
•WebHelp
•ePub
•Kindle
•Microsoft HTML Help
•Adobe DPS
6)After you complete the style mapping and output setting customizations, save the updated settings to a STS Settings File (.sts).
important: The settings file is a FrameMaker-specific file. This means that you cannot edit this file in any other program.
Style mapping
The Style Mapping WYSIWYG editor, allows you to map the formats that are available in the current document template to alternative output styles. For example, from the available paragraph formats, you select Heading1. In the FrameMaker template the heading is associated with a specific style. You can then associate Heading1 with alternative output styles.
note: When you associate a template format with an alternative output style, the source document style remains unaffected.
To customize style settings:
1)In the Style Mapping tab of the Publish Settings dialog, select the style you want to customize (paragraph, character, table, cross reference, image or general).
2)Configure the desired options for the selected style.
note: The options available for each type of style that you can customize are explained in the following (Style Mapping) tables.
3)Click Save.
The following Style Mapping tables describe all options available in the Style Mapping tab.
|
Option |
Description |
Available in |
|---|---|---|
|
Automap <Available in> Style |
Select Automap <Available in> Styles to map the styles in the selected content to the styles defined in the CSS selected for style mapping. |
•Paragraph •Character •Table |
|
Style Preview |
The Style Preview allows you to compare the source style (defined in the Output Style list prior to any customization) with the custom style (defined in the Output Style list, and displayed with an appending asterisk, after customization using the CSS Rule definition dialog). |
•Paragraph •Character •Table •Cross Reference |
|
Output Style |
To customize the output style for the selected format, choose an alternative style from the Output Style list. |
•Paragraph •Character •Table •Cross Reference |
|
Remove Overrides |
Revert any style changes applied to the source format. |
•Paragraph •Character |
|
Edit Style |
Click the Edit Style button to open the CSS Rule definition dialog and customize the output style. note: Say, the selected Output Style is [Source] and you use the CSS Rule definition dialog to customize the style. In this case, the Output Style displayed is appended with an asterisk (*) to indicate customization to the selected style. |
•Paragraph •Character |
|
Exclude Form Output |
Exclude the selected tag from the generated output. |
•Paragraph •Character |
|
Split Into Topics Based on This Style |
Create a Help topic at each occurrence of the selected MS Word paragraph style. For example, if you select Heading 1 and Pagination (Split into topics based on this style), FrameMaker starts a new topic at every instance of Heading 1. |
•Paragraph |
|
Map to HTML tag |
Select or enter a user-defined HTML tag for the selected style.For example: A paragraph with style ParaStyleOne is imported in FrameMaker as: <p class=ParaStyleOne> Paragraph Text </p> Specifying this string as Pre for the style ParaStyleOne causes FrameMaker to import the paragraphs with the style ParaStyleOne as: <pre> Paragraph Text </pre> |
•Paragraph •Character |
|
Autonumber |
Specify a way to handle auto-numbering text. Available options are: •Ignore: Choose this option if the autonumber text is relevant only in print format. The converted paragraph does not contain autonumbering. For example, suppose you ignore autonumbering for the FrameMaker paragraph format "Section2 Level." In this case, "Section 1.1: System Requirements" in the source appears as "System Requirements" in the published output. •Convert to HTML List: Convert the autonumber to HTML lists using HTML tags such as <ol>, <ul>, and <li>. •Convert to Text: Retain the appearance of the FrameMaker numbered lists. The autonumber part loses its sequencing properties and appears as part of the paragraph text in FrameMaker topic. |
•Paragraph |
Table styles
The following table describes additional options that are available in the Table Styles.
|
Option |
Description |
|---|---|
|
Table Properties |
|
|
Caption Style |
Select the Caption Style name to map to the selected table format caption. Or select [Source]. FrameMaker retains the appearance of the table caption in the online Help format. You can also select Automap for an individual table caption style. |
|
Table Size |
Specify a preferred table width and / or height (in px). |
|
Cell Size |
|
|
Preferred Column Width/Row Height |
Specify a preferred column width and / or row height (in px). |
Cross reference style
The following table describes an additional option that is available in the Cross Reference style.
|
Option |
Description |
|---|---|
|
Building Blocks |
To build the cross reference format, place the cursor in the Output Style box and double-click on a format in the Building Blocks table.The available formats are called building blocks, because you create a custom format by using any combination of the available formats. To do this, double-click a building block to place the format in the Output Style list. You can then keep adding to the format by placing the insertion point before or after any selected building block. |
Image settings
The following table describes the options that are available in the Image Settings.
|
Option |
Description |
|---|---|
|
Use Distiller To Generate Image |
Select this option to generate web-friendly image formats from graphics linked and inserted in FrameMaker documents. You should use this option especially if you have vector graphics formats, such as EPS or AI, or graphics with text content in them. |
|
Import Reference Page Images |
Select this option to import images embedded in the reference pages of FrameMaker documents. |
|
Preserve 3D Images |
Select this option to convert the 3D graphics as a PDF file, with the 3D rendering intact within the PDF file. To ensure that the 3D image retains its rendering, enable embedding in FrameMaker. |
|
Preferred Dimensions |
Specify the dimensions for the images. Select one of the following: •Scale: Scale images as a percentage of the existing size. The aspect ratio of the images is maintained. •Width and Height: Specify the absolute image size as Height and Width, in points. Select Maintain Aspect Ratio to ensure that the images are not skewed. note: To convert the images in FrameMaker documents to the actual dimensions of the images, specify the height and width as 0pt. The <img> tag for such images in the generated HTML does not have the height and width values. This conversion is irrespective of the dimensions of the anchored frames that contained the images. |
|
Maximum Dimensions |
Set the maximum dimensions for images in online format. Images that exceed the maximum dimensions you specify are automatically scaled down to fit the maximum size you specify. If you scale the images and specify an aspect ratio, then the publishing process scales the images within the maximum dimensions specified and maintains the aspect ratio.Use this option to avoid large images causing the browser window to scroll horizontally or vertically. For example, if you specify the window size to be 800 x 600 pixels, you can specify the maximum dimensions to be 640 x 480, so that the images do not exceed the window size. |
|
Margins |
Set the margins for the images as: •Set equal margins on all sides by setting the margin in All Sides. •To set margins on individual sides, set the margins on each side. |
|
Borders |
Set a border for the images as: •To set a uniform border on all sides, select All from the Border pop-up menu. Alternatively, you can specify the side on which you want the border to appear from the pop-up menu. •To set the border style, select the style from the Style pop-up menu. •To set the border color, select the color from the Color pop-up menu. •To set the border width, select it in, in points, from the Width menu. |
|
Advanced |
|
|
Default Format |
Define the image format, color depth, and quality settings for the web-supported images that are converted from the images in the FrameMaker document: •As Is: Select this option for retaining the images in the current web-supported format. •JPG: Select this option for multicolor images such as screenshots or photographs. JPG format with a high color depth provides the best online quality, but increases the file size. Select this option for photographs. •PNG: Select this option for screenshots. •BMP: Select this option only for small images such as icons and logos. BMP format images are large in size and uncompressed but rich in color and quality. Also, these images do not scale or compress well. Hence, this format is not suitable for web. •GIF: Select this option if the FrameMaker document contains only line art, such as schematic diagram. |
|
JPEG Quality |
Set the quality percentage for JPG images. |
|
Color Bit Depth |
Set the color bit depth for bit map images. JPG and PNG formats can have either 8- or 24-bit color depth, while BMP images can have color bit depths of 1, 4, 8, 16, 24, or 32. GIF images can have only 8-bit color depth. |
|
Grayscale |
Select this option if you want monochrome images. |
General settings
The following table describes the options that are available in the General Settings.
|
Option |
Description |
|---|---|
|
Topic Settings |
|
|
Split Into Topics Using Marker |
Specify a marker that is used in the FrameMaker document for pagination. |
|
Merge Topics With No Content |
Specifies whether the empty topics (after pagination) should be merged with previous topic or not. By default, this option is checked. |
|
Add All Topics to Table of Contents |
Specifies whether all generated topics (after pagination) should be included in TOC or not |
|
Topic Name Pattern |
Specify the topic name pattern for topics generated from the added FrameMaker document. |
|
Use Only ASCII Characters in Generated Filenames |
Specify whether to allow non-ASCII characters in the generated topic filenames or automatically convert to ASCII characters. |
|
Glossary |
|
|
Style |
Specify how glossary terms display: •Hyperlink: Display as a hyperlink and navigates the user to the definition in the glossary. •Pop-up: Displays a pop-up on the page. •Expanding Text: Displays in-line expanding text on the page. •Tooltip: Displays as a tooltip if the user hovers the mouse over the term. note: For details on creating a FrameMaker glossary, see Glossaries. |
|
Marker Type |
Keeping the marker text as same, apply glossary marker to the glossary definition paragraph in the document and Glossary Term marker to glossary term instance in text. |
|
DHTML Effects |
|
|
Create Drop Down |
Define DHTML effects to be applied to the drop-down lists and expanding text. |
|
Create Expanding Text |
|
Outputs settings
The Outputs tab of the Publish Settings dialog provides options to customize publish output format settings such as the title, favicon, layout, and table of contents (for eBook output formats).
The following tables describe all options available in the Outputs tab.
General tab
The following options are available in the General tab.
|
Option |
Description |
Available in |
|---|---|---|
|
Title |
Specify a title for your output. You can use variables to dynamically generate titles. For example, you can use the variables as: <OutputName> (Default) Name of the output being published. <SourceFilename> Name of the FM file/book being published. <$VarName> Value of variable VarName as defined in the FrameMaker source document/book. note: VarName cannot contain the / (front-slash) character. |
•Responsive HTML5 •WebHelp •ePub •Kindle •MS HTML Help |
|
Favicon |
Specify an icon to associate with the output. The icon appears in the browser tab or the address bar depending on the browser being used. |
•Responsive HTML5 •WebHelp |
|
Language |
Specify the output language for the layout if the language is different from the language of the project. FrameMaker uses this language setting for the UI strings and language-related UI elements in the preview and generated output. |
•Responsive HTML5 •Mobile App •WebHelp •ePub •Kindle •MS HTML Help |
|
Encoding |
Specify the character encoding format if the web server to which you are publishing has character encoding different from UTF-8. |
•Responsive HTML5 •Mobile App •WebHelp |
|
Manage layout |
Customize or use an existing layout for the published output. The drop-down list provides the following options: •Edit: Customize the current layout. For more information about customizing layout, see Customize layout. •New: Choose New to open the Choose Screen Layout dialog to select a new layout. In the Choose Screen Layout dialog: a) Select a screen layout from the available list in the Gallery. b) Click OK to select a new screen layout for your output. •Import: Import a screen layout file (.slz). •Export: Export the current screen layout as a .slz file. You can use this layout in other FrameMaker or RoboHelp projects. important: The Theme Standard or Theme Black layout currently have certain vulnerability issues. If you are using the Theme Standard or Theme Black layout, please see the Knowledge Base article for details on the issues and a resolution - Cross Site Scripting Vulnerability |
•Responsive HTML5 •Mobile App |
|
Use HTML Page Template |
Import a .htt, .htm, or .html template file to define and create a mini TOC in the published output. For details on how to define the HTML page template, see Create an HTML page template. |
•Responsive HTML5 •Mobile App •WebHelp •ePub •Kindle •MS HTML Help •Adobe DPS |
|
Override Styles for This Output |
Import a .css file to override the defined output styles. |
•Responsive HTML5 •Mobile App •WebHelp •ePub •Kindle •MS HTML Help •Adobe DPS |
|
Enable Browse Sequence |
Specify whether the output should display browse sequences. |
•Responsive HTML5 •Mobile App •WebHelp (Navigation tab) |
|
Use Dynamic Content Filter in the Output: |
Assign a dynamic content filter to the current output. For details on how to create a user dynamic content filters, see Generate dynamic content output. |
•Responsive HTML5 •Mobile App |
|
Use Lowercase File Names |
Create filenames that use only lowercase letters. This option is recommended for UNIX users. |
•WebHelp |
|
Table of Content Settings |
A table of content to display in the generated Help. You can choose Index, Glossary, or both. Also, you can specify the positioning of Index and Glossary in the published output. |
•ePub •Kindle |
|
Validate EPUB 3 Output |
Set FrameMaker to validate the EPUB output using the standard EPUB validation tool EpubCheck. EpubCheck requires Java Runtime 1.5 or above installed on the computer. note: If the EpubCheck.jar file is not available on your computer, download it from the link provided in the EPUB Validation dialog box. Validation messages are available only in English. |
•ePub |
|
Embed Fonts |
Embed the selected fonts into the eBook. Use this option, if you are creating content that includes uncommon fonts, or if you are using custom fonts that may not be available on the end-users’ environment.Since the fonts will be included as part of the eBook output, the user experience will be uniform even if some users do not have the font installed.When you check this option, the Embed Font dialog is displayed. In this dialog, you can choose to embed fonts that are currently included in your RoboHelp project. You can also choose embed system fonts that are not currently included.Click the Manage button to open the Embed Fonts dialog to make changes to the currently embedded fonts. |
•ePub |
|
Show KindleGen Logs |
Select to display the errors, warnings, and status messages generated by the KindleGen converter in the Output View pod. |
•Kindle |
|
Add Breadcrumbs Links |
Add breadcrumbs in the topic pages. |
•WebHelp (Navigation tab) •MS HTML Help |
|
Optimize CHM File Size |
Reduces the size of the CHM file. |
•MS HTML Help |
|
TOC/Index Settings |
Open the HTML Help - Advanced Settings dialog and configure the following settings: In the Index tab: •Default Window: To display the topic in a custom window, select the window name. •Default Frame: To display the topic in a custom frame, select the frameset name. •Font: Use Select Font to choose a font. Click Default Font to set the selected font as the default font. The TOC Styles tab has the following options in addition to the options available in the Index tab: •Border: Add a border around the table of contents. •Dialog Frame: Add a frame around the table of contents. •Lines From Root: Displays lines connecting books and pages starting at root. •Plus/Minus Squares: Display plus and minus icons that open and close books. •Always Show Selection: Display the topic selected from the Contents tab (even if this tab is not the left-pane focus). •Folders Instead Of Books: Display folder icons instead of book icons. •Lines Between Items: Add lines between books and pages. •Single-Click To Open Book: Enable books to open with one click. •Raised Edge orSunken Edge: Create a three-dimensional appearance. •Binary TOC: Create a binary TOC. The binary TOC option is recommended only for large Help systems. It requires compiled HTML Help and does not support customization or external TOC files. |
•MS HTML Help |
|
Upload Articles to Adobe DPS |
Use the Adobe DPS output format to generate DPS article and then upload the generated articles to Adobe DPS. Use your Adobe account to sign into the Adobe DPS portal and create your projects. Ensure that you are signed into FrameMaker using the same Adobe ID. In the Publish Settings dialog, select "Upload Articles to Adobe DPS." FrameMaker will get the list of your Adobe DPS accounts and projects from DPS server. Account Choose the Adobe account to which you want to upload these articles. Project Choose the DPS project to which you want to upload these articles. Save and Close the dialog. When you run the publish procedure, the articles are generated in your output folder and uploaded to the selected DPS project in your DPS account. |
Adobe DPS |
Optimization tab
The following options are available in the Optimization tab.
|
Option |
Description |
Available in |
|---|---|---|
|
Convert Absolute Image Size to Relative Image Size |
Convert the actual width and height of images into percentages. In this way, you can make images used in your project device-friendly and adapt to different device sizes. |
•Responsive HTML5 •Mobile App •ePub (General tab) •Kindle (General tab) •Adobe DPS (General tab) |
|
Convert Absolute Table Size to Relative Table Size |
Convert the actual width and height of tables into percentages. By allowing FrameMaker to optimize the tables in this way, you ensure that the tables adapt to different device sizes. |
•Responsive HTML5 •Mobile App •ePub (General tab) •Kindle (General tab) •Adobe DPS (General tab) |
|
Enable Zoom On iOS Devices |
Enable or disable pinch zoom on the iPad and the iPhone. When this option is enabled, users can zoom in on a FrameMaker output displayed on an iPad or iPhone by pinching the device screen. |
•Responsive HTML5 •Mobile App |
|
Convert SVG to Raster Image |
Convert the SVG images in the document to rasterized images.By default, FrameMaker embeds the entire SVG code in the final Responsive HTML5 output. SVG images retain their image quality regardless of the screen size and resolution of the device on which they are being viewed. |
•Responsive HTML5 •Mobile App |
Search tab
The following options are available in the Search tab.
|
Option |
Description |
Available in |
|---|---|---|
|
Enable Substring Search |
If you enable this feature, a search for "log" returns topics containing the words "catalog" and "logarithm." Substring search takes longer than whole-string search. |
•Responsive HTML5 •Mobile App •WebHelp |
|
Show Context in Search Results |
Select to have the search results displayed along with the first specified number of characters of the topic. |
•Responsive HTML5 •Mobile App •WebHelp |
|
Number of Characters in Search Context |
Number of characters to display as defined in Show Context in Search Results. |
•Responsive HTML5 •Mobile App |
|
Number of Results on a Page |
The number of search results to display on each page. |
•Responsive HTML5 •Mobile App |
|
Enable Highlighting in Search Results |
Select to enable highlighting of search results. From the color selection dialog, select a color for the highlight. |
•WebHelp |
|
Hide Rank Column in Search Results |
Select not to display the Rank column in search results. |
•WebHelp |
|
Show Total Number of Search Results |
Select to show the number of search results for a specific search string. |
•WebHelp |
|
Show AND Search in Output |
Select to display only those topics that have all the words that are specified without using quotation marks in the Search box. By default, FrameMaker performs OR search when a user types multiple words without enclosing them in quotation marks. This means that FrameMaker finds all topics that have any of the word specified in the Search box. note: AND search can be used in combination with phrase search. Select the Enable AND Search by Default option, if required. By default, if you disable the AND search option, end users have the option to enable it in the output. |
•WebHelp |
|
Generate XML Sitemap |
Select to generate a sitemap for your published output. In the published output, you will find the sitemap.xml file, which contains the sitemap of your published output. You can submit the sitemap.xml file to your search engine to improve the search results for your site. As different search engines use different process for sitemap.xml submission, ensure you follow the correct process as described in the search engine’s documentation. |
•Responsive HTML5 |
|
Base URL of the Help System |
Specify the base URL of your site where you plan to host the published output. If your base URL is different from your primary domain, then you must add the location of the sitemap.xml file in the robots.txt file. For example, if your site's primary domain is www.example.com and you plan to keep the sitemap.xml file at the www.example.com/ProductName/help/ location, then you must add an entry of the sitemap.xml file in the robots.txt file. Else, if the sitemap.xml file is saved at the same location as robots.txt, then you do not need to make any changes in the robots.txt file. |
•Responsive HTML5 |
|
Content Change Frequency |
Select the frequency at which you intend to update your help system or website. Search engines can use this information to revisit your site for indexing updated content. |
•Responsive HTML5 |
Server tab
The following options are available in the Server tab of the Responsive HTML5 output.
|
Option |
Description |
|---|---|
|
Servers |
Click New to add details of the RoboHelp Server where you want to publish your project. In the New Destination dialog, specify the following details: •Descriptive Name: Enter a descriptive name to identify the RoboHelp Server configuration. •Server Name: Specify the RoboHelp Server URL in the format http://<servername>:<port number>/<context-name>/server •User ID and Password: Specify the user ID and password of the user account that has publishing rights on RoboHelp Server. •Save Password: Select this option to save the user credentials. •Help Area: Click the refresh button to get a list of areas defined on the RoboHelp Server. Select an area name from the drop-down list to publish your project to the selected area. If you don’t select any area, then your project is published on to the default area. Click Edit to make changes to an existing RoboHelp Server configuration, or click Delete to remove the saved configuration. |
|
Check for Deleted files |
When selected, FrameMaker checks for files that have been deleted from the destination location and republishes them. |
|
Prompt before Overwriting files (no overwriting when batch generating) |
When selected, FrameMaker prompts before overwriting files. However, it will not overwrite files in case you are generating the output using the batch generate feature. |
|
Republish All |
Select this option to republish all files at the destination, overwriting existing files. note: If you have updated any document in your book, you will have to regenerate the updated content locally. However, only the updated documents are published on RoboHelp Server. |
note: For details about how to publish files from FrameMaker to RoboHelp Server 10, see Publish Responsive HTML5 output on RoboHelp Server 10.
Application details tab
The following options are available in the Application Details tab of the Mobile App output. For more information about uploading you app to the app store, see Upload your mobile app to the app store.
|
Option |
Description |
|---|---|
|
Package Name |
A name that will uniquely identify the Mobile app. A common naming convention is to use your company domain name in reverse followed by the name of the App. For example com.adobe.myapp. This name is used by PhoneGap to uniquely identify the application. note: To avoid issues with third-party tools used in PhoneGap, you are recommended to use English alphabets, underscore character, and the dot as the separator. |
|
Version |
The PhoneGap version number for the app. |
|
Version Code (Android) |
The Android version number for the app. If you upload your app to an Android store such as Google Play, a user will be notified of updates to your app every time you update the version number. note: This is not required if you are creating an iOS app. |
|
Title |
The title of the application that will display on a mobile device. |
|
Description |
The PhoneGap description for the application. |
|
Icon |
The icon of the application that will display on a mobile device. |
|
Splash Screen |
The splash screen that will display when the app is opened on a mobile device.You can specify multiple splash screens for the app. a) After completing the options in the Applications Details tab, save your settings. b) On your computer, extract the settings (.sts) archive. To do this, you can use any archive application such as WinZip or WinRAR. For example, you can rename the extension of the settings file to .zip and then use one of these applications to extract the archive. c) The extract folder contains a config.xml file. This file contains the settings that are required to define multiple splash screens in your mobile app. For details on the config.xml, see the PhoneGap document: Splash screens. |
|
PhoneGap Credentials |
PhoneGap or Adobe ID user name and password. note: To use the FrameMaker - PhoneGap integration, you require a PhoneGap or Adobe user account. |
|
Validate User ID |
Test your PhoneGap or Adobe ID credentials. note: If this fails even with the correct credentials, go to phonegap.com and log in with the same credentials. After logging in to phonegap.com, try the connection again. |
|
Platform - iOS |
To create an iOS app, you are required to provide the following files: •Digital Certificate: To run the app on an Apple device, the app must be signed by a valid certificate. This file is provided by Apple through the Provisioning Portal. •Certificate Password: Password associated with the digital certificate. •Provisioning Profile: A file that allows applications to be installed on an iOS device. The file contains the digital certificate, App ID, and one or more device UDIDs on which you can install the app for testing. A user can directly install the app on these devices. |
|
Platform - Android |
You can create an Android debug app without requiring the following Android signing files and credentials. However, to upload you app to the Google Play Store, you are required to provide the following files: •Keystore File: A keystore is a binary file that contains a set of private keys. •Keystore Password: Password associated with the keystore file. •Certificate Alias: Represents the entity to be identified with the app, such as a person or a company. •Certificate Password: Password associated with the alias. |
Navigation tab
The following additional options are available in the Navigation tab of the WebHelp output.
|
Option |
Description |
|---|---|
|
Skin Selection |
Apply skins to the published output to customize the colors, buttons, text, fonts, and icons in the output.In the Skin Selection drop-down list, choose from the following options: •Default: To use the FrameMaker's default skin. •Traditional style - no skin: To use no skin. In the Skin Selection settings drop-down list, choose from the following options: •Edit: Edit the current WebHelp skin in the Skin Editor. •New: Select a new skin from the Skin Gallery. •Import: Import a Skin file (.zkn) that has been export from another FrameMaker document or RoboHelp project. •Export: Export a Skin file (.zkn) that you can then import into another FrameMaker document or RoboHelp project.For more details, see the Skins section in the Using RoboHelp guide. |
|
Toolbar Buttons |
Select navigation toolbar buttons to appear in the left pane. |
|
Synchronize Table of Contents |
Synchronize the TOC with the topic in the right pane so that users see where they are in the structure. •To synchronize the TOC automatically, click the pop-up menu and select Automatically. •To add a button that users can click to synchronize the TOC, click the pop-up menu and select Manually. note: If you use custom skins, provide a button icon in the WebHelp Skin Editor. |
|
Show Navigation Pane Link in Topics |
Select to include a link to the navigation pane in topics that are opened through the context-sensitive Help calls. |
|
Search Input Field in Toolbar |
Include a search field in the main toolbar. |
|
Add About Box |
Set up information that appears in a dynamic window when users click the image in the main toolbar. |
Meta Information tab
The following options are available in the Meta Information tab of the ePub and Kindle output formats.
|
Option |
Description |
|---|---|
|
Author(s) |
The name of the author. To specify multiple author names, use comma as the separator. |
|
Publisher(s) |
The name of the entity responsible for making the output available, for example, the author or the organization. |
|
Rights |
A statement about rights, for example, a copyright notice. |
|
Description |
A description of the content. |
|
Publication Identifier |
An identifier conforming to specifications, such as ISBN. |
|
Publish Date |
The date of publishing the output. Follow the format specified in Date and Time Formats. |
|
Cover Image |
Specify the path for a JPG, JPEG, or PNG image that you want to use as the cover page of the eBook and the dimensions (use percentage values to allow browsers to optimize display for different-sized screens). You can also specify a GIF image. However, in the case of a GIF animation, only the first frame is used as the cover page. note: If you do not specify a cover image, FrameMaker uses the first topic in the TOC as the cover page. |
|
Custom Metadata |
Specify additional EPUB 3-specific metadata in XML format. For more information on specifying metadata for EPUB, refer to EPUB 3 specification for metadata.For example, if you want to add the identifier type (ISBN, UUID, DOI, etc.) for a Publication Identifier, you can use the XML format below: <dc:identifier id="pub-id">urn:doi:10.1016/j.iheduc.2008.03.001</dc:identifier> <meta refines="#pub-id" property="identifier-type" scheme="onix:codelist5">06</meta> |
Customize layout
To customize the layout in Responsive HTML5 or Mobile App output:
1)In the Manage Layout option, click the settings button and choose Edit.
The Layout Customization dialog displays a preview of the layout.
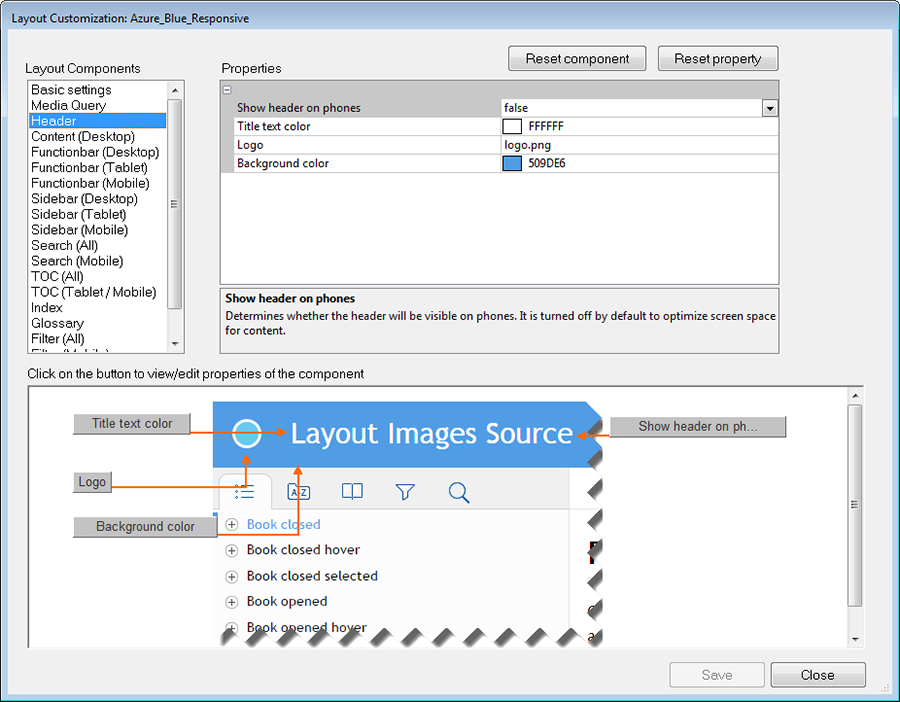
2)Select a layout component from the Layout Components list.
Each component has a set of customizable properties associated with the component.
3)To edit a property, go to the property value in the Properties pane and edit it.
You can go to a property in the Property pane by clicking the property in the Property pane and editing the value of the property.
Alternatively, notice the Component preview pane displays the preview of the component. In addition, the preview pane displays buttons pointing to each property in the preview pane.
You can click a property button in the preview pane to go to the property in the Properties pane.
This will allow you to identify (from the preview) the property that you are editing.
4)Click Save to save the updates.
5)To reset all the component properties, click Reset component.
6)To reset a specific component property, select the component (either from the Property pane or from the preview pane) and click Reset property.
7)After you have completed the layout customization, click Close.
Upload your mobile app to the app store
After you have configured your mobile app settings, you can then generate the app. This app is the uploaded to the PhoneGap server. You can then either download the app to your computer or you can use the QR code to download the app to your mobile device.
To upload the app to the Apple or Android app stores, follow the instructions in the following articles:
•Submitting Your App to the Apple App Store
Additional information on Adobe DPS output
note: You cannot publish FrameMaker documents to the DPS output format on Windows 32 bit computers.
While creating articles on the Adobe DPS portal, make sure that you keep the article name the same as the file name (without the extension) of the article on your computer. This will ensure correct functioning of the FrameMaker cross-references in the DPS output.
For example, if you have the following 3 .article files generated by FrameMaker, on your computer:
•Great_Pyramids.article
•Amazon_Rainforest.article
•Grand_Canyon.article
Then, while creating the articles on the DPS portal, choose the following article names for each file, respectively:
•Great_Pyramids
•Amazon_Rainforest
•Grand_Canyon
This will ensure that any cross-references across these articles, will function correctly in published output (App).
Publish Responsive HTML5 output on RoboHelp Server 10
Follow the steps given below to publish Responsive HTML5 output on RoboHelp Server 10:
note: Before performing the steps in this procedure, ensure that your RoboHelp Server 10 is up and running.
1)Select the document file (.fm or .xml) or book file (.book or .ditamap) that you want to publish.
2)Select File > Publish.
3)In the Publish pod, right-click Responsive HTML5 and select Edit Settings.
The Output tab appears with the Responsive HTML5 selected by default.
4)Select the Server tab.
5)Click New to create a RoboHelp Server destination to publish projects. In the New Destination dialog, provide Descriptive Name, Server Name, User ID, and Password to connect and authenticate to the RoboHelp Server.
6)Click the Refresh button to refresh the list of areas from the server. If you do not select an area, the project is published in the default area.
note: To publish to the default context (robohelp), enter the server name in the http://<server-name>:<port-number> format. FrameMaker appends /robohelp/server to it. Else, to publish to a context other than the default context (robohelp), specify complete URL in the format http://<server-name>:<port-number>/<context- name>/server.
7)Click OK to save the server configurations and close the New Destination dialog.
The new server destination can be seen in the Servers dialog.
8)Click Save and Close to close the Publish Settings dialog.
9)To publish the project to the server, right-click Responsive HTML5 in the Publish pod and click Publish to Server.
10)Click Publish in the Result dialog.
You can view the files published on the server in the Statistics window.
note: To view the project on the server, go to RoboHelp Server Web Administrator and in the Projects tab, select the area where you have published the projects.