Using the Browse URL workflow
The Browse URL dialog box is integrated in all FrameMaker workflows. The Browse URL button appears in all FrameMaker dialog boxes related to file management.
New
You can specify the HTTP URL of the template you want to use for a new document. You can either type the complete URL of the template in the New dialog box or use the Browse URL dialog box to select the template.
Open
You can open any HTTP file on a server by typing its URL in the filename of the file Open dialog box. You can open all the FrameMaker file types supported through local file paths using HTTP paths. These file types include .fm, .book, .mif, .xml, .ditamap, and .bookmap. You can also open text file, Microsoft Office file formats, such as RTFs, and QuarkXPress documents.
Import
You can import files by specifying their HTTP paths. You can import them by reference or copy them into your document. You can import an HTTP text inset, add a cross-reference to an HTTP file, import graphics, U3D objects, or SWF files by specifying their HTTP paths.
Save
You can specify a URL in the Save As dialog to upload the file to a WebDAV enabled server. You can save a file in all FrameMaker formats.
note: You cannot do a batch conversion of documents for HTTP WebDAV directories.
Browse URL
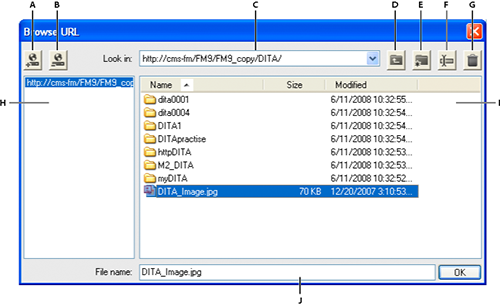
A. Store the URL path by specifying a nickname to the server B. Delete the stored URL path C. Look In list displays the recently accessed file D. Move up one folder level E. Create a folder on the server F. Rename a file or folder G. Delete selected file or folder H Stored server name I. File details that you can sort according to any column J. Specify the complete URL for a file
Save a WebDAV server connection
When working with Browse URL you don’t have to explicitly set up a server. If a WebDAV server has an authentication process setup, you need to provide login credentials the first time you access a file on the server. If you work frequently with a server, you can save the server connection in the Browse URL for quicker access.
1)Access the Browse URL dialog box and type the HTTP path to the WebDAV enabled server in the filename box.
2)If prompted, specify your login ID and password.
3)To save the server connections, click the Store URL  button.
4)Specify a nickname for the server connection and click OK.
Once saved, the server connection is displayed each time you access the Browse URL dialog box.
To delete a saved server connection, click the Remove URL  button.
Setting preferences
1)Choose Edit> Preferences and set the following options.
Checkout HTTP Files On Open
Clear this option if you do not want to check out a file from a WebDAV server when opening the file.
Upload HTTP Files On Save
Clear this option if you want to check in a file only once when you close the file.
Using HTTP paths to open files
You can open any file on a WebDAV server by specifying its URL.
For xml files, FrameMaker silently downloads all HTTP references, such as the xml schema or the DTDs associated with the xml file. Other references, such as text or graphic insets or cross-referenced files are also downloaded.
You can also reference or import graphic file objects in your documents by specifying their URLs. You can include links to documents by specifying their HTTP paths in hypertext markers.
Add, open, and save documents
You can create, save, or open files directly from a WebDAV server by specifying the file URL.
Create a file
1)Choose File > New > Document and click the Browse URL button.
2)Select the server name from the right panel or specify the HTTP path to the server.
3)Specify a filename and click OK.
You can create a DITA topic, Ditamap, or a bookmap on a WebDAV server.
1)Choose DITA > New DITA File and select any option from the menu.
2)Click the Browse URL button in the new file dialog boxes to create a DITA file on a WebDAV server.
Open a file
If you selected the Checkout HTTP Files On Open option from the Preferences dialog box, a file is automatically locked and checked-out when you download it. An asterisk symbol appears against the filename indicating that it is checked-out.
Open a n unstructured FrameMaker file
1)Choose File > Open and click the Browse URL button.
2)Select the server name from the right panel, navigate to the folder, and double-click the file to open it.
Alternatively, specify the complete HTTP path to the file and click Open.
Open a DTD
1)Choose Structure Tools > Open DTD and click the Browse URL button.
2)Select the server name from the right panel, navigate to the folder, and double-click the file to open it.
Alternatively, specify the complete HTTP path to the DTD file and click Open.
Open a schema
1)Choose Structure Tools > Open Schema and click the Browse URL button.
2)Select the server name from the right panel, navigate to the folder, and double-click the file to open it.
Alternatively, specify the complete HTTP path to the schema file and click Open.
Save a file
You can automatically upload changes to the WebDAV server. To do so, ensure that you have selected the Upload HTTP Files On Save option in the Preferences dialog box.
1)Choose File > Save As and click the Browse URL button.
2)Select the server name from the right panel, navigate to the folder, and click Save.
Save a DTD
1)Choose Structure Tools > Save As DTD and click the Browse URL button.
2)Select the server name from the right panel, navigate to the folder, and click Save.
Import files
Import a file:
Choose File > Import > File and click the Browse URL button.
Import a DTD:
Choose Structure Tools > Import DTD and click the Browse URL button.
Import a schema:
Choose Structure Tools > Import Schema and click the Browse URL button.
Import a CSS file:
Choose Structure Tools > Import CSS and click the Browse URL button.
Close a file
By default, when you close a file the file is automatically checked-in.
Associate a template with a folder
You can specify the HTTP path of the template when associating it with a folder in a hierarchical book.
1)In the book window, right click the folder for which you want to specify a template and click Properties.
2)Select the Template Path option and click the add template button  to browse for a file.
3)Specify the complete HTTP path in the filename box or click Browse URL to locate the file on the server.
4)Click OK, Open, and Set to associate a template for the selected folder.