Viewing options
Faster page display
To display pages quickly:
•Open the document by bypassing the update of imported graphics, cross-references, and text insets. (Opening a document without updating references makes a document open faster but can slow down the display of individual pages.)
•Turn off the display of graphics by choosing View > Options, deselecting the Graphics option, and clicking Set.
important: If you deselect the Graphics option and generate a PDF, the graphics do not appear in the PDF.
•Display small text as gray bars by choosing File > Preferences > General, entering a point size in the Greek Screen Text Smaller box, and clicking Set. Whenever text in your document is in a point size smaller than the size you specified, it appears on the screen as a gray bar.
Preset display units
Some text boxes in dialog boxes require a unit of measurement (such as points or inches) for the value you enter. You can specify the default units for font size and line spacing (font size units) and for other measurements (display units). The default units of measurement appear after the values in the text boxes. If you enter a value without a unit of measurement, FrameMaker uses the default unit.
•To change the preset units, make the appropriate window is active. Select View > Options. Select the values for Display Units and Font Units, and then click Set.
•To enter different units in a box, make the appropriate window active. Enter an abbreviation for the unit along with the numeric value. Use cm for centimeters, mm for millimeters, "or in for inches, pc, pi, or pica for picas, pt or point for points, dd for didots, cc or cicero for ciceros, Q for Q units (refers to font size and line spacing for the Japanese language only).
FrameMaker converts the entry to the preset display units when you click a command button in the dialog box. For example, if your document display units are picas and you want to set a paragraph indent of 1 inch, enter 1" in the First Indent box. When you click Apply, the measurement changes to the number of picas that corresponds to 1 inch.
Spacing of ruler or grid intervals
1)Make the appropriate document window or book window active. If a book window is active, select the documents you want to affect.
2)Select View > Options. Select a new setting from the Rulers menu or the Grid menu, and click Set.
Line numbers
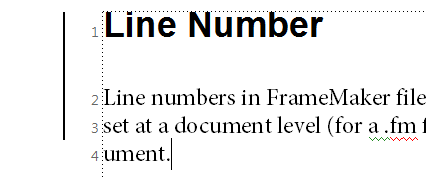
Line numbers in FrameMaker files help you identify particular lines of content. Line numbers are set at a document level (for a .fm file) and appear before each inserted line in a FrameMaker document.
While using line numbers and change bars, ensure that they do not overlap.
Line numbers and change bars displayed in a FrameMaker file
Insert line numbers
To insert line numbers, complete the following steps:
note: You can also use the View > Line Numbers to display/hide line numbers.
1)Select Format > Document > Line Numbers.
2)In the line number properties dialog, select Show line numbers and specify the following:
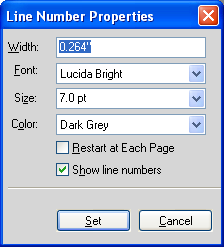
a)Width: Distance of line numbers from the column. The distance is relative to the columns that contain text.
b)Font: Font of the line numbers
c)Size: Size of the line numbers
d)Color: Color of the line numbers
e)Restart at Each Page: Selecting this option restarts line numbers for each page
Some highlights of line numbers
1)Support for multicolumn and multiflow formats: For files with multicolumn formats, line numbers appear for text in each of the columns. For multi-flow documents, the line numbers are calculated according to the text flows and continue accordingly.
2)Recalculation: When you insert text within a paragraph with line numbers are enabled, the line numbers are recalculated to accommodate the new text.
3)Document level property: Line numbers are a document level property, so you can enable/disable this feature for a document (.fm file). Line numbers can be set at a document level to continue from previous page or restart at each page.
4)Text flows: For multi-flow documents, the line numbers follow the text flows and continue according to the text flows.
5)XML documents: Line numbers do not persist in XML documents. However, you can enable line numbers in the application template.
6)Printing: Line numbers are visible in the print and PDF created using Save As PDF.
Visual guides
You can show several of these visual guides in a document window:
•Borders around text frames, graphic frames, and imported objects
•Markers, paragraph returns, and other symbols in running text
•Rulers along the top and left side of the window
You can also show a grid of horizontal and vertical lines for drawing, resizing, and aligning graphics. All visual guides are non-printing, so you do not need to hide them when you print.
1)Make the appropriate document window or book window active. If a book window is active, select the documents you want to affect.
2)Do the following:
•To show or hide borders, select View > Borders.
•To show or hide the text symbols, select View > Text Symbols.
•To show or hide the rulers, select View > Rulers.
•To show or hide grid lines, select View > Grid Lines.
•To show the element boundaries, select View > Element Boundaries or Element Boundaries (As Tags) in Structured FrameMaker. FrameMaker automatically toggles these two options.
Text symbols
|
Text symbol |
Meaning |
|---|---|
|
|
End of paragraph |
|
|
End of flow and end of table cell |
|
|
Tab |
|
|
Anchored frame and table anchor |
|
|
Marker |
|
|
Forced return |
|
|
Manual equation alignment point |
|
|
Non-breaking space |
|
|
Discretionary hyphen |
|
|
Suppress hyphenation |


Subset of menu commands
You can display a subset of menu commands called quick menus. The quick menus do not have commands for formatting text, editing some aspects of graphics, and inserting some objects such as markers and variables.
If you do not see the full set of menu commands, the quick menus is probably displayed.
note: If you’re using a structured document, your application developer can change the commands available in the complete menus.
•To display quick menus, select View > Menus > Quick.
•To restore the complete menu, select View > Menus > Complete.
•To customize menus, add, move, or remove menus and commands as described in the online manual Customizing FrameMaker on the Adobe website www.adobe.com/go/lr_FrameMaker_support_en.
High-contrast workspace
FrameMaker uses system colors to draw window backgrounds, text, and other graphics. Users who have trouble discerning colors or variations in contrast, or who have low visual acuity, can set high-contrast color schemes and custom text and background colors. This setting makes the information in the user interface easier to view.
1)Open the Windows Control Pod, double-click Accessibility Options, and select the Display tab.
2)Change contrast globally or change the color theme, as follows:
•To change the appearance of all operating system windows at once, select the Use High Contrast option.
•To change the color theme, click Settings and select one of the High Contrast Appearance Scheme options.
note: FrameMaker does not adjust colors of all items. Some of these include the background color, and the fill color of graphic objects.