|

About universal voice audio providers
Audio
providers
are companies that provide audio conferencing services
that work with Connect. Administrators configure the audio providers
that everyone on an account can use. Hosts configure providers for
a specific use, such as a meeting. Both account administrators and
hosts can configure an audio provider for universal voice.
The
configuration for a
universal voice audio provider
includes
the details required for hosts and participants to join an audio
conference, such as the telephone numbers and steps required to
dial into the audio conference. The configuration also specifies
the host-defined options. For example, administrators configure the
tones and pauses for dialing into a meeting. Hosts provide the meeting
ID and any passwords that participants use to join the audio conference.
Once you configure a universal voice audio provider, meeting
hosts can create audio profiles that map to the provider. Audio
profiles contain the audio conference settings used to start an
audio conference.
Universal voice audio providers include these types:
For more information about Connect audio providers, see
Audio conferencing options
. Adobe Connect accepts either a free
phone numbers originating in the United Kingdom of the format 0800
or 0808 or an international free phone numbers of the format 00800.
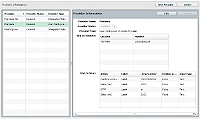
View audio providers
All available audio providers for a specific account appear
in the Provider Information window. Each audio provider is configured
with descriptive information and a dialing sequence for connecting
to an audio conference. You can view the information associated
with any audio provider on the account. Only enabled providers can
be edited.
Note:
Administrators, limited administrators, and hosts can access
this window.
-
Do one of the following to view the provider list:
-
(Administrators) Click the Administration tab at the top
of the Adobe Connect Central window, and then click Audio Providers.
-
(Hosts) Click My Profile at the upper-right corner of the
Connect window, and then click My Audio Providers.
-
To view provider information, select the provider in the
list.
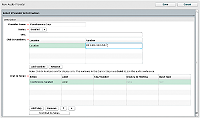
Create or edit audio providers
Use the New/Edit Audio Provider window to configure universal
voice audio providers. Fields in the New/Edit Audio Provider dialog
box with a red star are required.
When you add an audio provider to an account, the provider appears
in the Provider Information window (Administration >
Audio Providers or My Profile > My Audio Providers).
-
Do one of the following to view the provider list:
-
(Administrators) Click the Administration tab at the top
of the Adobe Connect Central window, and then click Audio Providers.
-
(Hosts) Click My Profile at the upper-right corner of the
Connect window, and then click My Audio Providers.
-
Do one of the following to add conferencing details for a
provider:
-
To add a provider, click New Provider.
-
To edit a user-configured provider, select the provider in
the left pane and click Edit.
-
Add or change conference identification details and click
Save.
-
Provider Name
-
Name of the audio provider, such as MeetingPlace.
-
Provider Status (Enabled/Disabled)
-
Only enabled providers can be edited. Enabled providers appear
to hosts when they set up an audio profile for an audio conference.
You can enable multiple providers for an account.
Important:
Disabling a provider also disables all the
current audio profiles set up for this provider and disassociates
the audio profiles from the meetings.
-
URL
-
A link to an information page. For example, this page can
include conference account details for hosts to use when setting
up their audio profiles. The information page could also be a sign-up
page for purchasing a conference account from an audio provider.
Account administrators typically create these information pages.
-
Dial-In Numbers
-
Numbers for dialing into a meeting. To add dial-in numbers, click
Add Number, click the word Location, and type a name, such as
Internal
or
the country name. Click the word Number and type the dial-in number.
The dial-in numbers appear in the upper-right corner of the meeting
room.
Note:
Provide either a free phone number originating in the
United Kingdom of the format 0800 or 0808 or an international free
phone numbers of the format 00800.
-
Dial-In Steps
-
A sequence of DTMF tones and pauses for dialing into an audio conference.
The dialing sequence also include the conference number as the first
step.
Define a dialing sequence
The
dialing sequence
or
dial-in
steps
are DTMF tones and pauses for dialing into an audio
conference. In hosted accounts, the Adobe Connect server uses the
dialing sequence to join the audio conference in the background
when the host joins the conference in the meeting room. Some DTMF
tones can be host-defined options, such as participant codes. You
build a dialing sequence for a provider by placing these items in
sequence in a table.

A well-defined dialing sequence
can require small and frequent adjustments to the dial-in steps.
One way to create the flow of steps is to dial into the audio conferencing
service using a telephone and take notes. For example, dial in as
a moderator and start the audio conference. Use a separate telephone
to dial into the conference as a participant, and then write down
the steps to enter the conference.
View full size graphic
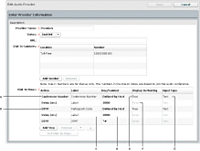
Example of a dialing sequence
-
A.
-
Telephone number to join the audio conference
-
B.
-
DTMF tones
and pauses between actions
-
C.
-
Name for
the step
-
D.
-
Values entered to program
the step
-
E.
-
Displayed in meeting
-
F.
-
Not displayed
in meeting
-
G.
-
Displays information
as a text box
Most options appear in pop-up menus. To display a pop-up menu,
click the information in each row.
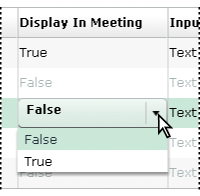
Available choices for the Display In Meeting column
-
In the Dial-In Steps section of the New/Edit Provider
window, click Add Step.
-
In the Action column, click the information in the first
row, and select Conference Number from the pop-up menu. Enter the
dial-in number for the meeting room and specify the remaining information
for that step.
-
For each remaining step in the dialing sequence, specify
DTMF tones and pauses.
-
To move a step up or down in the sequence, select the step
and use the Up or Down Arrows.
-
To delete a step, select it and click Remove.
-
When you’re finished, click Save.
Dialing sequence options
Action column
-
Conference
Number
-
The
telephone number for joining the audio conference. The conference
number must be the first step in the dialing sequence.
Hosted accounts
,
where Adobe provides the server for the account, require a toll
free U.S. telephone number to join an audio conference.
On-premise
or
licensed
accounts
can use any number. Only one conference number is
allowed.
-
DTMF
-
Buttons on a telephone keypad, such as the pound key (#).
-
Delay (ms)
-
The delay in milliseconds between each action. These delays provide
pauses before a meeting participant enters information. For example, users
wait for a welcome announcement before entering a participant code.
You specify the amount of delay in the Key/Number column.
Label column
-
Label
-
An identifier for the action. For example, to program a DTMF
action for a meeting ID, replace the word Label in the column with
Meeting ID. Only labels for Defined By Host actions appear in the
program. In the Meeting ID example, a text box labeled Meeting ID
appears when hosts create an audio profile for this provider.
Key/Number column
In this column, you
choose which steps a host has to define. Host-defined steps appear
when a meeting host sets up an audio profile for an audio conference.
-
(blank)
-
The numbers or symbols on a telephone keypad required to
complete the step. For example, to program a pause of 5000 milliseconds
for users to wait for a welcome announcement, click the blank option
and enter 5000.
-
Defined By Host
-
Account administrators choose this option when they want hosts
to enter information while setting up an audio profile for an audio conference.
For example, a host-defined DTMF action with the label “Meeting
ID” requires the host to enter the meeting ID when setting up the
audio profile.
Display In Meeting column
The pop-up menu
in this column is available only for Defined By Host steps.
-
False/True
-
Determines whether the information for this action is displayed
in the meeting invitation and upper-right corner of the meeting
room window.
Input Type column
The pop-up menu in this
column is available only for Defined By Host steps. The options
define how information appears when hosts set up audio profiles.
These options also determine how the information appears in read-only
pages, such as the Audio Conference Information section in a meeting
room.
-
Text
-
Displays a single-line text box in the audio profile, and
a single line of information in read-only pages.
-
Password
-
Shows the information as asterisk characters (*).
Test a dialing sequence
It’s a good idea to test the dialing sequence before you
use it to start an audio conference. Using this test, you can ensure
that you have accounted for all the required steps and that the
delays between steps are sufficient. If you have added any host-defined
steps to the dialing sequence, be prepared to enter that information
in the Test Dial-In Steps dialog box. For example, to have Connect
dial into the audio conference as a participant, enter the participant
code in the dialog box.
-
Click Test Dial-In Steps at the bottom of the dialing
sequence.
-
Fill in the host-defined text boxes.
-
Click Connect in the Test Dial-In Steps dialog box.
As
soon as the call is answered, you can hear if audio is being broadcast.
-
Listen to the audio and then adjust the dialing sequence
as necessary.
Note:
If the provided free phone numbers are not the type of numbers
recommended above, the dial out fails.
Delete an audio provider
-
Click the Administration tab at the top of the
Connect Central window.
-
Click Audio Providers.
-
Select the provider in the Audio Providers list and click
Delete.
|
|
|