|

If your authoring and publishing environment includes these
two tools, you have multiple options of incorporating their strengths
into your workflow.
You can map FrameMaker formats directly to RoboHelp styles in
a standard CSS that ensures consistency in appearance and behavior
across the entire project. In addition, within FrameMaker, you can
use markers to denote context-sensitive topics, which you can directly
reuse in RoboHelp to create a context-sensitive Help system.
-
FrameMaker and RoboHelp as independent products
-
If you have FrameMaker and RoboHelp as independent products,
you can retain your authoring workflow. In this workflow, you author
content in FrameMaker for print and PDF output. Then you use RoboHelp
to generate richly formatted online Help. Both FrameMaker and RoboHelp
provide enhanced features for importing FrameMaker content into
RoboHelp projects. You can also use them together to create online
Help formats such as WebHelp and Help based on
Adobe
AIR
.
-
Adobe Technical Communication Suite
-
Adobe® Technical Communications Suite provides technical
communicators a streamlined workflow to author content once and
deliver in multiple formats. You can author in FrameMaker and publish
richly formatted PDF for print and online viewing. Technical Communication
Suite provides more features than the component applications that
make the suite. You can integrate FrameMaker and RoboHelp authoring
and publishing and dynamically link FrameMaker and RoboHelp content.
Adobe
Technical Communication Suite includes Adobe Captivate and Adobe Photoshop—tools
that you can use to include rich multimedia capabilities in your
output formats. In addition, you can use Adobe Acrobat to set up
shared reviews and consolidate review comments and edits. You can
later import these comments and edits into your FrameMaker documents.
Authoring considerations for optimizing for online output
If your authoring process in FrameMaker is optimized for
print output, consider the following before linking or importing
FrameMaker documents into RoboHelp projects.
-
Heading formats
-
Determine the best mapping of FrameMaker heading formats
to RoboHelp styles. FrameMaker documents define various heading formats
specifically for print documentation. Among these formats are side heads
and heading styles that start on a new page. These formats don’t
apply to online formats. You generally map these heading styles
to a few standard styles in the RoboHelp project.
-
Page layout settings
-
Often FrameMaker chapter templates specify an even number
of pages so that new chapters begin on a recto (right) page. For
online Help, ignore these pagination considerations.
-
Headers and footers
-
RoboHelp ignores headers and footers during conversion, including
legal text such as “Confidential” and copyright lines. Include such
text in the headers and footers in a separate step, after conversion.
Similarly, in RoboHelp, re-create watermark text or images that
you used in the printed documentation.
-
Navigation
-
In print, cross-references specify page numbers which are
irrelevant in Help. Converting to online Help removes chapter and
section titles in headers and footers. You can enhance navigability
by using breadcrumbs, and back and next buttons instead.
-
Redundant content
-
To provide context in different sections of a printed document,
writers generally add redundant information such as brief summaries of
concepts covered previously. Because online Help is a random-access, nonlinear
medium, it requires less redundant content. Use cross-references
and conditional text options to minimize redundant content in your
outputs.
-
Chapter versus topic
-
In printed documentation, chapters signal stand-alone logical
units, which readers use to grasp the scope of content. Online Help
segregates content at topic level, accessed one topic at a time.
You can group the content into chapter-like folders that expand
when a user navigates the table of contents. Even so, only one topic
appears at a time. In this case, try to provide comprehensive information
without adding redundancy by grouping related topics together.
-
Context sensitivity
-
Although you can assign map IDs to topics in RoboHelp, you
can also assign context-sensitive Help markers in FrameMaker documents. RoboHelp
reads these markers and assigns the map IDs to the generated topics. Ensure
that the topics created in FrameMaker contain sufficient information.
For
example, a short procedure as a stand-alone topic does not provide conceptual
context for the reader. To avoid creating topics with incomplete
information, assign context-sensitive Help markers to topics at
a higher level. In this way, the generated Help topic contains the
concept, procedure, and any relevant graphics.
Prepare FrameMaker documents for conversion to Help
If the FrameMaker document that you are importing is an
unstructured FrameMaker book, you can define a single FrameMaker
template for the conversion. You can then specify this template
as the project template that overrides the formats of individual
documents at the RoboHelp project level. You can also reuse the
conversion settings across other projects by exporting the conversion
settings.
Carefully examine the FrameMaker templates before importing the
documents into RoboHelp, such as when you use a general-purpose
FrameMaker template. If this template contains formats that aren’t
used in the book, omit those formats in the template you use for
the conversion.
-
Create a FrameMaker template that contains the formats
you need in Help. Alternatively, customize the FrameMaker template.
You don’t have to apply the template manually. You can set RoboHelp
to apply a selected template to FrameMaker files before they are
linked or imported to RoboHelp.
In Structured FrameMaker,
the element definition document (EDD) or the DTD used in the structured
FrameMaker template automatically controls formatting. Because structured
FrameMaker enforces a valid structure and format, structured documents
do not contain format overrides.
-
Create the required DHTML effects such as expanding text
and drop-down text using the RoboHelp menus in FrameMaker.
-
Apply context-sensitive Help markers to the required topics.
-
Enclose graphics, callouts, and graphic or text frames you
created with FrameMaker graphic tools in anchored frames. RoboHelp
imports only those FrameMaker graphics that are enclosed in anchored
frames.
By default, graphics and multimedia files imported
into a FrameMaker document are placed in anchored frames. If your
FrameMaker document contains graphics in graphic frames, place them
in anchored frames before linking or importing the FrameMaker files
into RoboHelp.
-
To maintain the original quality of images, insert them in
FrameMaker documents by reference. RoboHelp copies the referenced
images directly from the source if the complete image is visible
inside the anchored frame. Similarly, if the images are large, insert
them in the source document by reference.
-
Fix any issues in the document such as unresolved cross-references,
missing fonts, and irregular numbering issues.
-
Set up alternative text or captions for the images and graphics
to create accessible online content.
-
Apply conditional text settings in FrameMaker documents.
-
Edit the FrameMaker TOC reference pages to have indented
hierarchical headings with different styles.
Linking options for documents
When you link a document to a RoboHelp project, you have
two options. To specify the linking options, in RoboHelp choose
File > Project Settings. Click the Import tab and select one
of the following:
-
Create a Reference
-
You create a reference to an external document. In this case, the
source document is not copied into the RoboHelp project folder and
remains outside the project. However, the document is visible in
the Project Manager pod. You can edit and update the source document
independently. Later, in RoboHelp, you can update the topics generated
from the linked document.
Use the linking by reference option
to bring in content that is shared across multiple projects. Because
only a single copy of the document exists, any change in the source
document is reflected in all projects to which this document is linked.
-
Create a Copy and Link
-
You create a copy of the source document and link to the
RoboHelp project. In this case, a copy of the source document is
copied into the RoboHelp project and is visible in the Project Manager
pod. You can edit and update the copy without affecting the source
document. You update the topics generated from the copied document
whenever you edit the document.
Use the Create a Copy and
Link option to maintain the document in RoboHelp and restrict access
to the source document. This option allows editing only in the copy
available in the RoboHelp project. For example, if you want to bring
in content from a static FrameMaker document, link the document
by copying it to the RoboHelp project.
Note:
FrameMaker books are
always linked by reference, irrespective of the linking option you
choose.
Trade-offs between linking and importing
-
Link FrameMaker and Word documents when your
entire authoring is in one or both of these tools. You can make
full use of RoboHelp’s advanced integration features, such as converting
TOC, index, and glossaries, and creating context-sensitive Help.
Whenever the source content changes, you can quickly update the
topics generated in RoboHelp from the linked documents. In such
cases, RoboHelp converts your FrameMaker or Word documents to multiple
Help outputs with a few clicks, with little, or no native authoring
in RoboHelp.
-
Import FrameMaker and Word documents when you have multiple independent
documents and carefully use RoboHelp’s integration features. In addition,
ensure that the documents you import are stable and don’t require updates
independently until you have finished publishing the online Help.
-
Avoid editing the generated topics in RoboHelp so that you
don’t lose your edits if you have to update the generated topics
or overwrite them. Topics generated from
linked
documents
can be preserved with their edits, but topics generated from
imported
documents
are overwritten.
-
If you are making minimal changes to a large RoboHelp project,
do not link or import documents into RoboHelp. Doing so can disturb
the natively created TOC, index, and glossary, pagination, and context-sensitive
Help settings.
Linking and importing FrameMaker documents
The RoboHelp workflow for linking or importing FrameMaker
documents allows you to do the following:
-
Create a RoboHelp project by importing a FrameMaker book
or DITAMAP.
-
Link or import FrameMaker book or DITAMAP into a RoboHelp
project.
-
Link or import FrameMaker documents into a RoboHelp project.
You can import FM, MIF, DITA, and XML files.
When you link a FrameMaker book or DITAMAP, HTML files are not
created until you define the project settings and generate the Help
topics. At the same time, you can see the added files in their hierarchical
order. Importing the FrameMaker documents and editing the HTML files
generated from them in RoboHelp does not affect the source FrameMaker
documents.
Before you import FrameMaker documents, check them in FrameMaker
for errors such as unresolved cross-references and format overrides.
Create a RoboHelp project by linking or importing FrameMaker books or documents
You can create a RoboHelp project by importing FrameMaker
books or documents.
-
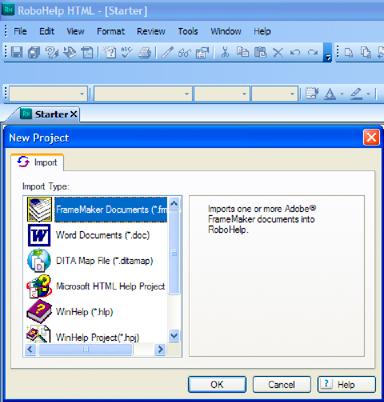
On the RoboHelp Starter page, click
More under Import, or select File > New > Project.
-
On the Import tab of the New Project dialog box, select FrameMaker Document
and click OK.

Importing a FrameMaker book or ditamap to create RoboHelp
project
-
Select the FrameMaker book or document from the Files Of
Type pop-up menu. Then browse to select the FrameMaker book, and
click Open.
Import a FrameMaker book or DITAMAP into RoboHelp project
-
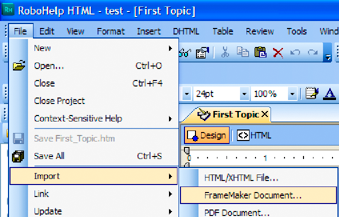
Create a project or open an existing project in
RoboHelp.
-
Select File > Import > FrameMaker
Document.

Importing a FrameMaker book or ditamap into a RoboHelp project
-
Select FrameMaker Book or FrameMaker DITAMAP from the Files
Of Type pop-up menu.
-
Browse to select the FrameMaker book or DITAMAP file and
click Open.
-
Optionally, select a DITAVAL file and click Open. Click Cancel
to proceed without a DITAVAL file.
If you are importing a FrameMaker document, you can select the
components that you want to import from the Content Settings wizard
that appears. You can select the TOC, index, and glossary, and specify
the conversion settings.
Note:
FrameMaker documents created in versions earlier than 6.0
(FRM files) can be imported but not linked.
Link a FrameMaker book or DITAMAP into RoboHelp project
-
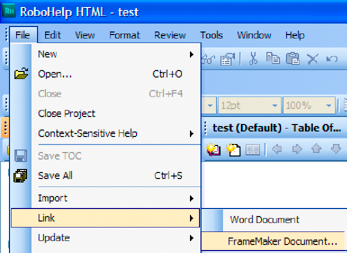
Create a project or open an existing project in
RoboHelp.
-
Select File > Link > FrameMaker Document.

Linking a FrameMaker book or ditamap into a RoboHelp project
-
Select FrameMaker Book or FrameMaker DITAMAP from the Files
Of Type pop-up menu.
-
Browse to select the FrameMaker book or DITAMAP file and
click Open.
Note:
FrameMaker documents created in versions earlier than 6.0
(FRM files) can be imported but not linked.
Generate HTML topics from linked FrameMaker documents
Linking FrameMaker documents does not automatically create
the topics. You generate the topics after you set the project and
conversion settings.

Do one of the following:
However, if you are importing a FrameMaker document, topics are
generated immediately according to the conversion settings you specify.
In addition, you can select the components that you want to import
from the Import wizard that appears. You can select the TOC, index,
and glossary, and specify the conversion settings.
Convert a FrameMaker TOC
When you import a FrameMaker book to a RoboHelp project,
you can also import the table of contents (TOC). Import the TOC
into the RoboHelp project to retain the navigation structure you
defined in the FrameMaker book.
-
Select File > Import > FrameMaker Document.
-
In the Content Settings dialog box, select Convert FrameMaker
Table Of Contents, and browse to select the FrameMaker TOC file.
-
Select one of the following options:
-
Add To Existing TOC
-
Appends the TOC entries to any existing RoboHelp TOC in the
project. Select an existing RoboHelp TOC from the list.
-
Create New Associated TOC
-
Enter a name for a new associated TOC that is added to the
RoboHelp project.
Styles in the FrameMaker TOC determine which TOC items become
books, sub-books, or pages. The most important element in determining
the level is the left-most indent, followed by the font size and
font weight. TOC entries that have indented items under them become
books in the RoboHelp TOC. If all the TOC entries have the same
indention, font size, and weight, the TOC in RoboHelp appears flat.
-
To make a heading a main book, include indented heading
levels beneath that heading, or use smaller fonts or no bold for
the subsumed headings.
-
To make a heading a sub-book, place the heading under a main
heading. Then include indented heading levels beneath the sub-book
heading, or use smaller fonts or no bold for the subsumed headings.
-
To make a heading a page, don’t include any heading levels
beneath that heading. Indent the page heading, or use smaller fonts
or no bold.
Differences between FrameMaker and RoboHelp TOCs
You can either import the FrameMaker TOC or automatically
create a TOC in RoboHelp from generated topics.
-
In FrameMaker, the TOC is generated according to the
heading styles that you include in the TOC. In RoboHelp, the TOC
is generated according to the topic titles. If you use topic name
markers in FrameMaker to name the topics when you import FrameMaker
documents, filenames in RoboHelp differ from the topic titles.
-
Autocreating a TOC for a FrameMaker 9 book can create multiple
layers of content because of the folder structure in a FrameMaker
9 book.
-
In RoboHelp, you can place a TOC placeholder in another TOC,
thus allowing you to create nested TOCs.
Import FrameMaker index entries
RoboHelp creates an index based on the index markers in
the document you are importing. However, the index file generated
in the FrameMaker book is not imported into the RoboHelp project.
-
Select File > Import > FrameMaker
Document and select the FrameMaker book or document.
-
Select Convert Index in the Content Settings dialog box,
and select one of the following options:
-
Add To Existing Index
-
Add the FrameMaker index entries to the existing RoboHelp
index of the project.
-
Create New Associated Index
-
Enter a name for a new associated index that is added to
the RoboHelp project.
-
Add To Topic
-
Add the FrameMaker index entries to individual topics in
which they appear.
Import glossary definitions
RoboHelp creates a glossary based on glossary markers in
the document you are importing. The text inside the glossary marker
is the glossary term, and the paragraph text that contains the marker
is the definition.
-
Select File > Import > FrameMaker
Document and select the FrameMaker book or document.
-
Select Convert Glossary in the Content Settings dialog box,
and select one of the following options:
-
Add To Existing Glossary
-
Add the FrameMaker glossary to the RoboHelp glossary of the
project. You can select the glossary from the list.
-
Create New Associated Glossary
-
Enter a name for a new associated glossary that is associated
with the existing glossary in the RoboHelp project.
|
|
|