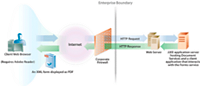
The Forms service renders interactive PDF forms to client
devices, typically web browsers, to collect information from users.
After an interactive form is rendered, a user can enter data into
form fields and click a submit button located on the form to send
information back to the Forms service. Adobe Reader or Acrobat must
be installed on the computer hosting the client web browser in order
for an interactive PDF form to be visible.
Note:
Before you can render a form using the Forms
service, create a form design. Typically, a form design is created
in Designer and is saved as an XDP file. For information about creating
a form design, see
LiveCycle Designer
.
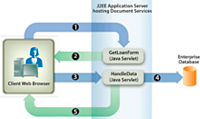
Sample loan application
A sample loan
application is introduced to demonstrate how the Forms service uses
interactive forms to collect information from users. This application
lets a user fill in a form with data required to secure a loan and
then submits data to the Forms service. The following diagram shows
the loan application’s logic flow.
The
following table describes the steps in this diagram.
|
Step
|
Description
|
|
1
|
The
GetLoanForm
Java Servlet
is invoked from an HTML page.
|
|
2
|
The
GetLoanForm
Java Servlet
uses the Forms service Client API to render the loan form to the
client web browser. (See
Render an interactive PDF form using the Java API
.)
|
|
3
|
After the user fills the loan form and clicks
the submit button, data is submitted to the
HandleData
Java
Servlet. (See
“Loan form”
.)
|
|
4
|
The
HandleData
Java Servlet
uses the Forms service Client API to process the form submission
and retrieve form data. The data is then stored in an enterprise
database. (See
Handling Submitted Forms
.)
|
|
5
|
A confirmation form is rendered back to
the web browser. Data such as the user’s first and last name is
merged with the form before it is rendered. (See
Prepopulating Forms with Flowable Layouts
.)
|
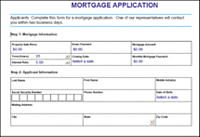
Loan form
This interactive loan form is
rendered by the sample loan application’s
GetLoanForm
Java
Servlet.
Confirmation form
This form is rendered
by the sample loan application’s
HandleData
Java Servlet.
The
HandleData
Java
Servlet prepopulates this form with the user’s first and last name
as well as the amount. After the form is prepopulated, it is sent
to the client web browser. (See
Prepopulating Forms with Flowable Layouts
.)
Java Servlets
The
sample loan application is an example of a Forms service application
that exists as a Java Servlet. A Java Servlet is a Java program
running on a J2EE application server, such as WebSphere, and contains
Forms service Client API code.
The following code shows the
syntax of a Java Servlet named GetLoanForm:
    public class GetLoanForm extends HttpServlet implements Servlet {
        public void doGet(HttpServletRequest req, HttpServletResponse resp
        throws ServletException, IOException {

        }
        public void doPost(HttpServletRequest req, HttpServletResponse resp
        throws ServletException, IOException {

            }
Normally, you would not place Forms service
Client API code within a Java Servlet’s
doGet
or
doPost
method.
It is better programming practice to place this code within a separate
class, instantiate the class from within the
doPost
method
(or
doGet
method), and call the appropriate methods.
However, for code brevity, the code examples in this section are
kept to a minimum and code examples are placed in the
doPost
method.
Summary of steps
To render an interactive PDF form, perform
the following tasks:
-
Include project files.
-
Create a Forms Client API object.
-
Specify URI values.
-
Attach files to the form (Optional).
-
Render an interactive PDF form.
-
Write the form data stream to the client web browser.
Include project files
Include necessary files into your development
project. If you are creating a client application using Java, include
the necessary JAR files. If you are using web services, ensure that
you include the proxy files.
Create a Forms Client API object
Before you can programmatically
perform a Forms service Client API operation, you must create a
Forms Client API object. If you are using the Java API, create a
FormsServiceClient
object.
If you are using the Forms web service API, create a
FormsService
object.
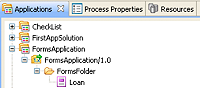
Specify URI values
You can specify URI values that are required
by the Forms service to render a form. A form design that is saved
as part of a LiveCycle application can be referenced by
using the content root URI value
repository:///
.
For example, consider the following form design named
Loan.xdp
located
within a LiveCycle application named
FormsApplication
:
To
access this form design, specify
Applications/FormsApplication/1.0/FormsFolder/Loan.xdp
as
the form name (the first parameter passed to the
renderPDFForm
method) and
repository:///
as
the content root URI value.
Note:
For information
about creating a LiveCycle application using Workbench,
see
workbench Help
.
The
path to a resource located in a LiveCycle application is:
Applications/Application-name/Application-version/Folder.../Filename
The
following values show some examples of URI values:
-
Applications/AppraisalReport/1.0/Forms/FullForm.xdp
-
Applications/AnotherApp/1.1/Assets/picture.jpg
-
Applications/SomeApp/2.0/Resources/Data/XSDs/MyData.xsd
When
you render an interactive form, you can define URI values such as
the target URL to where form data is posted. The target URL can
be defined in one of the following ways:
If
the target URL is defined within the form design, do not override
it with the Forms service Client API. That is, setting the target
URL using the Forms API resets the specified URL in the form design
to the one specified using the API. If you wish to submit the PDF
form to the target URL specified in the form design, then programmatically
set the target URL to an empty string.
If you have a form
that contains a submit button and a calculate button (with a corresponding
script that runs at the server), you can programmatically define the
URL to where the form is sent to execute the script. Use the submit
button on the form design to specify the URL to where form data
is posted. (See
Calculating Form Data
.)
Note:
Instead of specifying a URL
value to reference a XDP file, you can also pass a
com.adobe.idp.Document
instance
to the Forms service. The
com.adobe.idp.Document
instance
contains a form design. (See
Passing Documents to the Forms Service
.)
Attach files to the form
You can attach files to a form. When
you render a PDF form with file attachments, users can retrieve
the file attachments in Acrobat using the file attachment pane. You
can attach different file types to a form, such as a text file,
or to a binary file such as a JPG file.
Note:
Attaching
file attachments to a form is optional.
Render an interactive PDF form
To
render a form, use a form design that was created in Designer and
saved as an XDP or PDF file. As well, you can render a form that
was created using Acrobat and saved as a PDF file. To render an
interactive PDF form, invoke the
FormsServiceClient
object’s
renderPDFForm
method
or
renderPDFForm2
method.
The
renderPDFForm
uses
a
URLSpec
object. The content root to the XDP file is
passed to the Forms service using the
URLSpec
object’s
setContentRootURI
method.
The Form design name (
formQuery
) is passed as a
separate parameter value. The two values are concatenated to get the
absolute reference to the form design.
The
renderPDFForm2
method
accepts a
com.adobe.idp.Document
instance that
contains the XDP or PDF document to render.
Note:
The
tagged PDF run-time option cannot be set if the input document is
a PDF document. If the input file is an XDP file, the tagged PDF
option can be set.