|

You must set up your development environment before you
customize the LiveCycle Contentspace (Deprecated) user interface.
Your development environment consists of a number of files, such
as XML files, images files, and properties files, which you modify
to customize the Contentspace user interface. These files are retrieved
from taking the Content Services (Deprecated) WAR file (located
within Content Services EAR file) and extracting it, and then organizing your
development environment to modify and repackage the files back into
an EAR file that you deploy to the forms server.
Note:
Adobe is migrating Content Services ES customers
to the Content Repository built on the modern, modular CRX architecture,
acquired during the Adobe acquisition of Day Software. The Content
Repository is provided with LiveCycle Foundation and is available
as of the LiveCycle ES4 release.
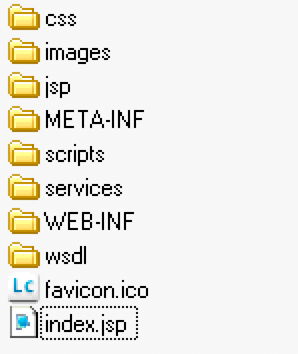
The following illustration shows the extracted content that you
should see after completing the steps in this section. This top-level
view is the
root level
in your development environment and
is referred to as root level for many of the procedures you see.
Copying the Content Services (deprecated) EAR file
You must copy the adobe-contentservices.ear file to another
location on your computer. The contents inside the adobe-contentservices.ear
file are used for customizations. After you are done your customizations,
you repackaged the files back into the adobe-contentservices.ear
file when you are ready to deploy your customizations to the application
server. Before you can complete this procedure, verify that you
can access the deploy folder on the forms server.

It is recommended that you make a backup copy
of the original Content Services (deprecated) EAR file in a separate
location that is not part of your development environment.
Copying the Content Services (deprecated) EAR file:
-
Create
a new folder on your computer to copy the adobe-contentservices.ear file
to, such as
CustBuildEAR
.
-
Copy the adobe-contentservices.ear file from the LiveCycle
deploy folder to the folder you created in the previous step. The
deploy folder is typically located at
[install folder]
/deploy
where
[install folder]
is the location where you installed
LiveCycle.
Creating a development environment
Your development environment is a folder structure of files
extracted from the contentservices.war file, which is extracted
from the adobe-contentservices.ear file. After completing this procedure,
you will have a development environment that consists of a folder
to re-create the adobe-contentservices.ear file and a working folder
for making customizations to. You can choose to edit your files using
a simple text editor or you can import the folder structure to an
integrated development environment.
The following procedure is a recommended way to set up your development
for customizing the Contentspace so that you have the proper folder
structure for re-creating the EAR file. The procedures suggest using
a simple text editor but you can choose to use a different environment
as long as you preserve the folder structure necessary for re-creating
the adobe-contentservices.ear file.
To create a development environment
-
In the folder
you copied the adobe-contentservices.ear file to, perform the following
steps:
-
Extract the adobe-contentservices.ear file
by using an archiving utility. For example, in the command prompt,
navigate to the CustBuildEAR folder and type the following command:
jar -xvf adobe-contentservices.ear.
After
you enter the
jar
command, you will see a META-INF
folder and a contentservices.war file.
-
Delete the adobe-contentservices.ear file from the folder.
-
Create another folder, such as
CustWorking
and
copy the contentservices.war file to the new folder you created
from the folder in the previous step.This folder is used for extracting
the contents of the contentservices.war file and is your root level
folder for accessing the files and folder to customize Contentspace.
Note:
The folder you create must be a separate folder
that is not located under the folder where the adobe-contentservices.ear
file was extracted to in the previous step.
-
Go to the folder you created in the previous step that contains
the contentservices.war file and perform the following steps:
-
Extract the contents of the contentservices.war file using
an archiving utility.
For example, in the command prompt,
go to the folder and type the following command:
jar -xvf contentservices.war
After
you enter the
jar
command, a number of folders
appear, such as scripts, jsp, services, WEB-INF, META-INF, wsdl,
and css. This is Contentspace, which is a collection of image, JavaScript,
JSP, WSDL, CSS, and XML files that you modify.
-
Delete the contentservices.war file you copied to the folder.
You no longer require it because you will re-create a new contentservices.war
file.
|
|
|