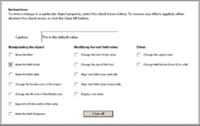
The example demonstrates how
to manipulate the visual properties of an object; in this case,
a text field. For example, selecting the Make the Field Wider check box
expands the fillable area of the text field to four inches.
Note:
To alter the visual properties of objects on
the client, you must save your form as an Acrobat Dynamic PDF Form
file.
In this example, the check boxes do not have unique object names;
therefore, Designer assigns an instance value to reference the object.
The check box script uses an
if-else
statement
to give the effect of selecting and deselecting.
To see this scripting example and others, visit the visit the
Developer
Center
.
Scripting for the Move the Field check box
When
the check box is selected, the field is moved according to the x
and y settings. When the check box is deselected, the field is returned
to its original location.
if (CheckBox1.rawValue == true) {
    TextField.x = "3.0in";
    TextField.y = "3.5in";
}
else {
    TextField.x = "1in";
    TextField.y = "3in";
}
Scripting for the Make the Field Wider check box
When
the check box is selected, the field changes to 4 inches. When the
check box is deselected, the field width changes to 2.5 inches.
if (CheckBox2.rawValue == true)
    TextField.w = "4in";
else
    TextField.w = "2.5in";
Scripting for the Make the Field Taller check box
When
the check box is selected, the field height changes to 1.5 inches.
When the check box is deselected, the field height changes to .5
inches.
if (CheckBox3.rawValue == true)
    TextField.h = "1.5in";
else
    TextField.h = "0.5in";
Scripting for the Change the Border Color of the Object check box
When the check box is selected, the field
border changes to red. When the check box deselected, the field
border changes to white.
if (CheckBox4.rawValue == true)
    TextField.border.edge.color.value = "255,0,0";
else
    TextField.border.edge.color.value = "255,255,255";
Scripting for the Change the Fill Color of the Fillable Area check box
When the check box is selected, the fillable
area of the text field changes to green. When the check box is deselected,
the fillable area of the text field changes to white.
if (CheckBox5.rawValue == true) {
    xfa.resolveNode("TextField.ui.#textEdit.border.fill.color").value = "0,255,0";
}
else {
    xfa.resolveNode("TextField.ui.#textEdit.border.fill.color").value = "255,255,255";
}
Scripting for the Expand to Fit the Width of the Value check box
When the check box is selected, the fillable
area of the text field adjusts to accommodate the value. When the
check box is deselected, the fillable area of the text field does
not adjust.
if (CheckBox6.rawValue == true)
    TextField.minW = "0.25in";
else
    TextField.maxW = "2.5in";
Scripting for the Make the Field Disappear check box
When the check box is selected, the field is hidden.
When the check box is deselected, the field is visible.
if (CheckBox7.rawValue == true)
    TextField.presence = "hidden";
else
    TextField.presence = "visible";
Scripting for the Change the Font of the Value check box
When the check box is selected, the font of the value
changes to Courier New. When the check box is deselected, the font
of the value changes to Myriad Pro.
if (CheckBox8.rawValue == true)
    TextField.font.typeface = "Courier New";
else
    TextField.font.typeface = "Myriad Pro";
Scripting for the Change the Size of the Font check box
When the check box is selected, the font size changes
to 14 pt. When the check box is deselected, the font size changes
to 10 pt.
if (CheckBox9.rawValue == true)
    TextField.font.size = "14pt";
else
    TextField.font.size = "10pt";
Scripting for the Align Text Field Value Vertically check box
When the check box is selected, the text field
value is aligned to the top. When the check box is deselected, the
text field value is aligned to the middle.
if (CheckBox10.rawValue == true)
    TextField.para.vAlign = "top";
else
    TextField.para.vAlign = "middle";
Scripting for the Align Text Field Value Horizontally check box
When the check box is selected, the text field
value is aligned to the center. When the check box is deselected,
the text field value is aligned to the left.
if (CheckBox11.rawValue == true)
    TextField.para.hAlign = "center";
else
    TextField.para.hAlign = "left";
Scripting for the Display a Set Value check box
When
the check box is selected, the value that is defined by using a
script appears in the text field. When the check box is deselected,
the default value (which is also defined by using a script) appears
in the text field.
if (CheckBox12.rawValue == true)
    TextField.rawValue = "This is a value set using a script.";
else
    TextField.rawValue = "This is a default value.";
Scripting for the Change the Caption Text check box
When the check box is selected, the alternate caption
text that is defined by using a script appears as the caption. When
the check box is deselected, the default caption (which is also
defined by using a script) appears in the text field.
if (CheckBox13.rawValue == true)
    xfa.resolveNode("TextField.caption.value.#text").value = "Alternate Caption:";
else
    xfa.resolveNode("TextField.caption.value.#text").value = "Caption:";
Scripting for the Change Field Border from 3D to Solid check box
When the check box is selected, the field
border changes to a solid box. When the check box is deselected,
the field border changes to 3D.
if (CheckBox14.rawValue == true)
    xfa.resolveNode("TextField.ui.#textEdit.border.edge").stroke = "solid";
else
    xfa.resolveNode("TextField.ui.#textEdit.border.edge").stroke = "lowered";
Scripting for the Clear All Check Boxes button
Use
the
resetData
method to reset all of the check
boxes to their default value (Off).
xfa.host.resetData();
Use
the
remerge
method to remerge the form design and
form data. In this case, the method effectively returns the text
field to its original state.
xfa.form.remerge();