|

In the Execute tab in the Object palette, you can select a data
connection for the button and specify whether the associated processing
will be carried out on the client computer, the server, or both.
The data connection must provide access to a web-service interface
or OLEDB database server that will either return data to the form
at run time or perform an action elsewhere.
After you specify the data source (see
Working with Data Sources
), you can specify the operation or query
to run. When the button is clicked at run time, processing is completed
as defined through the operation or query.
Returned data can be merged with the form so that only data associated
with existing objects is overwritten without refreshing the structure
of the form. Alternatively, you can choose to update the structure
of the form based on the returned XML data. In this case, the structure
of the form is updated, and the returned data is merged after processing
is completed.
To define processing options for a button, you must first select
the button. The processing options are set in the Execute tab of
the Object palette. To view the Execute tab, the Execute option
must be selected in the Control Type area in the Field tab.
To execute a web service operation or database query using a button
Using an Execute
button type, you can execute a process request to a web service.
A web service processes operations that you send to it to define
input and output information in your form.
You add a connection to the web service and then create or bind
fields to the request and response messages. The bound fields can
generate input data to send to the service or receive data from
the service. Multiple fields can be used to create the request message,
and the response message can populate multiple fields. To process
the operation, you can use an Execute button or write a script. For
example, you can use a web service to look up an interest rate,
a currency exchange rate, or a stock quote.
-
Add a button to the form design. See
To add objects to a form design
.
-
In the Object palette, click the Field tab.
-
In the Control Type area, select Execute. A web-service operation
or database query will be executed according to the settings in
the Execute tab.
-
Click the Execute tab and select New Data Connection from
the Connection list.
-
Select WSDL File and click Next.
-
In the WSDL File box, type the URL to the WSDL document,
or click Browse
 to
locate and select the document on your computer’s hard disk. If
the WSDL document is stored on a secure server, either the Authentication
Required dialog box or the Select a Digital ID dialog box is displayed.
to
locate and select the document on your computer’s hard disk. If
the WSDL document is stored on a secure server, either the Authentication
Required dialog box or the Select a Digital ID dialog box is displayed.
-
Perform one of the following actions:
-
In the
Authentication dialog box, type the correct user name and password, and
click OK.
-
In the Select A Digital ID dialog box, select the correct
digital ID to use as a client certificate, and click OK.
-
Select the operation to call, and click Next.
The window
on the right displays details for the selected operation. If the selected
operation is not SOAP-encoded or is not doc-literal, a warning appears
in this window and you cannot continue.
-
(Optional) To set up client authentication, perform one of
the following actions:
-
To define HTTP or HTTPS authentication,
select Requires HTTP/HTTPS Authentication, and then optionally select
the credentials to accept for verification.
-
To define SOAP message authentication, select Requires Message
Level Authentication, and then optionally select Accepts User Name
and Password.
-
Click Finish.
-
In the Run At list, specify where the processing will take
place:
-
To process the request on the client computer,
select Client.
-
To process the request on the server, select Server.
-
To process the request on the client computer and server,
select Client And Server.
-
To update the structure of the form and merge returned data
after processing is completed, select Re-merge Form Data. You must
use the Re-merge Form Data option if the response data is going
to populate dynamic data (such as a repeating subform) that is bound
to WSDL data, which may occur a variable number of times in the
response. Dynamic data requires a full remerge to generate the correct
number of repeating subforms. If the WDSL response data is bound
to a fixed number of fields, the response data will populate the existing
fields, such that you do not need to re-merge the form data.
To attach a database script to a button
You can use scripting to perform
more complex data manipulation on an enterprise system. In this
example, you can see how to add some simple script to button fields
to do basic database operations, including moving to the first, previous,
next, and last records, adding new records, updating existing records, and
deleting records.
Note:
This example is based on a particular database and configuration
that is not included in the Designer samples.The example is intended
as a reference for creating your own databaselookup scripts.
-
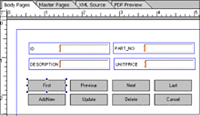
In the Object Library palette, click the Standard category
and drag eight button objects onto the form design. When you add
a button object, the default control type is Regular. Accept the
default setting.
-
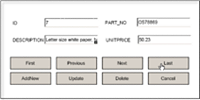
Name the buttons as follows: First, Previous, Next, Last,
AddNew, Update, Delete, and Cancel.
-
Select the first button, in this case the one named First.
-
In the Script Editor, select
click
from
the Show list, select JavaScript from the Language list, and select
Client from the Run At list.
-
In the Script Editor, add the following JavaScript script:
xfa.sourceSet.DataConnection.first();
-
Repeat step 5 for each of the remaining buttons, using the
following scripts:
-
Previous:
xfa.sourceSet.DataConnection.previous();
-
Next:
xfa.sourceSet.DataConnection.next();
-
Last:
xfa.sourceSet.DataConnection.last();
-
AddNew:
xfa.sourceSet.DataConnection.addNew();
-
Update:
xfa.sourceSet.DataConnection.update();
-
Delete:
xfa.sourceSet.DataConnection.delete();
-
Cancel:
xfa.sourceSet.DataConnection.cancel();
-
Save the form design.
-
Test
the form using the Preview PDF tab. If such a form were being filled
in Adobe Reader, you would have to set usage rights for the form
by using Acrobat Reader DC extensions in order for Adobe Reader
to access the database.
-
Click the different buttons to display the data associated
with each record. The example shows that the Last button causes
the ID, part number, description, and unit price for the last record
to appear in the applicable fields.
Using a button to populate fields from a database
You can use a database to provide the
data for fields in your form, including text and numeric fields.
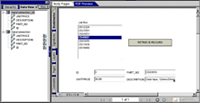
In this example, the Retrieve Record button and the list box
are bound to the database (named DataConnection) shown in the Data
View palette at the left. The button also has a FormCalc script
attached to it to retrieve information based on the part number
selected in the List Box field. The retrieved records appear in the
ID, PART_NO, UNITPRICE, and DESCRIPTION fields.
-
Connect to the database.
-
In the Data View palette, drag the UNIT_PRICE, DESCRIPTION,
PART_NO, and ID elements under DataConnection onto the form design.
Each node dragged onto the form design creates a bound field.
-
In the Object palette, click the Standard tab and drag a
button object onto the form design.
-
Enter a new name for the button. The example uses RETRIEVE
RECORD.
-
Select the button and, in the Script Editor, select click
from the Show list, select FormCalc from the Language list, and
select Client from the Run At list.
-
Enter a FormCalc script similar to the following example.
The script retrieves the data in the specified records and prints
it in the corresponding fields when the user clicks the button.
//Change the commandType from TABLE to TEXT. TEXT
//is the equivalent of SQL Property
$sourceSet.DataConnection.#command.query.commandType = "text"

//Set the Select Node. Select in this case will be
//whatever SQL Property you want
$sourceSet.DataConnection.#command.query.select.nodes.item(0).value = Concat("Select*from OfficeSupplies Where ID = ", DataListBox1.rawValue,"")

//Reopen the Data connection
$sourceSet.DataConnection.open()
-
Save the form design as a PDF file.
-
Test the form using the Preview PDF tab to verify that the
script works as expected.
|
|
|