|

About document security
Document security ensures that only authorized users can
use your documents. Using document security, you can safely distribute
any information that you have saved in a supported format. Supported
file formats include:
For more information about how policies protect supported file
types, see
Additional document security information
.
Using document security, you can easily create, store, and apply
predefined confidentiality settings to your documents. To prevent
information from spreading beyond your reach, you can also monitor
and control how recipients use your documents after you distribute
them.
You can protect documents by using policies. A
policy
is
a collection of information that includes confidentiality settings
and a list of authorized users. The confidentiality settings you
specify in a policy determine how a recipient can use a document
to which you apply the policy. For example, you can specify whether recipients
can print or copy text, edit text, or add signatures and comments
to protected documents.
Document security users create policies through the end-user
web pages. Administrators use the document security web pages to
create policy sets that contain shared policies that are available
to all authorized users.
Although policies are stored in document security, you apply
them to documents through your client application. How to apply
policies to PDF documents is described in detail in
Acrobat Help
.
Applying policies by using other applications, such as Microsoft
Office, is documented in the
Acrobat Reader DC extensions Help
for
the application.
When you apply a policy to a document, the confidentiality settings
specified in the policy protect the information that the document
contains. The confidentiality settings also protect any files (text,
audio, or video) within a PDF document. You can distribute the policy-protected
document to recipients who are authorized by the policy.
Document access control and auditing
Using a policy to protect
a document gives you ongoing control over that document, even after
you distribute it. You can monitor the document, make changes to
the policy, prevent users from continuing to access the document, and
switch the policy that is applied to the document.
Through
document security, you can monitor policy-protected documents and track
events, such as when an authorized or unauthorized user attempts
to open the document.
Components
Document
security consists of a server and user interface:
Server:
The
central component through which document security performs transactions
such as user authentication, real-time management of policies, and application
of confidentiality. The server also provides a central repository
for policies, audit records, and other related information.
Web pages:
The
interface where you create policies, manage your policy-protected
documents, and monitor events that are associated with policy-protected
documents. Administrators can also configure global options such
as user authentication, auditing, and messaging for invited users,
and manage invited user accounts.
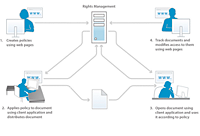
The steps in
the illustration are as follows:
-
The document owner
creates policies using the web pages. Document owners can create
personal policies that are accessible only to them. Administrators and
policy set coordinators can create shared policies within policy
sets that are accessible to authorized users.
-
The document owner applies the policy, and then saves and
distributes the document. The document can be distributed by email,
through a network folder, or on a website.
-
The recipient opens the document in the appropriate client
application. The recipient can use the document according to its
policy.
-
The document owner, policy set coordinator, or administrator
can track documents and modify access to them using the web pages.
About document security users
Various types of users work with document security to accomplish
different tasks:
-
The system administrator or other information systems
(IS) person installs and configures document security. This person
may also be responsible for configuring global settings for the
server, web pages, and policies and documents.
These settings
may include, for example, a base document security URL, auditing
and privacy notifications, invited user registration notices, and default
offline lease periods.
-
Document security administrators create policies and policy
sets, and manage policy-protected documents for users as required.
They also create invited user accounts, and monitor system, document,
user, policy, policy set, and custom events. They may also be responsible
for configuring the global server, and web page and policy settings
in conjunction with a system administrator.
Administrators
can assign users the following roles in the User Management area
of administration console. Users who are assigned these roles perform their
tasks in the document security user interface area of administration console.
-
Users within the organization who have valid document security
accounts create their own policies, use policies to protect documents,
track and manage their policy-protected documents, and monitor events
that are related to their documents.
-
Policy set coordinators manage documents, view events, and
manage other policy set coordinators (based on their permissions).
Administrators designate users as policy set coordinators for particular
policy sets.
-
Users who are external to your organization (for example,
a business partner) can use policy-protected documents if they are
in the document security document security directory, if the administrator
creates an account for them, or if they register with document security
through an automated email invitation process. Depending on how
the administrator enables the access settings, the invited users
may also have permission to apply policies to documents, to create,
modify and delete their policies, and to invite other external users
to use their policy-protected documents.
-
Developers use the AEM forms SDK to integrate custom applications
with document security.
Policies and policy-protected documents
A
policy
defines a set of confidentiality settings
and users who can access a document to which the policy is applied.
A policy also enables the permissions on a document to be changed
dynamically. It gives the person who secures the document permission
to change the confidentiality settings to revoke access to the document
or to switch the policy.
Policy protection can be applied to a PDF document by using Adobe
Acrobat® Pro and Acrobat Standard. Policy
protection can be applied to other file types, such as Microsoft
Word, Excel, and PowerPoint files, by using the client application
with the appropriate Acrobat Reader DC extensions installed.
How policies work
Policies contain information about the authorized users
and the confidentiality settings to apply to documents. Users can
be any one in your organization, as well as people who are external
to your organization who have an account. If the administrator enables
the user invitation feature, it is even possible to add new users
to policies, therefore initiating a registration invitation email
process.
The confidentiality settings in a policy determine how the recipients
can use the document. For example, you can specify whether recipients
can print or copy text, make changes, or add signatures and comments
to protected documents. The same policy can also specify different
confidentiality settings for specific users.
Note:
Confidentiality settings that are applied through
a policy override any settings that may have been applied to a PDF
document in Acrobat by using the password or certificate security
options. (See Acrobat Help for more information.)
Users and administrators create policies through the document
security web pages. Only one policy at a time can be applied to
a document. You can apply a policy by using one of these methods:
-
Open the document in Acrobat or another client application
and select a policy to secure the document.
-
Send a document as an email attachment in Microsoft Outlook.
In this case, you can select a policy from a list of policies or
select an auto-generated policy that Acrobat creates with a default
set of confidentiality settings to protect the document only for
the email message recipients.
A policy can be removed from a document by using the client application.
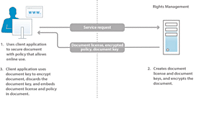
The steps in the diagram are as follows:
-
The document owner secures the document from a supported
client application with a policy that allows online use.
-
Document security creates a document license and document
keys, and encrypts the policy. The document license, encrypted policy,
and document key are returned to the client application.
-
The document is encrypted with the document key, and the
document key is discarded. The document now embeds the license and
policy. These tasks are performed in the supported client application.
When you apply a policy to a document, the information that the
document contains, including any contained files (text, audio, or
video) in PDF documents, is protected by the confidentiality settings
that are specified in the policy. Document security generates a
license and encryption information that is then embedded in the
document. When you distribute the document, document security can
authenticate the recipients who attempt to open the document and authorize
access according to the privileges specified in the policy.
If offline usage is enabled, recipients can also use policy-protected
documents offline (without an active Internet or network connection)
for the time period specified in the policy.
How policy-protected documents work
To open and use policy-protected documents, the policy
must include your name as a recipient, and you must have a valid
document security account. For PDF documents, you need Acrobat or
Adobe Reader®. For other file types, you need
the appropriate application for the file with the Acrobat Reader
DC extensions installed.
When you attempt to open a policy-protected document, Acrobat,
Adobe Reader, or the Acrobat Reader DC extensions connects to document
security to authenticate you. Then, you can proceed to log on. If
the document usage is being audited, a notification message appears.
After document security determines which document permissions to
grant, it manages the decryption of the document. You can then use
the document according to the policy confidentiality settings.
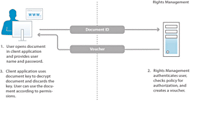
The steps in the diagram are as follows:
-
The document user opens the document in a supported client
application and authenticates with the server. The document identifier
is sent to the document security server.
-
Document security authenticates the users, checks the policy
for authorization, and creates a voucher. The voucher (which contains
the document key and permissions) is returned to the client application.
-
The document is decrypted with the document key, and the
document key is discarded. The document can then be used according
to the confidentiality settings of the policy. These tasks are performed
in the supported client application.
You can continue to use a document under these conditions:
You can also use policy-protected documents offline (without
an Internet or network connection) if the policy permits offline
access. You must first log in to document security to synchronize
the document. You can then use the document for the duration of
the offline lease period that is specified in the policy.
When the offline lease period ends, you must synchronize the
document with document security again, either by going online and
opening a policy-protected document or by using a command in the
client application. (See
Acrobat Help
or the appropriate
Acrobat Reader DC extensions Help
for
details.)
If you save a copy of a policy-protected document by using the
Save or Save As menu command, the policy is automatically applied
and enforced for the new document. Events such as attempts to open
the new document are also audited and recorded for the original
document.
Policy sets
Policy sets
are used to group a set of policies
that have a common business purpose. These policy sets are then
made available to a subset of users in the system.
Each policy set can have one or more associated policy set coordinators.
The policy set coordinator is an administrator or a user who has
additional permissions. The
policy set coordinator
is typically
a specialist in the organization who can best author the policies
in a particular policy set.
Policy set coordinators can perform these tasks:
-
Create new policies
-
Edit and delete any policy in the policy set
-
Edit policy set settings
-
Add and remove policy set coordinators
-
View policy and document events for any policy or document
within the policy set
-
Revoke access to documents
-
Switch policies for the document.
Policy sets are created and deleted in the document security
administration web pages by administrators and policy set coordinators
who have permission to do so.
Using the document security web pages
Users and administrators use the document security web
pages to create and manage policies, manage policy-protected documents,
and monitor events that are associated with policy-protected documents.
Administrators also use the web pages to create policy sets and
designate policy set coordinators, configure document security default
settings, manage invited user registration and accounts, and monitor
and manage server, policy, user, and document-related events.
To open the web pages, you require a browser and the URL and
your login information for document security. The URL for users
is different from the URL for administrators.
Log in to the web pages
To log in to the web pages using a browser, you need the
document security URL and an account. The URL for users is different
from the URL for administrators. Administrators can also log in
to the user pages to create policies.
If you have access to more than one installation of document
security, you need the URL for the instance of document security
you want to access. See your administrator if you do not have this
information. The default URL for the user pages is http://
[host]
:
[port]
/edc.
The port number may not be required in some cases. Ask your administrator
for details.
Note:
You can also access the web pages from Acrobat
and other client applications. See Acrobat Help or the appropriate
Acrobat Reader DC extensions Help for details.
Note:
When working with the web pages, avoid using
the browser buttons, such as the back button, refresh button, and
the back and forward arrows because this action can cause unwanted
data capture and data display problems.
Navigating the web pages
When you log in to the user web pages, you will see links
to the Policies, Documents, and Events user pages.
Use these links to access the various pages, where you create
and manage policies and policy-protected documents.
Display a page
 Click the name of the page; such as click
Policies.
Click the name of the page; such as click
Policies.
Go back to the previous page
Click the navigation
link at the top of the page for the page you want to go back to.
Refresh the data listing on a page
On the main page, click
the link to the page you want to refresh.
Note:
When working with the web pages, avoid using the
browser buttons, such as the back button, refresh button, and the
back and forward arrows, because this action can cause unwanted
data capture and data display problems.
Setting up access to document security from client applications
Client applications must be set up to connect to document
security to protect documents, open policy-protected documents,
and connect to the document security web pages. See
Acrobat Help
or
the appropriate
RightsManagementExtension Help
for information
about configuring the connection within the client application.
Document security is accessed via Secure Sockets Layer (SSL).
You must install the website’s certificate in your certificate store
so that you can access document security through the client applications.
These instructions are specific to Internet Explorer, but you
can install the certificate by using any supported web browser.
For more information, see the Help for your browser.
Install the server certificate using Internet Explorer
-
Open your web browser and type the base URL for document
security in the Address box. For example, type
https://[host]:[port]
.
A Security Alert dialog box appears.
-
Click View Certificate, and then click Install Certificate
and select the defaults for installation. The certificate needs
to be installed in the Trusted Root Certification Authorities.
-
Close your browser session.
-
Open another browser window and type the same URL in the
Address box. A Security Alert dialog should not appear. This test
confirms that the certificate is properly installed.
Log out of the web pages
Log out when you finish using the web pages so that you
can safely use your web browser for other purposes. Depending on
how document security is configured, you may need to close your
browser to completely log out.
-
In the upper-right corner of the page, click Logout.
-
If a message appears on the Logout page, close your browser
window to completely log out. Otherwise, you can proceed to use
the browser for other purposes.
Configuring client and server options
Configure the document security server
-
In administration console, click Services >
document security > Configuration > Server Configuration.
-
Configure the settings and click OK.
Server configuration settings
-
Base URL:
-
The base document security URL, containing the server name
and port. Information appended to the base creates connection URLs.
For example,
/edc/Main.do
is appended to access
the web pages. Users also respond to external user registration
invitations through this URL.
If you are using IPv6, enter
the Base URL as the computer name or the DNS name. If you use a
numerical IP address, Acrobat will fail to open policy protected
files. Also, use HTTP secure (HTTPS) URL for your server.
Note:
The base URL is embedded in policy-protected files.
Client applications use the base URL to connect back to the server.
Secured files will continue to contain the base URL, even if it
is changed later. If you change the base URL, configuration information will
need to be updated for all connecting clients.
-
Default Offline Lease Period:
-
The default length of time that a user can use a protected
document offline. This setting determines the initial value of the
Auto-Offline lease period setting when you create a policy. (See
Creating and editing policies
.) When the lease period expires, the
recipient must synchronize the document again to continue using
it.
For a discussion of how offline lease and synchronization
works, see
Primer on configuring offline lease and synchronization
.
-
Default Offline Synchronization Period:
-
The maximum time any document can be used offline from when
it is initially protected.
-
Client Session Timeout:
-
The length of time, in minutes, after which document security
disconnects if a user who is logged in through a client application
does not interact with document security.
-
Allow Anonymous Users Access:
-
Select this option to enable the ability to create shared
and personal polices that allow anonymous users to open policy-protected
documents. (Users who do not have accounts can access the document,
but they cannot log in to document security or use other policy-protected
documents.)
-
Disable Access to Version 7 Clients:
-
Specifies whether users can use Acrobat or Reader 7.0 to
connect to the server. When this option is selected, users must use
Acrobat or Reader 8.0 and later to complete document security operations on
PDF documents. If polices require that Acrobat or Reader 8.0 and
later must run in certified mode when opening policy-protected documents,
you should disable access to Acrobat or Reader 7. (See
Specify the document permissions for users and groups
.)
-
Allow offline access per document
-
Select this option to specify offline access per document.
If this setting is enabled, then the user will have offline access
to only those documents that the user has opened online at least
once.
-
Allow Username Password Authentication:
-
Select this option to enable client applications to use user
name/password authentication when connecting to the server.
-
Allow Kerberos Authentication:
-
Select this option to enable client applications to use Kerberos
authentication when connecting to the server.
-
Allow Client Certificate Authentication:
-
Select this option to enable client applications to use certificate
authentication when connecting to the server.
-
Allow Extended Authentication
-
Select to enable extended authentication and then enter the
Extended Authentication Landing URL.
Selecting this option
enables client applications to use extended authentication. Extended
authentication provides for customized authentication processes
and different authentication options configured on the AEM forms
server. For example, users can now experience the SAML-based authentication
instead of AEM forms username/Password, from Acrobat and Reader
Client. By default, the Landing URL contains
localhost
as
the server name. Replace the server name with a fully-qualified
hostname. The hostname in the landing URL is automatically populated
from the base URL, if extended Authentication is not enabled yet.
See
Add the extended authentication provider
.
Note:
Extended authentication
is supported on Apple Mac OS X with Adobe Acrobat release 11.0.6
and above.
-
Preferred HTML Control Width for Extended Authentication
-
Specify the width of the extended authentication dialog that
opens in Acrobat for entering user credentials.
-
Preferred HTML Control Height for Extended Authentication
-
Specify the height of the extended authentication dialog
that opens in Acrobat for entering user credentials.
Note:
The limits
of the width and height for this dialog box are as follows:
Width:
Minimum = 400, maximum = 900
Height: Minimum = 450; maximum
= 800
-
Enable Client Credential Caching:
-
Select this option to allow users to cache their credentials
(user name and password). When users’ credentials are cached, they
do not have to enter their credentials every time they open a document
or when they click the Refresh button on the Manage Security Policies
page in Adobe Acrobat. You can specify the number of days before
users must supply their credentials again. Setting the number of
days to 0 allows credentials to be cached indefinitely.
Add the extended authentication provider
AEM forms provides a sample configuration that you can customize
for your environment. Perform the following steps:
Note:
Extended authentication is supported on Apple Mac OS X with
Adobe Acrobat release 11.0.6 and above.
Add SSO redirect URLs for extended authentication
With extended authentication enabled, users opening a policy
protected document in Acrobat XI or Reader XI get a dialog for authentication.
This dialog loads the HTML page that you specified as the extended
authentication landing URL on the document security server settings.
See
Server configuration settings
.
Note:
Extended authentication is supported on Apple Mac OS X with
Adobe Acrobat release 11.0.6 and above.
-
In administration console, click Settings > User Management
> Configuration > Import And Export Configuration
Files.
-
Click Export and save the configuration file to your disk.
-
Open the file in an editor, and locate the AllowedUrls node.
-
In the
AllowedUrls
node, add the following
lines:
<entry key="sso-l" value="/ssoexample/login.jsp"/>
<entry key="sso-s" value="/ssoexample"/>
<entry key="sso-o" value="/ssoexample/logout.jsp"/>
-
Save the file, and then import the updated file from the
Manual Configuration page: In administration console, click Settings >
User Management > Configuration > Import
And Export Configuration Files.
Configuring offline security
document security provides the ability to use policy-protected
documents offline without an Internet or network connection. This
ability requires that the policy allow offline access, as described
in
Specify the document permissions for users and groups
. Before a document
having such a policy can be used offline, the recipient must open
the document while online and enable offline access, by clicking
Yes when prompted. The recipient may also be requested to authenticate
his identity. The recipient can then use documents offline for the
duration of the offline lease period that is specified in the policy.
When the offline lease period ends, the recipient must synchronize
again with document security either by opening a document online
or by using an Acrobat or Acrobat Reader DC extensions menu command
to synchronize. (See
Acrobat Help
or the appropriate
Acrobat Reader DC extensions Help
.)
Because documents that allow offline access require caching key
material on the computer where the files are stored offline, the
file can potentially be compromised if an unauthorized user can
obtain the key material. To compensate for this possibility, scheduled
and manual key rollover options are provided that you can configure
to prevent an unauthorized person from using the key to access the document.
Set a default offline lease period
Recipients of policy-protected documents can take the documents
offline for the number of days specified in the policy. After initially
synchronizing the document with document security, the recipient
can use it offline until the offline lease period expires. When
the lease period expires, the recipient must take the document online
and log in to synchronize with document security to continue using
the document.
You can configure a default offline lease period. The lease period
can be changed from the default when anyone creates or edits a policy.
-
On the document security page, click Configuration >
Server Configuration.
-
In the Default Offline Lease Period box, type the number
of days for the offline lease period.
-
Click OK.
Manage key rollovers
Document security uses encryption algorithms and licenses
to protect documents. When it encrypts a document, document security
generates and manages a decryption key called a
DocKey
that
it passes to the client application. If the policy that protects
a document permits offline access, an offline key called a
principal key
is
also generated for each user who has offline access to the document.
Note:
If a principal key does not exist, document
security generates one to secure a document.
To open a policy-protected document offline, the user's computer
must have the appropriate principal key. The computer obtains the
principal key when the user synchronizes with document security
(opens a protected document online). If this principal key is compromised,
any document to which the user has offline access might also be
compromised.
One way to lessen the threat to offline documents is to avoid
permitting offline access to particularly sensitive documents. Another
method is to periodically roll over the principal keys. When document
security rolls the key over, any existing keys can no longer access
the policy-protected documents. For example, if a perpetrator obtains
a principal key from a stolen laptop, that key cannot be used to
access the documents that are protected after the rollover occurs.
If you suspect that a specific principal key has been compromised,
you can manually roll over the key.
However, you also need to be aware that a key rollover affects
all principal keys, not just one. It also reduces the scalability
of the system because clients must store more keys for offline access.
The default key rollover frequency is 20 days. It is recommended
not to set this value lower than 14 days because people may be prevented
from viewing offline documents and system performance may be affected.
In the following example, Key1 is the older of the two principal
keys, and Key2 is the newer one. When you click the Rollover Keys
Now button the first time, Key1 becomes invalid, and a newer, valid
principal key (Key3) is generated. Users will obtain Key3 when they
synchronize with document security, typically by opening a protected
document online. However, users are not forced to synchronize with
document security until they reach the maximum offline lease period
specified in a policy. After the first key rollover, users who remain
offline can still open offline documents, including those protected
by Key3, until they reach the maximum offline lease period. When
you click the Rollover Keys Now button a second time, Key2 becomes
invalid, and Key4 is created. Users who remain offline during the
two key rollovers are not able to open documents protected with
Key3 or Key4 until they synchronize with document security.
For more information about security, see
Adobe AEM forms Overview
.
Change the key rollover frequency
For
confidentiality purposes, when you are using offline documents,
document security provides an automatic key rollover option with
a default frequency period of 20 days. You can change the rollover
frequency; however, avoid setting the value lower than 14 days because
people may be prevented from viewing offline documents and system
performance may be affected.
-
On the document security
page, click Configuration > Key Management.
-
In the Key Rollover Frequency box, type the number of days
for the rollover period.
-
Click OK.
Manually roll over principal keys
To maintain
confidentiality of offline documents, you can manually roll over principal
keys. You may find it necessary to manually roll over a key (for
example, if the key is compromised by someone who obtains it from
a computer where it is cached to enable offline access to a document).
Important:
Avoid frequently using manual rollover because
it causes all principal keys to roll over, not just one, and may
temporarily prevent users from viewing new documents offline.
The
principal keys must be rolled over twice before previously existing
keys on client computers are invalidated. Client computers that
have invalidated principal keys must re-synchronize with the document
security service to acquire the new principal keys.
-
On the document security page, click Configuration > Key
Management.
-
Click Rollover Keys Now and then click OK.
-
Wait approximately 10 minutes. The following log message
appears in the server log:
Done RightsManagement key rollover for
N
principals
.
Where
N
is the number of users in the document security system.
-
Click Rollover Keys Now and then click OK.
-
Wait approximately 10 minutes.
Configuring event auditing and privacy settings
Document security can audit and record information about
events that are related to interaction with policy-protected documents,
policies, administrators, and the server. You can configure event
auditing, and you can specify the types of events to audit. To audit
events for a particular document, the auditing option on the policy
must also be enabled.
When auditing is enabled, you can view details of the audited
events on the Events page. document security users can also view
events that are related specifically to the policy-protected documents
that they use or create.
You can select these types of events for auditing:
-
Policy-protected document events, such as attempts by
authorized or unauthorized users to open documents
-
Policy events, such as creating, changing, deleting, enabling,
and disabling of policies
-
User events, such as external user invitations and registrations,
activated and deactivated user accounts, changes to user passwords,
and profile updates
-
AEM forms events, such as version mismatches, unavailable
directory server and authorization providers, and server configuration
changes
Enable or disable event auditing
You can enable and disable auditing of events related to
the server, policy-protected documents, policies, policy sets, and
users. When you enable event auditing, you can choose to audit all
the possible events or you can select specific events to audit.
When you enable the server auditing, you can view the audited
events on the Events page.
-
In administration console, click Services > Document
Security > Configuration > Audit and Privacy Settings.
-
To configure server auditing, under Enable Server Auditing,
select Yes or No.
-
If you selected Yes, under each event category, do one of
the following actions to select the options to audit:
-
To audit all events in the category, select All.
-
To audit only some events, deselect All, and then select
the check boxes beside the events you want to audit.
-
Click OK.
Note:
When working with the web pages, avoid using
the browser buttons, such as the back button, refresh button, and
the back or forward arrow because this action can cause unwanted
data capture and data display problems.
Enable or disable privacy notification
You can enable and disable a privacy notification message.
When you enable privacy notification, a message appears when a recipient
attempts to open a policy-protected document. The notice informs
the user that the document usage is being audited. You can also
specify a URL that the user can use to view your privacy policy
page if one is available.
-
In administration console, click Services > Document
Security> Configuration > Audit and Privacy Settings.
-
To configure the privacy notification, under Enable Privacy
Notice, select Yes or No.
If the policy attached to a document
allows anonymous user access and Enable Privacy Notice is set to
No, the user is not prompted to log in and the privacy notification
message is not displayed.
If the policy attached to a document
does not allow anonymous user access, the user will see the privacy
notification message.
-
If applicable, in the Privacy URL box, type the URL to your
privacy policy page. If the Privacy URL box is left blank, the privacy
page from adobe.com is displayed.
-
Click OK.
Note:
Disabling the privacy notice does not disable document usage
auditing. Out of the box auditing actions and custom actions supported
via extended usage tracking can still collect user behavior information.
Import a custom audit event type
If you are using a document security-enabled application
that supports auditing of additional events, such as events specific
to a certain file type, an Adobe partner can provide you with custom
audit events that you can import into document security. Use this
feature only if you have been provided with custom event types by
an Adobe partner.
-
In administration console, click Services > Document
Security > Configuration > Event Management.
-
Click Browse to go to the XML file to import and click Import.
-
Importing overwrites existing custom audit event types on
the server if identical event code and namespace combinations are
found.
-
Click OK.
Delete a custom audit event type
-
In administration console, click Services >
document security > Configuration > Event Management.
-
Select the check box next to the custom audit event type
to delete and click Delete.
-
Click OK.
Export audit events
You can export audit events to a file for archiving purposes.
-
In administration console, click Services > Document
Security > Configuration > Event Management.
-
Edit the settings under Export Audit Events as required.
You can specify:
-
the minimum age of the audit events
to export
-
the maximum number of audit events to include in a single
file. The server generates one or more files, based on this value.
-
the folder where the file will be created. This folder is
on the forms server. If the folder path is relative, then it is
relative to your application server root directory.
-
the file prefix to use for the audit events files
-
the format of the file, either a comma-separated values (CSV)
file that is compatible with Microsoft Excel or an XML file.
-
Click Export. If you want to cancel the export, click Cancel
Export. If another user has scheduled an export, the Cancel Export
button is unavailable until that export is complete. The Cancel
Export button is unavailable if another user has scheduled an export.
To check whether a scheduled Export or Delete has started or finished,
click Refresh.
Delete audit events
You can delete audit events that are older than a specified
number of days.
-
In administration console, click Services > Document
Security > Configuration > Event Management.
-
Under Delete Audit Events, specify the number of days in
the Delete Audit Events Older Than box.
-
Click Delete. Click Export. If you want to cancel the delete,
click Cancel Delete. If another user has scheduled a delete, the
Cancel Delete button is unavailable until that export is complete.
The Cancel Delete button is unavailable if another user has scheduled
an export. To check whether a scheduled Delete has started or finished,
click Refresh.
Event auditing options
You can enable and disable event auditing and specify the
types of events to be audited.
Document events
-
View Document:
-
A recipient views a policy-protected document.
-
Close Document:
-
A recipient closes a policy-protected document.
-
Print Low resolution
-
A recipient prints a policy-protected document with the low-resolution
option specified.
-
Print High resolution:
-
A recipient prints a policy-protected document with high-resolution
option specified.
-
Add Annotation to Document:
-
A recipient adds an annotation to a PDF document.
-
Revoke Document:
-
A user or administrator revokes access to a policy-protected
document.
-
Unrevoke Document:
-
A user or administrator reinstates access to a policy-protected
document.
-
Form Filling:
-
A recipient enters information into a PDF document that is
a fillable form.
-
Removed Policy:
-
A publisher removes a policy from a document to withdraw the
security protections.
-
Change Document Revocation URL:
-
A call from the API level changes the revocation URL that
is specified in order to access a new document that replaces a revoked
document.
-
Modify Document:
-
A recipient changes the content of a policy-protected document.
-
Sign Document:
-
A recipient signs a document.
-
Secure a New Document:
-
A user applies a policy to protect a document.
-
Switch Policy on Document:
-
A user or administrator switches the policy that is attached
to a document.
-
Publish Document As:
-
A new document whose documentName and license are identical
to an existing document is registered on the server, and the documents
do not have a parent-child relationship. This event can be triggered using
the AEM forms SDK.
-
Iterate Document:
-
A new document whose documentName and license are identical
to an existing document is registered on the server, and the documents have
a parent-child relationship. This event can be triggered using the
AEM forms SDK.
Policy events
-
Created Policy:
-
A user or administrator creates a policy.
-
Enabled Policy:
-
An administrator makes a policy available.
-
Changed Policy:
-
A user or administrator changes a policy.
-
Disabled Policy:
-
An administrator makes a policy unavailable.
-
Deleted Policy:
-
A user or administrator deletes a policy.
-
Change Policy Owner:
-
A call from the API level changes the policy owner.
User events
-
Deleted User:
-
An administrator deletes a user account.
-
Register Invited User:
-
An external user registers with document security.
-
Successful Login:
-
Successful login attempts by administrators or users.
-
Invited Users:
-
Document security invites a user to register.
-
Activated Users:
-
External users activate their accounts by using the URL in
the activation email, or an administrator enables an account.
-
Change Password:
-
Invited users change their passwords or an administrator resets
a password for a local user.
-
Failed Login:
-
Failed login attempts by administrators or users.
-
Deactivated Users:
-
An administrator disables a local user account.
-
Profile Update:
-
Invited users change their name, organization name, and password.
-
Account Locked:
-
An administrator locks an account.
Policy Set Events
-
Created
Policy Set:
-
An administrator or policy set coordinator creates a policy set.
-
Deleted Policy Set:
-
An administrator or policy set coordinator deletes a policy set.
-
Modified Policy Set:
-
An administrator or policy set coordinator changes a policy
set.
System events
-
Directory
Synchronization Complete:
-
This information is not available from the Events page. The
current directory synchronization information, including the current
synchronization state and time of the last synchronization, is displayed
on the Domain Management page. To access the Domain Management page
in administration console, click Settings > User Management >
Domain Management.
-
Client Enable Offline Access:
-
A user enabled offline access to documents that are secured
against the server on the user’s computer.
-
Synchronized Client
-
Client application must synchronize information with the server
to allow for offline access.
-
Version Mismatch:
-
A version of the AEM forms SDK that is incompatible with the
server attempted to connect to the server.
-
Directory Synchronization Information:
-
This information is not available from the Events page. The
current directory synchronization information, including the current
synchronization state and time of the last synchronization, is displayed
on the Domain Management page. To access the Domain Management page
in administration console, click Settings > User Management >
Domain Management.
-
Server Configuration Change:
-
Changes to the server configuration that are done either
through the web pages or manually by importing a config.xml file. This
includes changes to the base URL, session time-outs, login lockouts, directory
settings, key rollovers, SMTP server settings for external registration, watermark
configuration, display options, and so on.
Configuring extended usage tracking
Document security can track various custom events that
may be performed on a protected document. You can enable the tracking
of events from the document security server at the global level
or at a policy level. You can then set up a JavaScript to capture
specific actions performed within the protected PDF document such
as clicking a button, or saving the document. This usage data is
sent as an XML file in key-value pairs, which you can use for further
analysis. End users who access the protected documents can allow
or decline such tracking from the client application.
If tracking is enabled at the global level, you can override
this setting at the policy level and disable it for a particular
policy. Policy-level overriding is not possible if tracking is disabled
at the global level. The list of tracked events is automatically pushed
to the server when the event count reaches 25 or when the document
is closed. You can also configure your script to explicitly push
the event list as per your requirements. You can customize the event
tracking by accessing the document security object properties and
methods.
After you enable tracking, all policies that are subsequently
created will have tracking turned on by default. Policies created
prior to tracking being enabled on the server will need manual updates.
Enable or disable extended usage tracking
Before you begin, ensure that Server Auditing is enabled.
See
Configuring event auditing and privacy settings
for more information
on auditing.
-
In administration console, click Services > Document
Security > Configuration > Audit and Privacy Settings.
-
To configure extended usage tracking, under Enable Tracking,
select Yes or No.
-
To set the selection of the Allow collection of detailed
usage data check box on the log in page, under Enable Tracking default,
select Yes or No.
To view the tracked events you can use the Document Events filter
on the Events page. The events tracked using JavaScript are labelled
as Detailed Usage Tracking. Refer to
Monitoring events
for more information on events.
Configure document security display settings
-
In administration console, click Services >
document security > Configuration > Display Options.
-
Configure the settings and click OK.
Display settings
-
Rows to display for search results:
-
Number of rows that appear on a page when searches are performed.
Customization for client login dialog
These
settings control the text displayed in the login prompt that appears
when a user logs into document security through a client application.
-
Welcome Text:
-
The welcome message text, such as “Please Login with Your
User name and Password”. The welcome message text should contain
information on how to log in to document security and how to contact
an administrator or other designated support person in your organization
for assistance. For example, external users may need to contact
an administrator if they forget their passwords or need assistance
with the registration or login process. The maximum length of the
welcome text is 512 characters.
-
User Name Text:
-
The text label for the user name box.
-
Password Text:
-
The text label for the password box.
Customization for client certificate authentication dialog
These settings control the text displayed in the
certificate authentication dialog box.
-
Choose
Authentication Type Text:
-
The text displayed to direct a user to select an authentication
type.
-
Choose Certificate Text:
-
The text displayed to direct a user to select a certificate
type.
-
Certificates Not Available Error Text:
-
Message of up to 512 characters to display when the selected
certificate is not available.
Customization for client certificate display
-
Only Display Trusted Credential Issuers:
-
When this option is selected, the client application presents
the user with only certificates from credential issuers that AEM
forms is configured to trust (See
Managing certificates and credentials
.) When this option is not selected,
the user is presented with a list of all certificates on the user’s
system.
Configure dynamic watermarks
Using document security, you can configure default settings
for the dynamic watermark option that you can apply when you create
policies. A
watermark
is an image that is superimposed over
text in the document. It is useful for tracking the content of a
document and can help identify illegal use of the content.
A dynamic watermark can consist of either text made up of defined
variables such as user ID and date and custom text, or rich content
within a PDF. You can configure watermarks with several elements
each with its own positioning and formatting.
Watermarks are not editable and therefore they are a more secure
method of ensuring the confidentiality of the document content.
Dynamic watermarks also ensure that a watermark shows enough user-specific
information to act as a deterrent to further distributing the document.
The watermark that a policy specifies appears in the policy-protected
document when a recipient views or prints the document. Unlike permanent
watermarks, a dynamic watermark is never saved in the document,
which provides the flexibility that is necessary when deploying
a document in an intranet environment to ensure that the viewing
application displays the identity of the specific user. Also, if
a document has multiple users, the use of the dynamic watermark
means you can use one document instead of multiple versions, each
with a different watermark. The watermark that appears reflects
the identity of the current user.
Notice that dynamic watermarks are different from the watermarks
that users can add directly to the document in Acrobat. The result
is that you can have two watermarks in a policy-protected document.
Considerations when creating watermarks
You can create dynamic watermarks with several watermark
elements with each element specified as either text or PDF. You
can include up to five elements, in a watermark.
If you choose a text-based watermark, you can specify several
elements within the watermark with multiple text entries and specify
the positioning of each element. Assign meaningful names to these
elements, such as header, footer, and so on.
For example, if you want to specify different text in the header,
footer, on the margins, and across the document as a watermark,
you create several watermark elements and specify their positions.
If you want the user ID of the user and the current date of accessing
the document to appear in the header, the policy name in the right
margin, and a custom text “CONFIDENTIAL” to appear diagonally across
the document, you define separate watermark elements with text as
the type, and specify its formatting and positioning. When the watermark
is applied to a document, all the elements in the watermark are
applied to the document at the same time, in the order they are
added to the watermark.
Typically, you use PDF-based watermarks to include graphic contents
such as logos or special symbols such as copyright or registered
trademark.
You can change the limits on the number of watermark elements
and the PDF file size by modifying the document security configuration
file. See
Change the watermark configuration parameters
.
Keep in mind the following when you configure watermarks:
-
You cannot use a password-protected PDF document as
the watermark element. However, if the watermark that you create
contains other elements that are not password-protected, they will
be applied as part of the watermark.
-
You can change the maximum PDF file size that you want to
use as watermark element. However, large PDF documents used as watermarks
degrade performance during offline synchronization of documents
applied with such watermarks. See
Change the watermark configuration parameters
.
-
Only the first page of the selected PDF is used as the watermark.
Ensure that the information that you want to appear as watermark
is available on the first page itself.
-
Even though you can specify the scaling of the PDF document,
consider the page size and layout of the PDF if you plan to use
it as a watermark in the header, footer, or margins.
-
When specifying the font name, enter the name correctly.
AEM forms substitutes the font that you specified if it is not present
in the client machine where the document is opened.
-
If you selected text as the watermark content, specifying
the scaling option as Fit To Page does not work for pages that have
dissimilar width.
-
When you specify the positioning of the watermark elements,
ensure that no more than one element has the same positioning. If
two watermark elements have the same positioning such as center,
they appear overlapped on the document, and in the order they were
added to the watermark.
-
When specifying the font size and type, ensure that the length
of text is completely visible within the page. Text contents roll
over into new lines, so the watermark content that you intended
to be present in the margins might overlap into the content areas
on pages. However, if the document is opened in Acrobat 9, text
beyond the single line is truncated.
Limitations of dynamic watermarks
Some client applications may not support Dynamic watermarks.
See the appropriate Acrobat Reader DC extensions Help. In addition,
keep in mind the following about the versions of Acrobat that supports
dynamic watermarks:
-
You cannot use a password-protected
PDF document as the watermark element.
-
Acrobat and Adobe Reader versions earlier than 10 do not
support the following watermark features:
-
PDF watermarks
-
Multiple elements in the watermark (Text/PDF)
-
Advanced options such as range of pages, or display options
-
Text formatting options such as specified font, font name
and color. However, earlier versions of Acrobat and Reader will
display the text content in the default font and color.
-
Acrobat 9.0 and earlier versions: Acrobat 9.0 and earlier
does not support policy names in dynamic watermarks. If Acrobat
9.0 opens a policy-protected document with a dynamic watermark that
includes a policy name and other dynamic data, the watermark is
displayed without the policy name. If the dynamic watermark includes
only the policy name, Acrobat displays an error message
Add a dynamic watermark template
You can create dynamic watermark templates. These templates
remain available as a configuration option for policies that administrators
or users create.
Note:
Dynamic watermark configuration information
is not captured with the other configuration information when you
export a configuration file.
-
In administration console, click Services > Document
Security > Configuration > Watermarks.
-
Click New.
-
In the Name box, type a name for the new watermark.
Note:
You
cannot use some special characters in the names or descriptions
of watermarks or watermark elements. See the restrictions listed
in
Considerations for editing policies
.
-
Under Name, next to the plus sign, enter a meaningful name
to the watermark element such as Header, and add a description,
and expand the plus sign to display the options.
-
Under Source, select the type of watermark as either Text
or PDF.
-
If you selected Text, do the following:
-
Select
the watermark types to include. If you select Custom Text, in the adjacent
box, type the text to display for the watermark. Keep in mind the text
length that will appear as watermark.
-
Specify the text formatting properties such as font name,
font size, foreground color, and background color for the text contents
of the watermark text. Specify the foreground and background color
as hex values.
Note:
If you select the scaling option as Fit
To Page, the font size property is not available for editing.
-
If you selected PDF for rich watermark options, Click
Browse
next
to Select Watermark PDF to select the PDF document that you want
to use as the watermark.
Note:
Do not use a password-protected PDF
document. If you specify a password-protected PDF as the watermark
element, the watermark is not applied.
-
Under Use As Background, select either Yes or No.
Note:
Currently,
the watermark appears in the foreground irrespective of this setting.
-
To control where the watermark is displayed on the document,
configure the Vertical Alignment and Horizontal Alignment options.
-
Either select Fit to Page or select % and type a percentage
in the box. The value must be a whole number, not a fraction. To
configure the watermark size, you can use a value that is the percentage
of the page or set the watermark to fit the size of the page.
-
In the Rotation box, type the degrees by which to rotate
the watermark. The range is from -180 to 180. Use a negative value
to rotate the watermark counterclockwise. The value must be a whole
number, not a fraction.
-
In the Opacity box, type a percentage. Use a whole number,
not a fraction.
-
Under Advanced Options, set the following:
-
Page Range Options
-
Set the range of pages where the watermark should be displayed.
Enter the start page as 1 and the end page as -1 to have all pages marked
with the watermark.
-
Display Options
-
Select where you want to have the watermark appear. By default,
the watermark appears both on soft copy (online) and hard copy (print).
-
Click
New
under watermark Elements to add more watermark
elements if necessary.
-
Click OK.
Edit a dynamic watermark template
-
In administration console, click Services >
document security > Configuration > Watermarks.
-
Click the appropriate watermark in the list.
-
On the Edit Watermarks page, change the settings as required.
-
Click OK.
Delete a dynamic watermark template
When you delete a dynamic watermark, it is no longer available
to add to a new policy. However, the watermark remains on existing
policies that currently use it, and documents that the policy currently
protects continue to show the dynamic watermark until you or a user
edits the policy that contains the deleted watermark. After the
policy is edited, the watermark is no longer applied. A message
appears, indicating that the existing watermark is deleted on the
policy and the user can select another one to replace it.
-
In administration console, click Services > Document
Security > Configuration > Watermarks.
-
Select the check box beside the appropriate watermark and
click Delete.
-
Click OK.
Configuring invited user registration
Users who are external to your organization can register
with document security. Invited users who register and activate
their accounts can log in to document security by using their email
address and the password they create when they register. Registered
invited users can use policy-protected documents to which they have
permissions.
When invited users are activated, they become local users. Local
users can be configured and managed by using the Invited and Local
Users area. (See
Managing invited and local user accounts
.)
Depending on the capabilities that you enable for invited users,
they can also use these document security features:
Document security automatically generates a registration invitation
email when the following events occur unless the user is already
in the source LDAP directory or has previously been invited to register:
The registration email contains a link to a Registration page
and information about how to register. After the invited user registers,
document security issues an activation email with a link to an Activation
page. When activated, the account remains valid until you deactivate
or delete it.
If you enable built-in registration, you specify your SMTP server,
registration email details, access capabilities, and reset password
email information only once. Before you enable built-in registration,
ensure that you have created a local domain in User Management have
assigned the “Document security Invite User” role to the appropriate
users and groups in your organization. (See
Add a local domain
and
Creating and configuring roles
.) If you do not use built-in registration,
you must have your own user registration system created using the
AEM forms SDK. See the help on “Developing SPIs for AEM forms” in
Programming with AEM forms
. If you
do not use the Built-in Registration option, it is recommended that
you configure a message in the activation email and on the client login
screen to notify users about how to contact the administrator for
a new password or for other information.
Enable and configure invited user registration
By
default, the invited user registration process is disabled. You
can enable and disable invited user registration for document security,
as required.
-
In administration console, click Services
> document security > Configuration > Invited User Registration.
-
Select Enable Invited User Registration.
-
(Optional) Update the invited user registration settings
as required:
-
(Optional) Under Built-in Registration, select Yes to enable
this option. If you do not enable built-in registration, you must
set up your own user registration system.
-
Click OK.
Exclude or include an external user or group
You can restrict registration with document security for
certain external users or user groups. This option is useful, for
example, to allow access to a certain user group but exclude specific
individuals who are part of the group.
The following settings are located in the Email Restriction Filter
area of the Invited User Registration page.
-
Exclusion:
-
Type the email address of a user or group to exclude. To
exclude multiple users or groups, type each email address on a new
line. To exclude all users who belong to a particular domain, enter
a wildcard and the domain name. For example, to exclude all users
in the example.com domain, enter
*.example.com
.
-
Inclusion:
-
Type the email address of a user or group to include. To
include multiple users or groups, type each email address on a new
line. To include all users who belong to a particular domain, enter
a wildcard and the domain name. For example, to include all users
in the example.com domain, enter
*.example.com
.
Server and registration account parameters
The following settings are located in the General Settings
area of the Invited User Registration page.
-
SMTP Host:
-
The host name of the SMTP server. The SMTP server manages
the outgoing email notices to register and activate invited user
accounts.
If required by your SMTP host, type the required
information in the SMTP Server Account Name and SMTP Server Account
Password boxes to connect to the SMTP server. Some organizations
do not enforce this requirement. If you need information, see your
system administrator.
-
SMTP server socket class name:
-
Socket class name for the SMTP server. For example,
javax.net.ssl.SSLSocketFactory
.
-
Email Content Type:
-
Accepted MIME type like
text/plain
or
text/html
.
-
Email Encoding:
-
Encoding format to use when sending email messages. You can
specify any encoding, for example, UTF-8 for Unicode or ISO-8859-1
for Latin. The default is UTF-8.
-
Redirect Email Address:
-
When you specify an email address for this setting, any new
invitation are sent to the address provided. This setting can be
useful for testing purposes.
-
Use Local Domains:
-
Select the appropriate domain. On a new installation, ensure
that you created the domain by using User Management. If this is
an upgrade, an external user domain was created during the upgrade
and can be used.
-
Use SSL for SMTP server:
-
Select this option to enable SSL for the SMTP server.
-
Display login link on registration page:
-
Displays a login link on the registration page displayed
for invited users.
To enable Transport Layer Security (TLS) for the SMTP server
-
Open the administration console.
The
default location of the Administration console is
http://<server>:<port>/adminui
.
-
Navigate to Home > Services > document security ES3
> Configuration > Invited User Registration.
-
On the Invited User Registration, specify all the configuration
settings and then click OK.
-
Next, you need to update the config.xml. See
Configuration to enable SMTP for Transport Layer Security (TLS)
Note:
If
you make any changes to the Invited User Registration options, the config.xml
file is overwritten and TLS is deactivated. If you overwrite the
changes, you need to perform the above step to re-active TLS support
for Invited User Registration.
Registration invitation email settings
Document security automatically issues a registration invitation
email when you create a new invited user account or when an existing
user adds an external recipient who has not previously registered
or been invited to register to a policy. The email contains a link
that the recipient can use to access the registration page and enter
personal account information, including user name and password.
The password can be any combination of eight characters.
When the recipient activates the account, the user becomes a
local user.
The following settings are located in the Invitation Email Configuration
area of the Invited User Registration page.
-
From:
-
The email address from which the invitation email is sent.
The default format of the From email address is postmaster@[your_installation_domain].com.
-
Subject:
-
Default subject for the invitation email message.
-
Timeout:
-
The number of days after which the registration invitation
expires if the external user does not register. The default value
is 30 days.
-
Message:
-
The text that appears in the body of the message inviting
the user to register.
Activation email settings
After invited users register, document security sends an
activation email. The activation email contains a link to the account
activation page where the users can activate their account. When
the accounts are activated, users can log in to document security
by using their email address and the password they created when
they registered.
When the recipient activates the user account, the user becomes
a local user.
The following settings are located in the Activation Email Configuration
area of the Invited User Registration page.
Note:
It is also recommended that you configure a
message on the login screen to advise external users how to contact
their administrator for a new password or for other information.
-
From:
-
The email address from which the activation email is sent.
This email address receives failed delivery notices from the registrant’s
email host and also any messages that the recipient sends in reply
to the registration email. The default format of the From email
address is postmaster@[your_installation_domain].com.
-
Subject:
-
Default subject for the activation email message.
-
Timeout:
-
The number of days after which the activation invitation
expires if the user does not activate the account. The default value
is 30 days.
-
Message:
-
The text that appears in the body of the message a message indicating
that the recipient’s user account needs to be activated. You may
also want to include information such as how to contact an administrator
to obtain a new password.
Configure a password reset email
If you have to reset an invited user’s password, a confirmation
email is generated that invites the user to choose a new password.
A user’s password cannot be determined; if the user forgets it,
you must reset it.
The following settings are located in the Reset Password Email
area of the Invited User Registration page.
-
From:
-
The email address from which the password reset email is
sent. The default format of the From email address is postmaster@[your_installation_domain].com.
-
Subject:
-
Default subject for the reset email message.
-
Message:
-
The text that appears in the body of the message a message indicating
that the recipient’s external user password is reset.
Enable users and groups to create policies
The Configuration page has a link to the My Policies page,
where you specify which end users can create my policies and which
users and groups are visible in search results. The My Policies
page has two tabs:
-
Create Policies tab:
-
Use to configure user permissions to create custom policies.
-
Visible Users and Groups tab:
-
Use to control which users and groups are visible in user
search results. The super user or policy set administrator is required to
select and add domains, created in User Management, to the visible
user and group for each policy set. This list is visible to the
policy set coordinator and is used to put limits on which domains
the policy set coordinator can browse when choosing users to add
to policies.
Before giving users permission to create custom
policies, consider how much access or control you want individual
users to have. Additionally, consider how exposed you want your
users and groups to be when making them visible to searches.
Specify users and groups who can create policies
As an administrator, specify which users and groups can
create custom policies. This permission can be set at the user and
group level. The search functionality searches the User Management
database for users and groups.
-
In administration console, click Services > Document
Security > Configuration > My Policies.
-
On the My Policies page, click the Create Policies tab and
click Add Users and Groups.
-
In the Find box, type the user name or email address of the
user or group that you are searching for. If you do not have this
information, leave the box empty. You can also type a partial name
or email address, such as when you know only the first two letters
of a user name.
-
In the Using list, select your search parameters Name or
Email.
-
In the Type list, select Group or User to narrow your search.
-
In the In list, select the domain to search. If you do not
know the user or group’s domain, select All Domains.
-
In the Display list, specify the number of search results
to display per page and then click Find.
-
To add My Policies users and groups, select the check box
for each user and group to add.
-
Click Add, and then click OK.
Your selected users and groups now have permission to create
custom policies.
Remove the create custom policies permission from a user or group
-
On the document security page, click Configuration
> My Policies.
-
On the My Policies page, click the Create Policies tab. Users
and groups with permissions to create custom policies are displayed.
-
Select the check box next to the users and groups to remove
from this permission.
-
Click Delete, and then click OK.
Specify users and groups that are visible in searches
When users are managing their custom policies, they can
search for users and groups to add to their policies. You must specify
the domains from which users and groups are visible in these searches.
-
On the document security page, click Configuration >
My Policies.
-
On the My Policies page, click the Visible Users and Groups
tab.
-
To make the users and groups in a domain visible, click Add
Domains, select the domains, and click Add. To remove a domain,
select the checkbox next to the domain name and click Delete.
Manually editing the document security configuration file
You can import and export the configuration information
that is stored in the document security database. For example, you
may want to make a backup copy of the configuration information
when you move from a staging to a production environment, or you
may want to edit advanced options that can only be configured be
editing this file.
You can make the following changes using the configuration file:
Display
CATIA permissions when creating and editing policies
Specify a timeout period for offline synchronization
Denying document security services for specific applications
Change the watermark configuration parameters
Disabling external links
Important:
Importing the configuration file reconfigures
your system based on the information in the file. The exceptions
are dynamic watermark configuration and custom events information,
which are not saved with the exported configuration file. You must
configure this information manually in your new system. Only a system administrator
or a professional services consultant who is familiar with document security
and XML should modify the content of a configuration file, such
as to reconfigure a corrupted setting or to tune parameters for
a particular enterprise deployment scenario.
Export a configuration file
-
In
administration console, click Services > document security 11
> Configuration > Manual Configuration.
-
Click Export and save the configuration file in another location.
The default filename is config.xml.
-
Click OK.
-
Before changing the configuration file, make a backup copy
in case you need to revert.
Import a configuration file
-
In
administration console, click Services > document security 11
> Configuration > Manual Configuration.
-
Click Browse to go to the configuration file and then click
Import. You cannot type the path directly in the File Name box.
-
Click OK.
Specify a timeout period for offline synchronization
Document security enables users to open and use protected
document when they are not connected to the document security server.
The user’s client application must regularly synchronize with the
server to keep documents valid for offline use. The first time users
open a protected document, they are asked whether their computer
should be authorized to perform periodic client synchronization.
By default, the synchronization occurs automatically every four
hours and as-needed when a user is connected to the document security
server. If the offline period for a document expires while the user
is offline, the user must reconnect to the server to enable the
client application to synchronize with the server.
In the document security configuration file, you can specify
the default frequency of the automatic background synchronization.
This setting acts as the default timeout period client applications,
unless the client explicitly sets its own timeout value.
-
Export the document security configuration file. (See
Manually editing the document security configuration file
.)
-
Open the configuration file in an editor and locate the
PolicyServer
node. Under
that node, locate the
ServerSettings
node.
-
In the
ServerSettings
node, add this following
entry and then save the file:
<entry key="BackgroundSyncFrequency" value="
time
"/>
where
time
is
the number of seconds between automatic background synchronizations.
If you sent this value to
0
, synchronization always
occurs. The default value is
14400
seconds (every
four hours).
-
Import the configuration file. (See
Manually editing the document security configuration file
.)
Denying document security services for specific applications
You can configure document security to deny services to
applications that meet specific criteria. The criteria can specify
a single attribute such as a platform name or it can specify multiple
sets of attributes. This feature can help you control the requests
document security must handle. Here are some applications of this feature:
-
Revenue protection:
You may want to deny access
to any client application that does not support your revenue conventions.
-
Application compatibility:
Some application may be
incompatible with the policies or behavior of your document security
server.
When client applications attempt to establish a link with document
security, they supply application, version, and platform information.
Document security compares this information against Denials settings
it obtains from the document security configuration file.
The Denials settings can contain several sets of denial conditions.
If all of the attributes of any one set match, the requesting application
is denied access to the document security services.
The denial-of-service feature requires that client applications
use the document security C++ Client SDK version 8.2 or later. The
following Adobe products provide product information when requesting
document security services:
-
Adobe Acrobat 9.0 Professional/Acrobat 9.0 Standard and
later
-
Adobe Reader 9.0 and later
-
Acrobat Reader DC extensions for Microsoft Office 8.2 and
later
Client applications use the Client API from the document security
C++ Client SDK to request services from document security. The Client
API requests include platform and SDK version information (precompiled
into the Client API) and product information obtained from the client
application.
Client applications or plug-ins supply product information in
their implementation of a callback function. The application provides
the following information:
-
Integrator name
-
Integrator version
-
Application family
-
Application name
-
Application version
If any information is not applicable, the client application
leaves the corresponding field blank.
Several Adobe applications include product information when requesting document
security services, including Acrobat, Adobe Reader, and Acrobat Reader
DC extensions for Microsoft Office.
Acrobat and Adobe Reader
When Acrobat
or Adobe Reader request a service from document security, it supplies
the following product information:
-
Integrator:
Adobe
Systems, Inc.
-
Integrator version:
1.0
-
Application family:
Acrobat
-
Application name:
Acrobat
-
Application version:
9.0.0
Acrobat Reader DC extensions for Microsoft Office
Acrobat
Reader DC extensions for Microsoft Office is a plug-in used with
the Microsoft Office products Microsoft Word, Microsoft Excel, and
Microsoft PowerPoint. When it requests a service, it supplies the
following information:
-
Integrator:
Adobe Systems
Incorporated
-
Integrator version:
8.2
-
Application family:
Acrobat Reader DC extensions for
Microsoft Office
-
Application name:
Microsoft Word, Microsoft Excel,
or Microsoft PowerPoint
-
Application version:
2003 or 2007
Configure document security to deny services for specific applications
-
Export the document security
configuration file. (See
Manually editing the document security configuration file
.)
-
Open the configuration file in an editor and locate the
PolicyServer
node. Add
a
ClientVersionRules
node as an immediate child
of the
PolicyServer
node, if one does not exist:
<node name="ClientVersionRules">
    <map>
        <entry key="infoURL" value="URL"/>
    </map>
    <node name="Denials">
        <map/>
        <node name="MyEntryName">
            <map>
                <entry key="SDKPlatforms" value="platforms"/>
                <entry key="SDKVersions" value="versions"/>
                <entry key="AppFamilies" value="families"/>
                <entry key="AppNames" value="names"/>
                <entry key="AppVersions" value="versions"/>
                <entry key="Integrators" value="integrators"/>
                <entry key="IntegratorVersions" value="versions"/>
            </map>
        </node>
        <node name="MyOtherEntryName"
            <map>
                [...]
            </map>
        </node>
        [...]
    </node>
</node>
where:
SDKPlatforms
specifies
the platform hosting the client application. Possible values are:
-
Microsoft Windows
-
Apple OS X
-
Sun Solaris
-
HP-UX
SDKVersions
specifies
the version of the document security C++ Client API used by the
client application. For example,
"8.2"
.
APPFamilies
is
defined by the Client API.
AppName
specifies
the name of the client application. Commas are used as name separators.
To include a comma in a name, escape it with a backslash (\) character.
For example,
"Adobe Systems\, Inc."
.
AppVersions
specifies
the version of the client application.
Integrators
specifies
the name of the company or group that developed the plug-in or integrated
application.
IntegratorVersions
is the version
of the plug-in or integrated application.
-
For each additional set of denial data, add another
MyEntryName
element.
-
Save the configuration file.
-
Import the configuration file. (See
Manually editing the document security configuration file
.)
Examples
In this example, all Windows
clients are denied access.
<node name="ClientVersionRules">
    <map>
        <entry key="infoURL" value="http://www.dont.use/windows.html"/>
    </map>
    <node name="Denials">
        <map/>
        <node name="Entry_1">
            <map>
                <entry key="SDKPlatforms" value="Microsoft Windows"/>
            </map>
        </node>
    </node>
</node>
In this example, My Application version
3.0 and My Other Application version 2.0 are denied access. The
same denials information URL is used regardless of the reason for
denial.
<node name="ClientVersionRules">
    <map>
        <entry key="infoURL" value="http://get.a.new/version.html"/>
    </map>
    <node name="Denials">
        <map/>
        <node name="FirstDenialSettings">
            <map>
                <entry key="AppNames" value="My Application"/>
                <entry key="AppVersions" value="3.0"/>
            </map>
        </node>
        <node name="SecondDenialSettings">
            <map>
                <entry key="AppNames" value="My Other Application"/>
                <entry key="AppVersions" value="2.0"/>
            </map>
        </node>
    </node>
</node>
In this example, all requests from
a Microsoft PowerPoint 2007 or Microsoft PowerPoint 2010 installation
of Acrobat Reader DC extensions for Microsoft Office are denied.
<node name="ClientVersionRules">
    <map>
        <entry key="infoURL" value="http://get.a.new/version.html"/>
    </map>
    <node name="Denials">
        <map/>
        <node name="Entry_1">
            <map>
                <entry key="AppFamilies" value=
    "document security Extension for Microsoft Office"/>
                <entry key="AppNames" value= "Microsoft PowerPoint"/>
                <entry key="AppVersions" value="2007,2010"/>
            </map>
        </node>
    </node>
</node
Change the watermark configuration parameters
By default, you can specify a maximum of five elements
in a watermark. Also, the maximum file size of the PDF document
that you want to use as watermark is limited to 100KB. You can change
these parameters in the config.xml file.
Note:
You should
change these parameters with caution.
-
Export the document security configuration file. (See
Manually editing the document security configuration file
.)
-
Open the configuration file in an editor and locate the
ServerSettings
node.
-
In the
ServerSettings
node, add the following
entries and then save the file:
<entry key="maximumSizeOfWatermarkElement" value="max filesize in KB"/>
<entry key="maximumWatermarkElementsPerWatermark" value="max elements"/>
The
first entry,
max file size
is the maximum file size (in KB)
that is allowed for a PDF watermark element. Default is 100KB.
The
second entry,
max elements
is the maximum number of elements
that is allowed in a watermark. Default is 5.
-
Import the configuration file. (See
Manually editing the document security configuration file
.)
Disabling external links
Many document security users do not have access to external
links such as
www.adobe.com
while they are using the Right
Management user interfaces:
The following changes to the config.xml disables all external
links from the Right Management user interfaces.
-
Export the document security configuration file. (See
Manually editing the document security configuration file
.)
-
Open the configuration file in an editor and locate the
DisplaySettings
node.
-
To disable all external links, in the
DisplaySettings
node,
add the following entry and then save the file:
<entry key="ExternalLinksAllowed" value="false"/>
-
Import the configuration file. (See
Manually editing the document security configuration file
.)
Configuration to enable SMTP for Transport Layer Security (TLS)
The following changes to the config.xml enable TLS support
for the Invited User Registration feature.
-
Export the document security configuration file. (See
Manually editing the document security configuration file
.)
-
Open the configuration file in an editor and locate the
DisplaySettings
node.
-
Locate the following node:
<node name="ExternalUser">
-
Set the value of the
SmtpUseTls
key in the
ExternalUser
node
to
true
.
-
Set the value of the
SmtpUseSsl
key in the
ExternalUser
node
to
false
.
-
Save the
config.xml
.
-
Import the configuration file. (See
Manually editing the document security configuration file
.)
Disable SOAP endpoints for Document Security documents
The following changes to the config.xml todisable SOAP
endpoints for document security documents.
-
Export the document security configuration file. (See
Manually editing the document security configuration file
.)
-
Open the configuration file in an editor and locate the following
node:
<node name="DRM">
-
In the DRM node, locate the
entry
node:
<entry key="AllowUnencryptedVoucher" value="true"/>
-
To disable SOAP endpoints for document security documents,
set the value attribute to
false
.
<node name="DRM">
    <map>
        <entry key="AllowUnencryptedVoucher" value="false"/>
    </map>
</node>
-
Save the
config.xml
.
-
Import the configuration file. (See
Manually editing the document security configuration file
.)
Managing invited and local user accounts
Use the Invited and Local Users page to manage your invited
and local users. This page is displayed only if the following requirements
are met:
The Invited and Local Users page contains two tabs that you can
use to search for, view, edit, lock, unlock, and delete invited
and local user accounts.
You can also manually send registration emails to your invited
users. You may want to do this, for example, if the registration
period that the email authorized ends and the user cannot use the
URL to register. In this case, you can resend a registration email
to the invited user. When the invited user registers and activates
the account, the user becomes a local user.
Note:
Invited users can also be added directly through
the LDAP directory that document security references, or when a
user or administrator invites a new user when creating or editing
a policy, therefore initiating a registration invitation email. Users
can add new invited users to policies if you enable the Enable Invited
User Registration option on the Invited User Registration page.
Add an invited user
You can add one or more invited user accounts to document
security at a time. To add an invited user account, you need the
email address of the user. When you add a user, document security
sends a registration email inviting the user to register.
-
In administration console, click Services > Document
Security > Invited and Local Users, and then click Invite New
User.
-
Type the email addresses of the users you want to invite.
Enter multiple addresses on a line, separated by a comma.
The
message that you created when enabling invited user registration
is sent to the users. (See
Configuring invited user registration
.)
-
Click OK.
View information about a local user
You can view information about local users, including the
name, email address, organization, registration status, and domain.
-
In administration console, click Services > Document
Security > Invited and Local Users, and then click Invite New
User.
-
Click the Local Users tab and, on the Manage Local Users
page, click the email address for the user you want to view.
The
user details are displayed, and you can reset the user’s password
and deactivate the account.
Send an email to an unregistered external user
When you add an invited user, document security automatically
sends the user a registration email request. You can also manually
generate a registration email to send to an invited user who has
not yet registered. You may want to do this, for example, to send
a new invitation if an invited user's registration email expires.
-
In administration console, click Services > Document
Security > Invited and Local Users.
-
In the user list, select the check box for each user to send
a registration email to and then click Resend Invitation Email.
-
Review the list of selected users and click OK.
Reset a local user password
You can reset passwords for activated invited users who
registered with document security but forgot their password. When
you reset a password, an email is generated that contains a new,
temporary password for the user.
When you enabled the invited user registration process, you created
an email message that will be sent to users prompting them to reset
their passwords. (See
Configuring invited user registration
.)
-
In administration console, click Services > Document
Security > Invited and Local Users and click the Local Users
tab.
-
In the user list, select the appropriate user.
-
On the Manage Local User page, click Reset Password and click
OK. A reset password email containing the new password is sent to
the user.
Enable or disable a user account
You can disable local user accounts to temporarily restrict
a user from logging in to document security. When you disable the
account, the user cannot use policy-protected documents or create
or apply policies.
You can enable a local user account that is currently disabled.
You cannot enable an invited user account that is listed as registered.
The registered status indicates that the invited user is registered
but has not yet activated the account using the link in the activation
email.
Restrict a user account
-
In Administration
Console, click Services > document security > Invited and Local
Users and click the Local Users tab.
-
In the user list, select the appropriate user.
-
On the Local User Detail page, click Account Disable.
Reinstate a user account
-
Click
Invited and Local Users and click the Local Users tab.
-
In the user list, select the appropriate user.
-
On the Local User Detail page, click Account Enable.
Remove an invited user account
You can delete invited user accounts from document security.
You may want to delete an account, for example, when a user changes
their personal email account information.
If you delete a user account, only you or another administrator
can reinstate the account by selecting the Add Invited User option
on the Invited Users page. Users cannot add the deleted user account
to a policy, and no invitation process can be initiated by that
method.
Note:
Invited users who were deleted through the AEM
forms User Management interface cannot be reinvited until they have
been deleted again using the following procedure.
-
In administration console, click Services > Document
Security > Invited and Local Users and click the Invited Users
tab.
-
Select the check box beside one or more users, click Delete,
and then click OK.
Search for an invited user account
You can search for invited user accounts by using an email
address.
-
In administration console, click Services > Document
Security > Invited and Local Users.
-
In the Find Email box, type the user’s email address, and
then click Find.
Search for a local user account
You can search for a local user by using the user’s email
address or name and domain.
-
In administration console, click Services > Document
Security > Invited and Local Users and click the Local Users
tab.
-
Type the search criteria in the Find box, select Name or
Email, and then click Find.
Remove a local user account
You can delete local user accounts from document security.
You may want to delete accounts, for example, when users change
their personal email account information.
-
In administration console, click Services > Document
Security > Invited and Local Users and click the Local Users
tab.
-
Select the check box beside one or more users, click Delete,
and then click OK.
Sort the user list
You can find users more easily by sorting the user list
by column heading. Triangle icons beside the column heading indicate
which column is currently used to sort:
Creating and managing policies
A
policy
defines a set of confidentiality settings
and users who can access a document to which the policy is applied.
A
policy set
is used to group a set of policies that have
a common business purpose. These policy sets are then made available
to a subset of users in the system. For details about policies,
see
Policies and policy-protected documents
.
Types of policies
Document security provides the following types of policies.
Personal policies
Users can create, edit,
copy, delete, and apply their own policies with settings appropriate
to a particular situation. Only the person who creates a policy
and the administrators can access that personal policy. Personal
policies appear on the My Policies tab of the Policies page.
Invited
users can also create, edit, copy, and delete personal policies
if the administrator enables this capability.
Shared policies
Administrators and policy
set coordinators create shared policies based on the confidentiality
requirements that your organization identifies for different types of
documents and users. Shared policies are contained within policy
sets and are available to all authorized users (document publishers,
policy set coordinators, and document recipients) for a particular
policy set. Administrators and policy set coordinators can enable
and disable shared policies. Shared policies appear in policy sets
on the Policy Sets tab of the Policies page.
Microsoft Outlook auto-generated policies
Using
Acrobat, you can apply policies to documents that you send as email attachments
in Microsoft Outlook. In Outlook, you can protect a document by using
an existing policy or by using an auto-generated policy that Acrobat generates
with default confidentiality settings and applies to the document
that is attached to an email message. (See
Acrobat Help
.)
Note:
In
order for a policy to be available in Outlook, you must set the
policy as a favorite in Acrobat. All other policies, including those
there you are the Publisher, are not displayed in Outlook.
Who can create and manage policies and policy sets
The way that you interact with policies and policy sets
depends on your role within the organization:
-
Users:
-
Users can create, edit, and delete their personal policies.
Invited users can also create personal policies if the administrator
enables this capability.
-
Policy set coordinators:
-
Policy set coordinators can create and manage shared policies
within the policy sets where they are designated as a coordinator.
A policy set coordinator is typically a specialist in the organization
who can best author the policies in a particular policy set.
-
Administrators:
-
Administrators can edit any user’s personal policies. They
can create shared policies. They can also create, edit, and delete
policy sets, and designate policy set coordinators.
For details
on the various document security roles, see
About document security users
.
Creating and editing policies
Users can create or edit personal policies for their own
use. Administrators and policy set coordinators can create or edit
shared policies for your organization.
Considerations for editing policies
When you edit a policy, the changes affect documents that
the policy currently protects, as well as documents that the policy
protect thereafter. For example, if you remove recipients from a
policy that is currently applied to a document, the recipients can
no longer open the document.
The status of the document determines when the change takes effect:
-
If the document is online, changes are applied immediately
unless the user has the document open. In this case, the user must
close the document for the changes to take effect.
-
If a recipient is using the document offline (for example,
on a laptop computer), the changes take effect the next time the
recipient takes the document online and synchronizes with document
security by opening any policy-protected document.
Note:
Policies that Acrobat auto-generates for the
recipients of documents that are attached to email messages in Microsoft
Outlook do not appear in the policy list. You can view these policies
only by opening the Document Detail page for the associated document.
When you edit policies, these restrictions apply:
-
Invited users can only edit policies if the administrator
enables this capability. If you cannot edit policies, the Edit option
will not be available.
-
Policy set coordinators can edit policies within policy sets
only if they have the correct permissions. The super user or policy
set administrator sets these permissions in the document security
administrator interface.
-
If the policy has a watermark configured that the administrator
deleted since the policy was created, this watermark will no longer
be applied to documents if you edit and save the policy. Deleted
watermarks remain in effect only for existing policies as long as
you do not edit the policy. If you edit the policy, you must select
another watermark to replace the deleted one.
-
You cannot grant anonymous access to a document by editing
the policy that is currently applied. If you edit the policy, users
must still log in to access the document. To apply anonymous access
to this document, first remove the policy in the client application
and then apply another policy that permits anonymous access.
-
Policies that Acrobat auto-generates for the recipients of
a document that is attached to an email message in Microsoft Outlook
do not appear in the policy list. To access this policy, locate
the document on the Documents page, open the Document Detail page,
and click the policy name in the list of document details.
Create or edit a policy
-
On the
document security page, click Policies and click one of these tabs:
-
To create or edit a personal policy, click the My Policy
tab.
-
To create or edit a shared policy, if you have permission,
click the Policy Sets tab and click the appropriate policy set name,
then click the Policies tab.
-
Click New or select the policy that you want to edit from
the list.
-
In the Name box, type a name that uniquely identifies the
policy. In the Description box, describe what the policy does and
when to use it. If the policy is within a policy set, the name and
description appear in the policy list for all specified users. Personal
policies are available only to the user and the administrators.
The
following characters cannot be used in the name or description:
If you use the following
character in the name or description, they are converted to spaces:
Note:
You can create
a policy name that contains extended characters; however, when a
comparison is made between two strings, accented and non-accented characters
such as "e" and "é" are considered to be the same. When someone creates
a policy, a comparison is made to check whether a policy with the
same name already exists. The comparison cannot distinguish between
names that are the same except for accented characters. It is assumed
that the policy is already added to the database and the new one
is not added.
-
Add users and groups to the policy and set the appropriate
permissions. (See
Users and Groups
.)
-
Under General Settings, select the appropriate options. (See
General Settings
.)
-
(Optional) If applicable, select an external authorization
provider and specify its properties. If you do not want to use an
external authorization provider, click Remove Default Provider.
An
external authorization provider is used to set up properties within
the policy and when selected, the external authorization provider
uses this information to evaluate the policy. The available properties
are configured by the administrator and the person who installs
the software.
-
Under Advanced Settings, select the appropriate options.
(See
Advanced Settings
.)
-
Under Unchangeable Advanced Settings, select the appropriate
options. (See
Unchangeable Advanced Settings
.)
-
Click Save. The policy appears in the policy list. An icon
with a red circle appears beside the new policy, indicating that
it is still disabled.
Users and Groups
In the Users and Groups area, you specify the users who
have access to documents protected with the policy. For each user
or group you specify, you also set the document usage privileges.
Note:
The document publisher is the user who protects
the document with the policy. This user is always included by default
on a policy, with full access rights, including revocation and policy-switching
capabilities. However, administrators can change the document publisher’s
access rights for shared policies. For example, the administrator
can restrict the document publisher from revoking document access
or switching the policy.
-
Add User or Group:
-
To add a user or group of users, click Add User or Group
and then click Advanced Search to find users or groups. Users include
your organization’s internal users and invited users who have registered
with document security. When you select this option, the Add User
or Group page appears:
-
In the Find box, type the user
or group name or email address.
-
In the Using list, select Name or Email.
-
In the Type list, select User or Group.
-
Select the domain you want to search from the In list, and
click Find.
-
When the results are returned, select the user or group to
add, and click Add.
Note:
If you enter
a correct invited user name or email address and no result is returned,
the user may not have registered yet, or the account may be deleted.
You can try adding the user as an invited user type or contact your
administrator.
-
Invite New User:
-
To add an invited user, click Invite New User, type the user’s email
address in the box that appears, and click Invite. This option is
available only if the administrator enabled it. When you add new
invited users to a policy, document security sends a registration
invitation email if the users are not already invited to register.
The users must use the link in the email to create an account, and
then they must activate the account.
After registering, invited
users can use policy-protected documents that they have authorization
for. Depending on the capabilities that the administrator enables,
the external users may have permission to apply policies to documents, create,
edit and delete policies, and add other external users to policies.
Specify the document permissions for users and groups
You can specify document permissions for one user or group
at a time, or you can select multiple users and groups from the
list and change their permissions using the options in the column
headings area.
By default, all policy-protected documents have a permission
that allows users to open them while online.
The Permissions and Options tab are displayed in document security.
These document permissions are available on the Permissions tab.
You can apply these permissions to PDF, PTC Pro/E, and Microsoft
Office files.
-
Print:
-
Permits the user to print a document that is protected with
this policy. For Office and Pro/E files, you can select the Print
check box to allow printing, or clear it to prevent printing. If
you select the Show Custom Permissions For PDF check box, you can
select from these options:
-
Not Allowed:
-
User is not allowed to print the PDF.
-
Allowed:
-
User is allowed to print the PDF.
-
Low res. only:
-
User is allowed to print the PDF at a low resolution.
-
Modify:
-
Permits the user to modify a document that is protected with
this policy. For Office and Pro/E files, you can select the Modify
check box to allow modifications, or clear it to prevent modifications.
If you select the Show Custom Permissions For PDF check box, you
can select from these options:
-
Not Allowed:
-
User is not allowed to modify the PDF.
-
Any:
-
User can modify the PDF.
-
Collaborate:
-
User is allowed to collaborate with others, using the Collaborate options
in Adobe Acrobat. This permission allows the user to copy form data even
if the Copy permission is not explicitly given in the policy.
-
Alter Pages:
-
User is allowed to add and remove pages and edit content
in the PDF.
-
Fill & Sign:
-
User is allowed to fill form fields on the PDF and sign it.
-
Copy:
-
Permits the user to copy text from a document that is protected
with this policy.
-
Screen Reader:
-
This permission is displayed if you select the Show Custom Permissions
For PDF check box. When this option is selected, Adobe Acrobat has permission
to add temporary tags to the PDF to improve its readability with
a screen reader.
These document permissions are available
on the Options tab. You can apply these permissions to PDF, PTC
Pro/E, and Microsoft Office files:
-
Offline:
-
Permits the user to view a document offline that is protected
with this policy.
-
Permission Validity:
-
Select Permissions Are Always Valid or set a document permissions
validity period. If you select a validity period, click the calendar
icons to select a date and use the arrows to specify the time in
24-hour format.
-
Revoke:
-
Permits the document publisher to revoke document access
privileges.
-
Switch:
-
Permits the document publisher to switch policy privileges.
General Settings
The General Settings area contains the following settings:
-
Validity Period:
-
The time period during which the policy-protected document is
accessible to authorized recipients. You can choose from these validity
period options:
-
Document will not be valid after:
-
The document is accessible for the specified number of days
from when the document was secured.
-
Document will not be valid after this date:
-
The document is valid from the date the policy is applied
to the document until the end date that is specified.
-
Valid from, to:
-
The document is valid during the dates you specified. You
can use the calendar to select a date, where applicable, by clicking
the calendar icon.
-
Document is always valid:
-
The document validity period does not expire.
Note:
The validity dates are based on the time zone
of the document security system, not on the time zone of your local
computer.
-
Auditing:
-
Enable or disable auditing of the events that are associated
with a policy-protected document. For example, document security
can record events such as attempts to open a document. Audited events
appear in the list on the Events page. If you do not select this
option, document security does not record events for documents that
are associated with the policy.
-
Extended Usage Tracking:
-
Enable or disable Extended Usage Tracking. document security
supports tracking of user events associated with various operations
performed on a PDF file. The document security object can be accessed
using a Java Script. A button click, a multimedia file being played,
or the saving of a file are some examples of events that can fired
from a policy protected PDF. Using the document security object,
you can also retrieve user information. The tracking of events may
be enabled from the document security server at the global level
or at a policy level.
-
Auto-Offline Lease Period:
-
The maximum number of days the recipient can use the policy-protected
document offline (without an active Internet or network connection).
When the lease period expires, the recipient must synchronize the document
again to continue using it.
External Authorization Providers
Select the external authentication providers if you have
already configured any. Available providers are listed.
Authentication Settings
You can override the authentication settings that you configured
on the server and specify the authentication options relevant for
this policy. Select Override Global Authentication Settings and
then select the authentication options relevant for this policy.
The following authentication options are available:
-
Allow Username Password Authentication:
-
Select this option to enable client applications to use user
name/password authentication when connecting to the server.
-
Allow Kerberos Authentication:
-
Select this option to enable client applications to use Kerberos
authentication when connecting to the server.
-
Allow Client Certificate Authentication:
-
Select this option to enable client applications to use certificate
authentication when connecting to the server.
-
Allow Extended Authentication
-
Select to enable extended authentication. Selecting this
option enables client applications to use extended authentication. Extended
authentication provides for customized authentication processes
and different authentication options configured on the Document
Security server
If you are overriding the global authentication settings, you
can choose the authentication options relevant for this policy.
For example, if you had enabled three authentication options (username
and password, client certificate, and extended authentication) on
the server, you can override that global setting and select only
extended authentication for this policy. You must ensure that the authentication
option that you select here is already configured on the server.
In this example, you cannot select Kerberos as the authentication
option because it is not configured on the server.
Note:
Extended authentication is supported on Apple Mac OS X with
Adobe Acrobat release 11.0.6 and above.
Advanced Settings
The Advanced Settings area contains the following settings:
-
Dynamic Watermark:
-
Select a watermark to be dynamically displayed on the pages
of a document (for example, when a recipient prints the document). Dynamic
watermarks uniquely identify a document, therefore helping to ensure the
confidentiality of the document and preventing copyright infringement.
For example, the administrator can configure a dynamic watermark
that displays the current date, the user name or identifier of the
person who is using the document, or the name of the policy used
to protect the document. A watermark can also display custom text
or graphic elements if configured. Administrators configure the
watermarks options, and administrators and users can apply them to
policies.
If you are editing a policy and
the administrator deleted a configured watermark that you previously
selected for this policy, a note appears on the Edit Policy page.
In this case, if you are saving the edited document, select a new
watermark if you want one to appear on the document.
Note:
For policies that provide anonymous user access,
the user name and identifier of an anonymous user is not displayed
as a watermark even if you select this type of watermark.
-
Use Only Certified Acrobat Plug-ins for PDF:
-
When selected for a policy, this option specifies that Acrobat
8.0 and later must run in certified mode when opening documents
that are secured with the policy. When Acrobat runs in certified
mode, it will not load any third-party plug-ins.
Select this
option if you are concerned about a document recipient writing a plug-in
that can circumvent any of the document protections in Acrobat 8.0
and later. Do not select this option if your document recipients
need to use third-party plug-ins in Acrobat to interact with documents.
This option enables only the
certified mode in Acrobat 8.0 or later; the administrator must disable
access for Acrobat 7.0.
This option does not
apply to Adobe Reader.
-
Access Denied Error Message:
-
A message that appears to anyone who attempts to open a policy-protected
document without permission. This message appears in Acrobat. Clients
that cannot display this message display a default message to indicate
that access is denied.
Unchangeable Advanced Settings
The Unchangeable Advanced Settings area contains the following
settings. You cannot change these settings after you save the policy.
-
Encryption Algorithm and Key Length:
-
Used to protect your documents. You can choose from these
options:
-
AES 128-bit
-
AES 256-bit. Only Acrobat 9.0 and later supports this option.
To use AES 256 encryption for PDF files, obtain and install the
Java Cryptography Extension (JCE) Unlimited Strength Jurisdiction
Policy files. These files replace the local_policy.jar and US_export_policy.jar
files in the [JAVE_HOME]/lib/security folder. For example, if you
are using Sun JDK 1.6, copy the downloaded files to the [dep root]/Java/jdk1.6.0_26/lib/security
folder. You can download these files from
Java SE Downloads
.
-
No encryption. Acrobat 9.0 and later currently support this
option. If you select this option, the Document Restrictions options
are disabled. This option may be useful if you want to use document
security for document auditing or version control but to not want
to encrypt the document.
-
Document Restrictions:
-
Select the PDF document components to encrypt. Other client
applications encrypt the entire document but not linked or embedded
files. You can choose from these options:
-
The entire
document, including its attachments and metadata.
Metadata
is information
about the document and its content that you can view through the
document Properties dialog box or the Acrobat Advanced menu. In Acrobat,
you can attach files of different types (for example, text, audio,
and video files) to PDF documents.
-
The document and its attachments but not the metadata.
-
The document attachments only. You can encrypt the attachments
to a PDF file without encrypting the document content.
View information about a policy
Using the My Policies tab, you can search personal policies.
Policy sets that administrators create are listed on the Policy
Sets tab of the Policies page with information about the policy
set, including its name, the date created and modified, and a description.
Click a policy set name to see its details. Policy set coordinators
who have permission to manage policies can create shared policies
within a particular policy set.
When you create or edit a policy, a page is displayed where you
can configure details such as policy name, permission levels, confidentiality
settings, and the recipients to include in the policy.
The administrator can configure the following confidentiality
settings for a policy:
-
General document confidentiality options, such as the
document validity period and offline lease period
-
The authorized users, and the document restrictions and privileges
for each of those users
-
Advanced document confidentiality options, including dynamic
watermarks and document encryption
Users can view the policies they created and any shared policies
that they have access to. Administrators can view all the shared
and personal policies that are in document security.
You can view more detailed information about a policy that appears
in the list, including the users or groups that are included on
the policy and the confidentiality settings that are specified for
those users.
Note:
Policies that Acrobat auto-generates for the
recipients of documents that are attached to email messages in Microsoft
Outlook do not appear in the policy list. You can view these policies
only by opening the Document Detail page for the associated document.
-
On the document security page, click Policies and then
click the My Policies tab.
-
Select the appropriate policy from the list.
-
On the Policy Detail page, you can see details about the
policy, edit the policy, or view events related to the policy.
Copy a policy
You can copy an existing policy and save it with a new
name and description. Copying policies is an efficient way to create
new policies by using existing settings.
External users can copy policies only if the administrator enables
this capability. If you cannot create policies, the Copy option
will not be available.
-
On the document security page, click Policies and then
click the My Policy tab.
-
Select the appropriate policy from the list.
-
On the Policy Detail page, click Copy.
-
In the New Policy Name box, type the new policy name. Optionally,
type a new Description.
The following characters cannot be
used in the name or description:
If you use the following
character in the name or description, they are converted to spaces:
Note:
You can create
a policy name that contains extended characters; however, when a
comparison is made between two strings, accented and non-accented characters
such as "e" and "é" are considered to be the same. When someone creates
a policy, a comparison is made to check whether a policy with the
same name already exists. The comparison cannot distinguish between
names that are the same except for accented characters. It is assumed
that the policy is already added to the database and the new one
is not added.
-
Click OK.
Delete a policy
You can delete policies that you created. Administrators
can delete policies that any user created. Policy set coordinators
can delete policies in their policy sets. A policy that you delete
is still enforced for documents that are protected with that policy.
You can delete more than one policy at a time.
Invited users can delete policies only if the administrator enables
this capability. If you cannot delete policies, the delete option
will not be available.
-
On the document security page, click Policies.
-
Click the My Policy tab.
-
Select the check box beside the appropriate policy and click
Delete, and then click OK.
Note:
You must use the client application to remove
policies from documents. (See Acrobat Help or the appropriate Acrobat
Reader DC extensions Help.)
Sort the policy list
You can sort the policy list by column heading to find
policies more easily. A triangle icon next to the column heading
indicate which column is currently used to sort. An upward-pointing
triangle indicates ascending order, while a downward-pointing triangle
indicates descending order.
-
On the document security page, click Policies and click
the Policy Set tab.
-
Select a policy set and then click the Policies tab.
-
Click the appropriate column heading.
-
To change the sort order, click the column again.
Creating and managing policy sets
Policy sets are used to group policies that have a common business
purpose. Policy sets can be made available to a subset of users
in the system.
Each policy set has at least one associated policy set coordinator.
The
policy set coordinator
is an administrator or a user
who has additional permissions. The policy set coordinator is typically
a specialist in the organization who can best author the policies
in a given policy set.
Policy set coordinators can perform these tasks:
-
Create new policies
-
Edit and delete any policy in the policy set
-
Edit policy set settings
-
Add and remove coordinators for the policy set
-
View policy and document events for any policy or document
within the policy set
-
Revoke access to documents
-
Switch policies for the document
Policy sets are created and deleted in the document security
administrator interface by super users and policy set coordinators
who have permission to do so.
When you delete a policy set, policies that were part of the
set cannot be applied to new documents. However, you can view the
policy information in both the administration console and the end
user web pages for policies that are still in use. You can view
the policy information from the document detail page for any document
protected by the policy. Policies still in use can be edited.
The super user or policy set coordinator adds domains that are
created in User Management to the visible user and group for each
policy set. This list is visible to the policy set coordinator and
is used to put limits on which domains the policy set coordinator
can browse when choosing users to add to policies.
When you create policy sets, you assign users the role of document
publisher. The
document publisher
is the user who protects
the document with a policy. This user is, by default, always included
on a policy with full access rights, including revoke and policy
switching capabilities. However, administrators can change the document
publisher’s access rights for shared policies. For example, the administrator
can disable the document publisher’s right to revoke document access
or switch the policy. If an administrator switches the policy attached
to the document, the Publisher name will be updated to the name
of the owner of the policy last applied to the document.
Upon installation of document security, a default policy set
is created called
Global Policy Set
. This policy set is managed
by the administrator who installed the software or the policy set
coordinator who is designated for this policy set.
Create a policy set
Global Policy Set is the only default policy set that is
created upon installation. You can create additional policy sets
and add policies, users, policy set coordinators, and document publishers.
After creating a policy set, you can create policies within the
set.
During policy set creation, you can use the Back button to return
to the previous screen and the Save button to save your policy set
at any time.
-
On the document security, page, click Policies, click
the Policy Sets tab, and then click New.
-
In the Name box, type a name for the policy set, optionally
type a Description, and then click Next. The name cannot contain
a colon (:).
Note:
You can create a policy set
name that contains extended characters; however, when a comparison
is made between two strings, accented and non-accented characters
such as "e" and "é" are considered to be the same. When someone
creates a policy set, a comparison is made to check whether a policy
set with the same name already exists. The comparison cannot distinguish
between names that are the same except for accented characters.
It is assumed that the policy set is already added to the database
and the new one is not added.
-
(Optional) To set the domains that are visible to Document
Publishers when they are adding users to a policy, click Add Domains,
select the domains to make searchable, click Add, and then click
OK.
-
On the Add Visible Users and Groups page, click Next.
-
(Optional) To add a policy set coordinator, click Add Users
and Groups on the Add Policy Set Coordinator(s) (Step 3 of 4) page
and perform these tasks:
-
In the Find box, type the
name or email address.
-
In the Using list, select the appropriate option.
-
In the Type list, select User and, in the In list, select
a domain to search.
-
In the Display list, select the number of results to display
per page, and then click Find.
-
Select the check box for the user or group to add and click
Next.
-
Select the policy set coordinator permissions and click Add.
The following permissions can be set:
-
View events
-
Manage documents (revoke and reinstate access to documents,
and switch policies on documents)
-
Manage policies (create, edit, and delete policies)
-
Managing Document Publishers (add and remove Document Publishers)
-
Delegate (add and remove Policy Set Coordinators)
-
Repeat step 5 to add more policy set coordinators.
-
Review the policy set coordinator settings and click Next.
-
Click Add Users and Groups to add document publishers who
can use the policies within the policy set to protect documents.
-
On the Add Document Publishers page, perform these tasks:
-
In the Find box, type the name or email address.
-
In the Using list, select the appropriate option.
-
In the Type list, select User and, in the In list, select
a domain to search.
-
In the Display list, select the number of results to display
per page, and then click Find.
-
Select the check boxes for the users and groups to add, click
Add, and then click OK.
-
Click Save.
You can now add policies to your policy set. (See
Creating and editing policies
.)
Edit a policy set
-
On the document security, page, click Policies,
click the Policy Sets tab, and click the policy set to edit.
-
Click the appropriate tab and edit as required:
-
Detail:
Edit the policy set name and description.
-
Policies:
Create, enable, edit, and delete policies
within the policy set.
-
Visible Users and Groups:
Add and remove visible users
and groups who can be included in a policy.
-
Policy Set Coordinators:
Add, remove, and change permissions
for coordinators.
-
Document Publishers:
Add and remove users who can
publish documents by using the policies in the set.
-
To delete a visible user or group, Policy Set Coordinator,
or Document Publisher, click the appropriate tab, select the check
box for the entry, click Delete, and then click OK.
-
To add visible users or groups, a Policy Set Coordinator,
or Document Publishers, click the appropriate tab, click Add Users
or Groups, search for the user or group to add, select the entry,
click Add, and then click OK.
-
On the Policies tab, search for policies to add to the policy
set and create new policies:
-
To search for a policy,
select Policy ID or Policy Name, type the corresponding value, select
the number of items to display, and click Find.
-
For details about creating a new policy, see
Creating and editing policies
.
Delete a policy set
When you delete a policy set, policies that were part of
the set cannot be applied to new documents. However, you can view
the policy information in both the administration console and the
end-user web pages for policies that are still in use. You can view
the policy information from the document detail page for any document
protected by the policy. Policies still in use can be edited.
-
Click Policies and click the Policy Sets tab.
-
Select the check box for the policy set to delete.
-
Click Delete and then click OK.
Controlling access to policy-protected documents
You can control the way in which recipients use your policy-protected documents
no matter how widely you distribute them.
Using the Documents page you can do these tasks:
-
Search for and view the details of policy-protected documents.
You can see information about the document name, publisher name,
policy name, and date the policy was applied. If the policy that
protected a document is deleted, you can also see the deleted policy
ID under the policy name. Users can view and manage their own policy-protected
documents. Administrators can view and manage all policy-protected
documents.
-
Change the details of the policy that is applied to a document.
Users can edit their own policies, administrators can edit shared
and personal policies, and policy set coordinators can edit shared
policies in the policy sets they have permissions for. You can access
the policy that is associated with a document directly from the
Document Detail page.
-
Revoke and reinstate access to a policy-protected document.
Administrators can revoke and reinstate access to any document.
Policy set coordinators (who have permission to manage documents)
can revoke and reinstate access to policy-protected documents that
use shared policies from their policy sets. Users can revoke access
to their policy-protected documents if they created the policy that
is protecting the document or if the policy is a shared one that permits
this capability.
-
Switch the policy that is applied to a document. Users who
apply policies to documents can switch a policy if they created
it or if it is a shared policy that enables this capability. Policy
set coordinators can switch policies from their policy sets. Administrators
can switch policies that are applied to any document.
When a document is protected by a policy and you revoke access
privileges or switch the applied policy, the changes take effect
as follows:
-
If the document is online, changes are applied immediately
unless the user has the document open. In this case, the user must
close the document for the changes to take effect.
-
If a recipient is using the document offline (for example,
on a laptop), the changes take effect the next time the recipient
synchronizes with document security by opening any policy-protected
document.
View information about a document
For each document that is listed on the Documents page,
you can see the document name, publisher name, policy name, and
date the document was protected. If the policy that protected a
document has been deleted, the policy ID is listed under Policy
Name.
You can also view more details, which are described below, about
a particular document on the Document Detail page:
Note:
You must use the Policy Name link on the Document
Detail page to access policies that are auto-generated in Microsoft
Outlook for recipients of a document that is attached to an email
message. These policies do not appear on the policies page.
-
Document Name:
-
The name of the selected document.
-
Document ID:
-
A unique identifier that document security assigns when a
policy is applied to the document. document security uses this number
to track the document.
-
Document Status:
-
Status of the document (for example, active or revoked.)
-
Publisher:
-
Name of the user who attached the policy to the document.
-
Policy Name:
-
The name of the policy that is used to protect the document.
You can click the name to open the policy. You must use this link
to access policies that Acrobat generates for recipients of a document
that is attached to an email message in Outlook. Those policies
do not appear on the Policies page.
-
Policy Type:
-
The type of policy that was applied to the document.
-
Date Published:
-
The date the policy was applied to the document.
-
Related Iterations:
-
If the document has related iterations, this item also appears
in the list. Click the link to view the list of related iterations
for the document.
Users can view information about their protected
documents. Administrators can view information about documents that
any user has protected with a policy. Policy set coordinators can
view information about documents that are protected by policies
from their policy sets.
-
On the document security
page, click Documents.
-
In the list of documents, click the appropriate document.
The Document Detail page opens, displaying detailed information
about the document. This page also provides options for revoking
document access, switching the policy, and viewing events that are
related to this document.
View related iterations for a document
If tracking related iterations is enabled, you can track
versions of a document that various users have saved. This feature
is supported only by certain applications, such as PTC Pro/ENGINEER
Wildfire.
This feature is useful when multiple users are collaborating
and are saving different versions of the same document. document
security can keep track of the various iterations; therefore, you
can easily view document information for the different versions.
If this feature is enabled, you can view the related iterations
of a document from the Documents page.
-
View the Document Detail page for a document. (See
View information about a document
.)
-
Click View Related Iterations. The option is available only
if the feature is enabled. The list of related iterations appears.
For each iteration, you can view the following information:
-
Iteration:
The filename. It may be different from
the original filename and it has a version number appended to the
end of it.
-
Publisher:
The publisher of the original document.
-
Created By:
The user who saved the iteration.
-
Date Created:
The date and time that the Iteration
was saved.
-
Policy:
The policy that protects the iteration. Different
iterations may be protected by different policies.
-
To display the Document Detail page for that iteration, click
the filename of an iteration.
Revoking and reinstating access to documents
You can revoke and reinstate access to policy-protected
documents:
-
Users:
-
Can revoke or reinstate access to documents that they protect
with their own personal policies or with shared policies for which
the revoke capability is enabled for the user who applies the policy.
Users who cannot revoke access to a document or switch a policy
need to contact the administrator.
-
Administrators:
-
Can revoke or reinstate access privileges to any policy-protected
document, including those protected by personal or shared policies.
If an administrator revokes access to a document that is protected
with a shared policy, only an administrator can reinstate access
privileges for that document.
-
Policy set coordinators:
-
Can revoke or reinstate access privileges for documents that
policies from their policy sets protect.
When you revoke or
reinstate document access privileges, the change takes effect at
these times:
-
If the document is online and closed,
the change takes effect the next time the recipient synchronizes
with document security by opening a policy-protected document.
-
If the document is online and open, the change takes effect
when the recipient closes the document.
-
If the document is offline, (in use without an Internet connection,
such as on a laptop), the change takes effect the next time the
recipient synchronizes with document security.
Revoke access to a policy-protected document
-
On the document security page, click Documents.
-
Select the check box beside the appropriate document and
click Revoke. You can revoke access to multiple documents at a time.
-
Select a message to display to users who attempt to open
the document after it is revoked:
-
General Message:
Indicates
that the author revoked the document
-
Document Terminated:
Indicates that the author terminated
the document
-
Document Revised
: Indicates that the author revised
the document
-
(Optional) If a newer version of the document is available,
enter the URL and click Test to verify the URL.
-
Click OK, and then click OK again to return to the Documents
page.
Reinstate document access privileges
-
On the document security page, click Documents.
-
In the list of documents, click the appropriate document.
-
Click Unrevoke and then click OK.
Switch a policy that is applied to a document
Users, policy set coordinators, and administrators can
switch the policy that is applied to a policy-protected document
(you can apply only one policy at a time to a document). Users can
switch policies that are applied to their own policy-protected documents
if they created the policy or if the policy is a shared one that
has this capability enabled. Otherwise, the administrator or policy
set coordinator must switch the policy. Administrators can switch
policies for any user’s policy-protected documents. Policy set coordinators
can switch policies from their policy sets.
When you switch a policy, the new policy is enforced as follows:
-
If the document is online and closed, the change takes
effect the next time the recipient synchronizes with document security
by opening any policy-protected document online.
-
If document is online and open, the change takes effect when
the user closes the document.
-
If the document is offline (in use without an active Internet
or network connection, such as on a laptop), the change is applied
the next time the user synchronizes with document security by opening
a policy-protected document online.
Note:
To permit anonymous access to a policy-protected
document that currently does not have this access, remove the existing
policy in the client application and then apply a policy that permits
anonymous access. If you switch the policy, users still must log
in to access the document.
-
On the document security page, click Documents.
-
In the list of documents, click the appropriate document.
-
Click Switch Policy. A list of up to 100 policies appears.
-
If the policy you want is not displayed, select Policy Name
or Policy ID from the Find list, type the name or ID, and click
Find.
-
Click a new policy in the list.
-
Click Switch Policy, and then click OK to return to the Documents
page.
Search for a document
You can search for documents on the Documents page by using
a combination of date range criteria and the search criteria that
are available in the list. These criteria include the document name,
policy name, or all documents.
Some additional search options are only available to administrators:
-
Document ID:
-
Unique ID number that document security assigns to the document
when the policy is applied.
-
Document name:
-
Name of the document.
-
Publisher name:
-
Name of the user who attached the policy to the document. You
can select the user from all domains or a specified domain.
-
Policy ID:
-
ID number of the policy that is attached to the document.
-
Policy name:
-
Name of the policy that is attached to the document.
-
All documents:
-
All documents protected by administrators and users. Using
the All Documents option to search may return a long list of documents.
-
On the document security page, click Documents.
-
In the Find list, select the required search criteria.
-
(Optional) In the Date list, select a date range option.
If you select Custom Dates, type the date in format yyyy/mm/dd in
the boxes that appear or use the Date Picker to specify the date
range:
-
Click the calendar to open the Date Picker.
-
Use the arrows to find a year and month.
-
Click a day of the month on the calendar.
-
Click OK to close the Date Picker.
-
Click Find.
Sort the document list
You can sort the list of documents by column heading. Triangle
icons next to the column heading indicate which column is currently
used to sort. An upward-pointing triangle indicates ascending order,
while a downward-pointing triangle indicates descending order.
-
On the document security page, click Documents.
-
Click the appropriate column heading.
-
To change the sort order, click the column again.
Add cover page to policy protected documents
In the case of most non-Adobe PDF viewers, if you open
a document security protected document either the first page is
displayed as a blank page or the application aborts without opening
the document.
You can use the Page 0 (Wrapper Document) support to allow non-Adobe
PDF viewers to open a protected document and display a cover page
in the document.
Note:
When viewing such documents (containing a Page 0) in Adobe Reader/Acrobat
or Mobile Reader, the protected document is opened by default.
To add cover page to a policy protected document
Use
the following processes in workbench:
-
Protect
Document With Cover Page:
-
Secures a PDF document with the specified policy, and adds
a cover page to the document
-
Extract Protected Document:
-
Extracts the policy-protected PDF document from the PDF document
with cover page
Use the following document
security APIs:
-
protectDocumentWithCoverPage:
-
Secures a given PDF with the specified policy, and returns
a document with a cover page and the protected document as an attachment
//Create a ServiceClientFactory instance
ServiceClientFactory factory = ServiceClientFactory.createInstance(connectionProps);

//Create a RightsManagementClient object
RightsManagementClient rightsClient = new RightsManagementClient(factory);

//Reference a PDF document to which a policy is applied
FileInputStream fileInputStream = new FileInputStream("C:\\testFile.pdf");
Document inPDF = new Document(fileInputStream);

//Reference a Cover Page document
FileInputStream coverPageInputStream = new FileInputStream("C:\\CoverPage.pdf");
Document inCoverDoc = new Document(coverPageInputStream);

//Create a Document Manager object
DocumentManager documentManager = rightsClient.getDocumentManager();
//Apply a policy to the PDF document
RMSecureDocumentResult rmSecureDocument = documentManager.protectDocumentWithCoverPage(
inPDF,
"ProtectedPDF.pdf",
"PolicySetName",
"PolicyName",
null,
null,
inCoverDoc,
true);

//Retrieve the policy-protected PDF document
Document protectPDF = rmSecureDocument.getProtectedDoc();

//Save the policy-protected PDF document
File myFile = new File("C:\\PolicyProtectedDoc.pdf");
protectPDF.copyToFile(myFile);
-
extractProtectedDocument:
-
Extracts the protected document which is an attachment in
the document with cover page. The document with the cover page can
be created using protectDocumentWithCoverPage method
//Create a ServiceClientFactory instance
ServiceClientFactory factory = ServiceClientFactory.createInstance(connectionProps);

//Create a RightsManagementClient object
RightsManagementClient rightsClient = new RightsManagementClient(factory);

//Reference a protected PDF document with a Cover Page
FileInputStream fileInputStream = new FileInputStream("C:\\policyProtectedDocWithCoverPage.pdf");
Document inPDF = new Document(fileInputStream);

//Create a Document Manager object
DocumentManager documentManager = rightsClient.getDocumentManager();

//Apply a policy to the PDF document
Document extractedDoc = documentManager.extractProtectedDocument(inPDF);

//Save the policy-protected PDF document
File myFile = new File("C:\\PolicyProtectedDoc.pdf");
extractedDoc.copyToFile(myFile);
Monitoring events
When the auditing capability is enabled, document security
enables you to monitor certain types of events. The events that
you can see depend on your role:
-
Users:
-
Can view audited events for their policy-protected documents
and for any protected documents that they receive and use.
-
Policy set coordinators:
-
Can view audited events, including document and policy events,
for documents that are protected by policies from their policy sets.
-
Administrators:
-
Can view audited events that are related to all policy-protected documents
and users. Administrators can also track other types of events, including
user, document, policy, and system events.
Note:
Events
that are performed on a copy of a policy-protected document are
also tracked as events on the original protected document.
A failed event is recorded if an
unauthorized user attempts to view a document or attempts to log
in using an incorrect user name or password.
Note:
Failed
anonymous access events for documents may be logged if a policy
is edited to remove anonymous access. When an authorized recipient
attempts to access a document that the edited policy protects, anonymous
access is still attempted but will fail.
If a policy allows
anonymous user access but the administrator later turns off anonymous
access for document security, anonymous access will fail for documents
protected with the policy and the event will not be logged.
Enable event auditing
These setup requirements must be met for event auditing
to take place:
Search for an event
You can search the events list and view more detailed descriptions
about events. The detailed descriptions include information such
as the event ID, description, IP address, organization, user affected,
date and time the event occurred, denied activities, and offline
events (when users attempt to use a document when not connected
to document security).
You can search for events on the Events page by using a combination
of event search criteria and the dates the events occurred. The
events that you can search for depend on your role:
-
Users:
-
Can view audited events for their policy-protected documents
and for any protected documents that they receive and use. These
search options are available:
-
Events related
to me:
-
Users can find events for any policy-protected document that
they created or received. For example, if a user opens, views, or
prints a document that another person protected, the user sees only
these events for that document.
-
Events related to my documents:
-
Users can find all events that are related to their own policy-protected
documents. The users see the events that are generated by every
person who handled their documents.
-
Policy set coordinators:
-
Can view audited events, including document and policy events,
for documents that are protected by policies from their policy sets. These
options are available:
-
Document events where
I am a policy set coordinator:
-
Policy set coordinators who have the view event permission
can find events that are related to documents that policies from
their policy sets protect.
-
Policy events where I am a policy set coordinator:
-
Policy set coordinators who have the view events permission
can find events that are related to policies from their policy sets.
-
Administrators:
-
Can view audited events that are related to all policy-protected documents
and users. Administrators can also track other types. Also, administrators
can further subdivide event searches according to the type of user:
-
Known users:
-
Users are in the source directories or are registered as
external users.
-
Anonymous users:
-
Unknown users who access a document that is protected with
a policy that permits anonymous access.
-
System users:
-
Server-initiated events, such as a directory synchronization.
-
On the document security page, click Events.
-
In the Find list, select the search criteria you want to
use. Depending on your selection in the Find list, a second list
is displayed that provides additional search criteria. If applicable,
in the text box, type the search criteria.
-
In the Date list, select a date range option. If you select
Custom Dates, boxes appear, where you type the date in the format
yyyy/mm/dd, or you can use the Date Picker to specify the date range:
-
Click the calendar to open the Date Picker.
-
Use the arrows to find a year and month.
-
Click a day of the month on the calendar.
-
Click OK to close the Date Picker.
-
In the Display list, select the number of search results
to display per page.
-
Click Find.
Any failed events are highlighted in the
list with a denied icon.
-
To view details about an event, click the description of
the event in the list.
Sort the event list
You can sort the events list by column heading to find
events more easily. Triangle icons next to the column heading indicate
which column is currently used to sort. An upward-pointing triangle
indicates ascending order, while a downward-pointing triangle indicates
descending order.
-
Click the appropriate column heading.
-
To change the sort order, click the column heading again.
|
|
|