|

You
can create authentication providers for User Management to use when
authenticating users. Creating Authentication Providers explains
how to use the User Management SPI to create custom authentication
providers that you can integrate with LiveCycle.
An authentication provider is used when you create a directory
service provider and those users want to authenticate with LiveCycle. Consider a directory service provider that retrieves users
from a MySQL database. In order for any of those users to perform
a LiveCycle task, such as invoking a LiveCycle service,
the user must be authenticated. An authentication provider is dependent
on a directory service provider; therefore, create a directory service
provider before you create an authentication provider. (See Creating Directory Service Providers.)
Typically, user authentication occurs in the following sequence:
A user attempts to invoke a LiveCycle service
and provides a user name and password. User Management verifies
whether these user credentials are valid.
User Management sends the user name and password,
as well as configuration information, to the authentication provider.
The authentication
provider connects to the user repository and authenticates the user.
The authentication provider returns the results to User Management.
User Management either allows or denies the user access to LiveCycle.
The directory service provider created in Programming with LiveCycle interacts
with a MySQL database. Therefore the authentication provider must
also interact with the same MySQL database to ensure that the user
credentials are valid. The following illustration shows the users table
that the authentication provider interacts with. Notice that this
table contains a user_password field that contains
the user password value. The values located in the user_password field
are encrypted. This table belongs to a MySQL database named spi.
Summary of stepsTo develop an authentication provider, perform
the following steps:
Set up your development environment.
Define your application logic.
Define
the component XML file.
Package the component.
Deploy and test your component.
Sample filesTo see sample files that represent an authentication
provider, see the <install directory>/Adobe/Adobe LiveCycle
ES4/sdk\samples\LiveCycleESAPI\FoundationSPI\UserManagementAuthentication folder.
Setting up your development environmentTo create a custom authentication provider,
create an Eclipse Java project. The version of Eclipse that is supported
is 3.2.1 or later. The User Management SPI requires the um-spi.jar
file to exist in your project’s class path. If you do not reference
this JAR file, you cannot use the User Management SPI in your Java
project. This JAR file is installed with the LiveCycle SDK
in the <install directory>\sdk\spi folder.
The following JAR files must be added to your project’s classpath:
Defining your application logicTo define an authentication provider, create a Java class
that implements the com.adobe.idp.um.spi.authentication.AuthProvider interface.
This interface processes authentication requests and provides the
name of the configuration node. Implement the following methods, that
are invoked by User Management when it performs authentication:
authenticate
getConfigName
Authenticating usersTo
create an implementation that allows for the authentication of users,
implement the authenticate method. User Management
passes the following user and configuration values to the authenticate method
when a user attempts to log in:
The authenticate method returns a com.adobe.idp.um.spi.authentication.AuthResponse object
that specifies whether the user was authenticated.
The sample authentication provider consists of two classes:
SampleAuthenticationManager: Handles
the requests from LiveCycle to authenticate users. This
class implements the AuthProvider class and contains
the following methods: authenticate and getConfigName.
AuthenticationController: Interacts with
the MySQL database to ensure that the specified user credentials
are valid. This class retrieves data from the MySQL database by
using classes located in the java.sql.* package.
The method located in the AuthenticationController class
that interacts with the users table is named isValidUser.
This method returns a Boolean value that specifies whether user
credentials are valid. The following code example shows the application
logic of this method.
private boolean isValidUser(String userName, String password) {
boolean valid = false;
try{
//Create connection to mySQL server
Class.forName("com.mysql.jdbc.Driver");
Connection con = DriverManager.getConnection("jdbc:mysql://hsmithk-380:3306/spi", "root", "password");
Statement statement = con.createStatement();

/*Compare the username and password, return the amount of matches
*If using a plain text password, you can compare the password without using the PASSWORD() function
*/
ResultSet res = statement.executeQuery("SELECT COUNT(*) FROM users where userid='"+userName+"' AND user_password=PASSWORD('"+password+"')");

//Go to the first result
res.next();

//If a positive number of matches was returned, the username/password values are valid
if (res.getInt("COUNT(*)") > 0){
valid=true;
}

}catch(Exception e){
    e.printStackTrace();
}
return valid;
}
Retrieving the configurationYour implementation
of the AuthProvider interface must include a getConfigName method.
This method provides the name of the configuration node whose first-level
children are extracted from the configuration file. The getConfigName method
does not require any input parameters and returns a string value.
This example contains a sample implementation of the getConfigName() method.
public String getConfigName() {
    return "SampleAuthenticationManager";
}
Defining the SampleAuthenticationManager implementationThe following application logic represents the SampleAuthenticationManager class.
package com.adobe.livecycle.samples.authentication;

import java.util.List;
import java.util.Map;

import com.adobe.idp.um.spi.authentication.AuthConfigBO;
import com.adobe.idp.um.spi.authentication.AuthProvider;
import com.adobe.idp.um.spi.authentication.AuthResponse;
import com.adobe.idp.um.spi.authentication.AuthScheme;
import com.adobe.livecycle.samples.authentication.AuthenticationController;

/**
    * This class is a sample implementation of a authentication providers.
    * It interacts with a MySQL database named spi.users to determine
    * if user credentials are valid.
    *
    * For information about the MySQL database, see "Creating Authentication Provider"
    * in "Programming with LiveCycle."
    */

public class SampleAuthenticationManager implements AuthProvider {

    private static AuthenticationController sampleAuthentication = new AuthenticationController();

    public AuthResponse authenticate(Map credential, List authConfigs) {
        String userName = null;
        String password = null;
        String authType = null;

        AuthResponse authResponse = null;

        // check the credential map to find out what the credentials are
        if (credential.containsKey(AuthProvider.USER_NAME))
            userName = (String) credential.get(AuthProvider.USER_NAME);
        if (credential.containsKey(AuthProvider.PASSWORD))
            password = (String) credential.get(AuthProvider.PASSWORD);
        if (credential.containsKey(AuthProvider.AUTH_TYPE))
            authType = (String) credential.get(AuthProvider.AUTH_TYPE);

        if (authType == null || authType.equals(AuthScheme.AUTHTYPE_USERNAME_PWD)) {

            for (int i = 0;i < authConfigs.size();i++) {
                AuthConfigBO authConfigBO = (AuthConfigBO)authConfigs.get(i);
                System.out.println(authConfigBO.getCustomConfiguration());
                authResponse = sampleAuthentication.doAuth(userName, password, authConfigBO.getDomainName());
                if (AuthResponse.AUTH_SUCCESS.equals(authResponse.getAuthStatus())) {
                    return authResponse;
                }
            }
        }

        return authResponse;
    }

    /**
     * This method returns the config name of this Provider. This name would be the configuration node whose first-level
     * children are extracted from the configuration file.
     */
    public String getConfigName() {
        return "SampleAuthenticationManager";
    }

}
Defining the AuthenticationController implementationThe following application logic represents the AuthenticationController class.
package com.adobe.livecycle.samples.authentication;

import java.sql.Connection;
import java.sql.DriverManager;
import java.sql.ResultSet;
import java.sql.Statement;
import com.adobe.idp.um.spi.authentication.AuthResponse;
import com.adobe.idp.um.spi.authentication.AuthResponseImpl;
import com.adobe.idp.um.spi.authentication.AuthScheme;

public class AuthenticationController {

    /**
     * This method returns an object of type
     * com.adobe.idp.um.spi.authentication.AuthResponse, which contains the
     * information about the success/failure of the authentication operation.
     */
    public AuthResponse doAuth(String userName, String password,
            String domainName) {
        AuthResponse response = new AuthResponseImpl();
        response.setAuthType(AuthScheme.AUTHTYPE_USERNAME_PWD);
        response.setUsername(userName);

        if (userName == null || "".equals(userName) || password == null
                || "".equals(password)) {
            System.out.println("User Name or Password is null");
            response
            .setErrorMessage("Sorry!! User Name and Password could not be empty! Please provide User Name & Password!");
            return response;
        }

        if (isValidUser(userName, password)) {
            response.setAuthStatus(AuthResponse.AUTH_SUCCESS);
            response.setDomain(domainName);
            System.out.println("User " + userName + " is valid !!!");
        } else {
            response.setAuthStatus(AuthResponse.AUTH_FAILED);
            response.setDomain(domainName);
            System.out.println("User " + userName + " is not a valid user!!!");
        }
        return response;
    }

    /**
     * The method authenticates a user by interacting with the spi.users MySQL database
     */
    private boolean isValidUser(String userName, String password) {

        boolean valid = false;

        try{
            //Create connection to mySQL server
            Class.forName("com.mysql.jdbc.Driver");
            Connection con = DriverManager.getConnection("jdbc:mysql://hsmithk-380:3306/spi", "root", "password");
            Statement statement = con.createStatement();

            /*
             * Compare the username and password, return the amount of matches
             * If using a plain text password, you can compare the password without using the PASSWORD() function
             */
            ResultSet res = statement.executeQuery("SELECT COUNT(*) FROM users where userid='"+userName+"' AND user_password=PASSWORD('"+password+"')");

            //Go to the first result
            res.next();

            //If a positive number of matches was returned, the username/password values are valid
            if (res.getInt("COUNT(*)") > 0){
                valid=true;
            }

        }catch(Exception e){
            e.printStackTrace();
        }

        return valid;
    }
}
注意: Ensure that you reference the MySQL database
properly. Within jdbc:mysql://hsmithk-380:3306/spi, replace hsmithk-380
with the name of the server hosting your MySQL database.
Defining the component XML file for the authentication providerCreate
a component XML file in order to deploy the authentication provider
component. A component XML file exists for each component and provides
metadata about the component. For more information about the component
XML file, see the Component XML Reference.
The following component.xml file is used for the authentication
provider. Notice that the service name is SampleAuthenticationManagerService and
the operations this service exposes are authenticate and getConfigName.
Defining the component XML file for the authentication provider<component xmlns="http://adobe.com/idp/dsc/component/document">
<component-id>com.adobe.livecycle.samples.authentication.SampleAuthenticationManagerService</component-id>
<version>1.0</version>
<bootstrap-class>com.adobe.livecycle.samples.authentication.BootstrapImpl</bootstrap-class>
<lifecycle-class>com.adobe.livecycle.samples.authentication.LifeCycleImpl</lifecycle-class>
<descriptor-class>com.adobe.idp.dsc.component.impl.DefaultPOJODescriptorImpl</descriptor-class>
<search-order>PARENT_FIRST</search-order>
<class-path></class-path>
<dynamic-import-packages>
<package version="1.0" isOptional="true">*</package>
</dynamic-import-packages>
<services>
<service name="SampleAuthenticationManagerService">
<implementation-class>com.adobe.livecycle.samples.authentication.SampleAuthenticationManager</implementation-class>
<specifications>
<specification spec-id="com.adobe.idp.um.spi.authentication.AuthProvider"/>
</specifications>
<operations>
<operation name="authenticate" method="authenticate" >
<input-parameter name="credential" type="java.util.Map" />
<input-parameter name="authConfigs" type="java.util.List" />
<output-parameter name="echoed-value" type="com.adobe.idp.um.spi.authentication.AuthResponse"/>
</operation>
<operation name="getConfigName" method="getConfigName" >
<output-parameter name="echoed-value" type="java.lang.String"/>
</operation>
</operations>
</service>
</services>
</component>
Packaging the authentication providerBefore deploying
the authentication provider to LiveCycle, you package your
Eclipse project into a JAR file. Ensure that the component XML file
and the external JAR files on which the authentication provider’s
business logic depends are present. The component.xml file and external
JAR files must be located at the root of the JAR file.
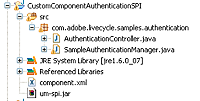
The following illustration shows the Eclipse project’s content
that is packaged into the custom authentication provider’s JAR file.
Package the authentication provider into a JAR file named adobe-authentication-spi-dsc.jar.
In the previous diagram, notice that .JAVA files are listed. Once packaged
into a JAR file, the corresponding .CLASS files must also be specified. Without
the .CLASS files, the authentication provider does not work.
注意: After you package the authentication provider
into a JAR file, you can deploy the component to LiveCycle.
(See Deploying your component.)
Deploying and testing the authentication providerAfter you package the authentication provider, deploy and
test it.
To deploy and test the authentication provider:Deploy
the adobe-authentication-spi-dsc.jar file using Workbench.
Restart the application server.
Log in to Administration Console.
Click Settings > User Management > Domain Management > New Enterprise Domain.
Specify the name and identifier of the domain.
Click Add Directory and add a directory to the domain
so that it contains some users.
Click Add Authentication. You are prompted to select
an authentication provider.
Select Custom. SampleAuthenticationManager is
listed as the provider.
Click OK. You can now save the domain.
|
|
|