Authoring and productivity enhancements
User interface enhancements
The following enhancements have been made in the latest user interface of FrameMaker.
Support for high-resolution screens
FrameMaker's user interface is now compatible with high-resolution screens ranging up to 3480 x 2160 pixels. Earlier, when you launched FrameMaker on a high-resolution display device, the text on the user interface would render too small. You would have to use a workaround to overcome this problem for earlier versions of FrameMaker. However, starting from 2017 release, FrameMaker supports high-resolution display devices. The user interface and all text automatically resizes as per Windows display settings.
New welcome screen
FrameMaker (2017 release) comes with a completely new look and feel. You will notice the change right from the welcome screen.
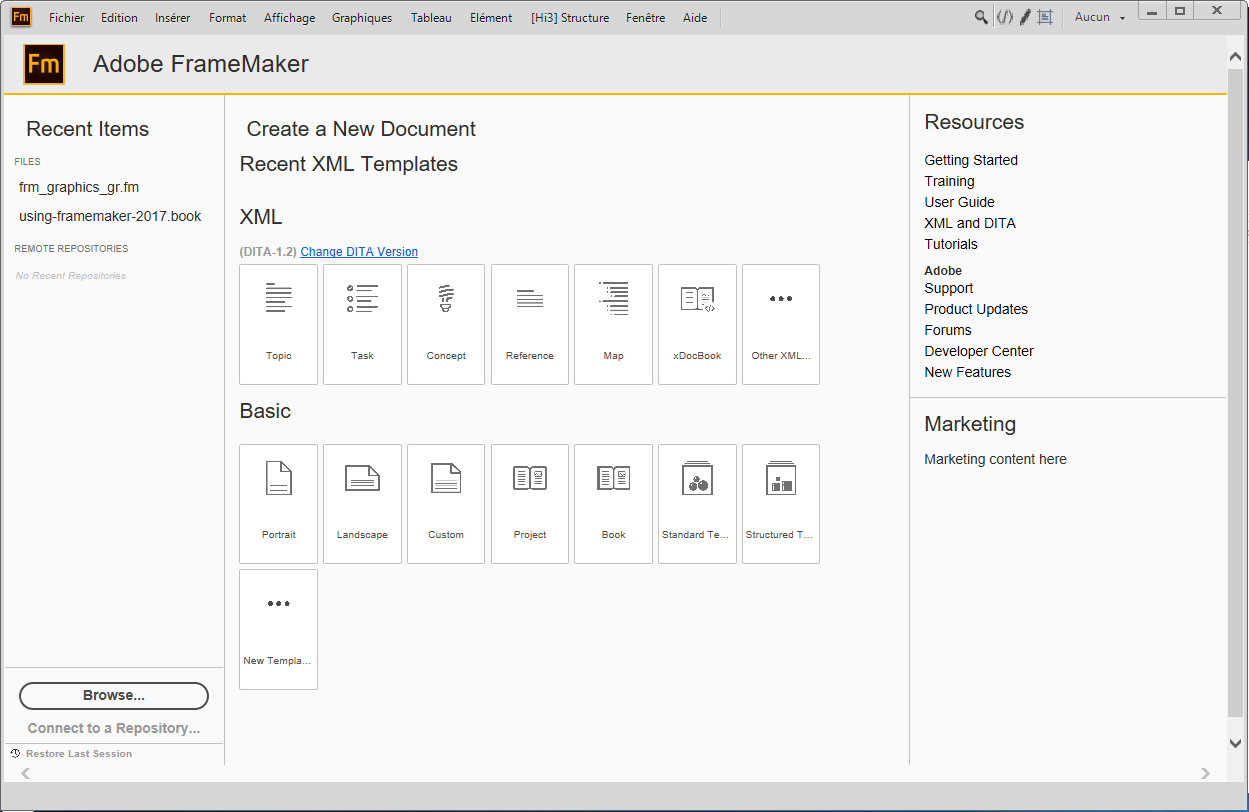
The welcome screen is divided into three panes. The left pane allows you to work with recent documents, browse to and open documents, connect to a document repository, or restore your last session. The middle pane allows you to create a new document based on a template. And, the right pane contain links to the valuable FrameMaker resources.
For more information, see Welcome screen.
Enhanced Table, Paragraph, and Character Designers
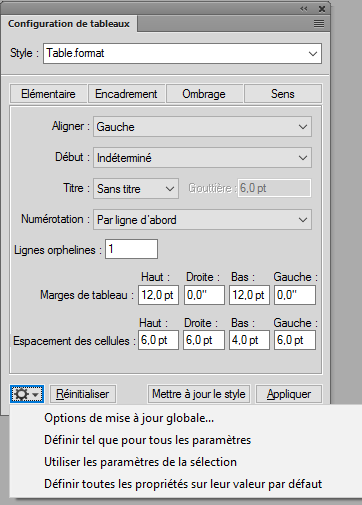
The new table, paragraph, and character designer comes with intuitive looks and presents the configurable options more clearly. You will notice the following enhancements in the new pod:
•Styling icons in table and paragraph designers have been replaced with labeled buttons
•Configurable options have been reorganized and relabeled
•The redundant command operations have been removed, which were: New Format and Delete Format
•One button for creating new style and updating all style formatting
Improved Conditional Tags pod
The following improvements have been introduced in the Conditional Tags pod:
•Adding or editing a conditional tag now happens through a dialog
•The old Select drop-down list has been replaced with Filter icon
•The Color and Background columns have been removed
•The conditional tags are listed with their close-to-final formatting
•A tooltip is displayed for conditional tags listed in the pod
For more information, see Conditional Tags pod.
Enhanced image insertion workflow
A new Insert menu has been introduced in FrameMaker that allows you to insert images, and also a few other components. If you choose Insert > Image workflow to insert and image, you no longer have to select the DPI settings for the imported image. The DPI settings are retained from the image itself. If the image is larger than the page width, it is automatically resized to fit into the page width. You can change the other properties of the image from the Object Properties pod.
You can also insert an image by dragging it from Windows Explorer and dropping it onto your active document. The image gets inserted in an anchored frame. When you save your document, the image is also saved along with the document, which was not the case in earlier version of FrameMaker.
For more information, see Import graphics.
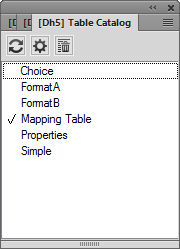
Redesigned catalog pods
Catalog pod like Paragraph, Character, Table, Object, and Elements have been redesigned. The old buttons for refresh, options, and delete have now been replaced with icons at the top of the pod. Also, the dialog to delete an item from the catalog has been simplified by removing the redundant Cancel button.
Session-level scope for View menu commands
Earlier when you selected a command from the View menu, the command would impact only the active document. However, from 2017 release, if you choose any command from the View menu, it will impact all documents opened in the current session. The following commands in the View menu affect the structured and unstructured documents:
•Borders
•Text Symbols
•Rulers
•Grid Lines
•Hotspot Indicators
However, the following commands in the View menu affect only the structured documents:
•Element Boundaries
•Element Boundaries (as Tags)
•Element Banner Text
For more information, see Viewing options.
Pods to dialog conversion
For improved usability, few pods have been converted into dialogs. Additionally, for some pods, the positioning in the main menu has been reorganized which aligns with their functionality. The following table lists the pods that have now been converted into dialogs, and their old and new menu positions have also been listed:
|
Pod |
Old menu position |
New menu position |
|---|---|---|
|
Align |
Graphics > Align |
Graphics > Arrange > Align |
|
Text Inset Properties |
Edit > Text Inset Properties |
Edit > Text Inset Properties |
|
Add Conditional Tags |
Special > Conditional Text > Conditional Tags > Create New Tag |
View > Pods > Conditional Tags > Create New Tag |
|
Add Variable |
Special > Variables > Create New User Variable |
Insert > Variables > Create New User Variable |
|
Page Break |
Special > Page Break |
Insert > Page Break |
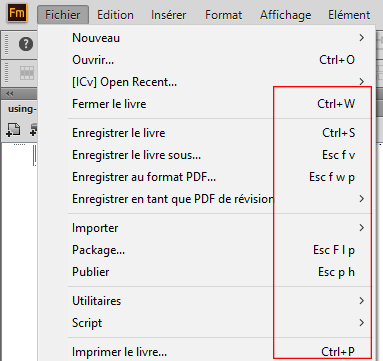
Command shortcuts added in main menu
Earlier, the commands shortcut keys were available only in the user guide. This made it a bit difficult for the new users to find the command shortcuts. Now, the shortcut keys are shown along with the command labels in the menu itself. Users can quickly launch the command by using the shortcut keys.
New name and menu location for pods
The following pods have been renamed and repositioned in the main menu:
•History pod
The History pod has now been renamed as Undo History pod. This is primarily because this pod displays only those actions that can be undone. Also, the new menu location to launch the Undo History pod is View > Undo History or you can also use the shortcut keys Ctrl+K.
•Currently Opened Files pod
Currently Opened Files pod has now been renamed as Open Files pod. The new menu location for this pod is View > Open Files and the shortcut keys to invoke it is Esc+S+F+L.
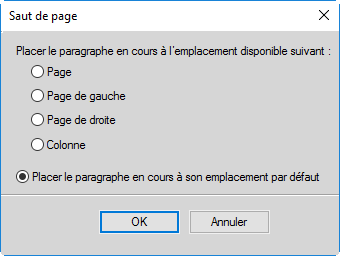
•Page Break pod
The Page Break pod has been moved into Insert menu. Also, new page break options have been added into the dialog.
Console window changed to pod
The FrameMaker Console window displays the error description and file that contains the error. This window has now been converted into a pod. You can launch this pod from the new menu location View > Pods > Console, or use Esc+c+P shortcut keys.
Other user interface modernization updates
•For pods where information is shown in the form of a list, such as Conditional Tags or Cross-References pods, a tooltip is displayed for items listed in the pod.
•Adding or editing a variable now happens through a dialog
•List of fonts is displayed in a single column.
•All dialogs open in center of the screen.
•List of symbols is alphabetically sorted and you can insert symbols from Insert > Symbols menu.
•List of items by which you can perform a search in the Find/Change dialog are shown in alphabetical order. Also, a history of search is maintained across sessions.
•The message shown in the alert pop-up on opening an older version of file is simplified.
•The resize gripper from all pods has been removed. You can adjust the pod size by simply dragging it from any edge.
•The pods have been rearranged to optimize screen usage and enhance usability. The following pods now show up in the bottom right corner of the user interface:
–Conditional Tags
–Cross-Reference
–Markers
–Fonts
–Insets
–Variables
–References
–Hotspots
–Open Files
–Review Comments
New project manager
Project management feature has been added in FrameMaker (2017 release). With the latest project management capabilities, you can:
•Organize content such as DITA map, book, topic, image, TOC, index files related to a project at a single place
•Drag-and-drop files from Windows explorer onto your project window to add files
•Drag-and-drop images from project window to an active document
For more information, see Projects.
Structured authoring enhancements
The following enhancements have been made in the structured authoring environment:
•In the Attributes pod, if there is not value assigned to an attribute, the Value field will be blank. Earlier, the Value field contained temporary text <no value> in it.
•The Status bar now provides information about the exact path of the current element in your structured document.
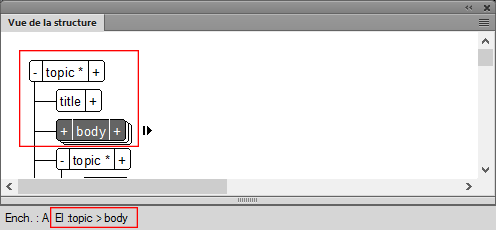
In the above example, the cursor is placed at the paragraph within the prereq element in the document, the same information is presented in the Status bar as breadcrumb.
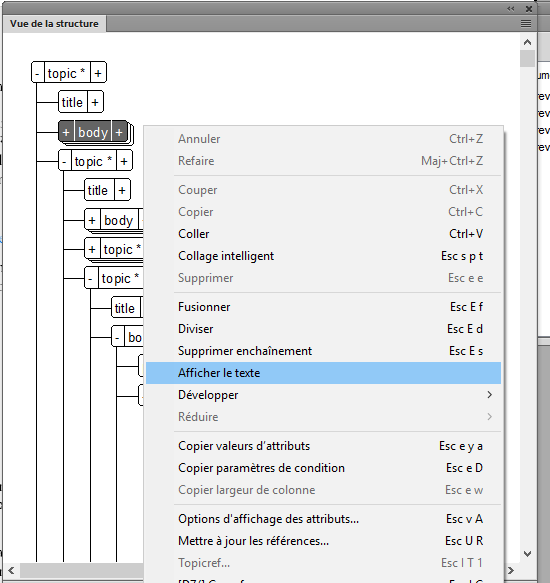
•You can show or hide content from the Structure View. To toggle between views, simply select the Show Text option from the context menu or from the main menu choose View > Show Text in Structure View. By default, the content is shown in the Structure View.
note: See a video on XML/DITAAuthoring in FrameMaker (2017 release).
Changes in the Insert Cross-References pod interface
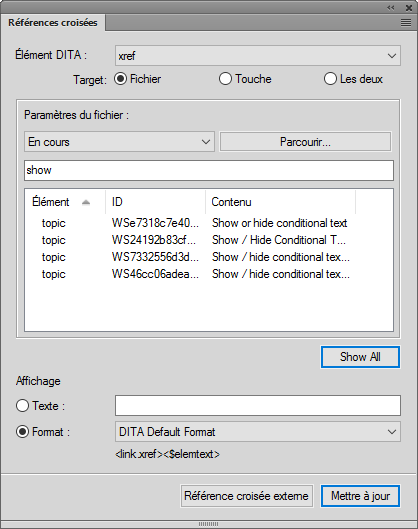
The user interface and workflow to insert a cross-reference in a structured document has been enhanced. The workflow for using Keyspaces in cross-references has been modified by removing a redundant Key Reference dialog. In addition, a powerful search functionality has been added in the Insert Cross-References dialog. For inserting cross-reference, you can search for the required text by its element type, ID, or text. The new menu location to insert cross-reference is Insert > Cross-Reference or you can also use the shortcut keys Esc+s+c.
For more information, see Cross-references.
DITA Keyspace Manager improvements
Working with the DITA Keyspace Manager dialog has been made easier by introduction of the following new features:
•If any DITA map is open in the current session, then it is added in the drop-down list of the Keyspaces.
•You can search for a keyspace by entering the first few characters of the key.
•By default, the first key in the list is always selected.
•If you click OK on the dialog, a common keyspace is considered for all open DITA maps.
•If you want to select a different keyspace for a particular document, then it can be set using the set keyspace manager.
•No different entry is made for the default keyspace (<default> filename) in the Keyspace drop-down list.
•You can set the keyspace from multiple paths. For example, you can set keyspace from DITA cross-reference, DITA link, insert conref, and more.
Element menu enhancements
A lot of new commands have been added in the Element menu to help you work more efficiently and easily with structured elements. In addition, a shortcut key is assigned to all of these commands to help you perform tasks quickly. A list of commands in the Element menu along with their shortcut keys is given in the following table:
|
Command name |
Shortcut |
|---|---|
|
Insert Element |
Ctrl+1 |
|
Wrap Element |
Ctrl+2 |
|
Change Element |
Ctrl+3 |
|
Unwrap |
Esc+E+u |
|
Edit Attributes |
Esc+E+A |
|
Namespaces |
Esc+E+N |
|
Merge |
Esc+E+m |
|
Merge Into Last |
Esc+E+M |
|
Split |
Esc+E+s |
|
Promote Element |
Esc+E+P |
|
Demote Element |
Esc+E+D |
|
Toggle Element Collapse |
Esc+E+x |
|
Toggle Element Collapse All Siblings |
Esc+E+X |
|
Transpose With Previous |
Esc+E+T |
|
Transpose With Next |
Esc+E+t |
|
Repeat Last Element Command |
Esc+e+e |
|
Move To Next Element |
Esc+s+D |
|
Move To Previous Element |
Esc+s+U |
|
Move Into Next Child |
Esc+s+N |
|
Move To Start of Element |
Esc+s+S |
|
Move To End of Element |
Esc+s+E |
|
Move To Before Element |
Esc+s+B |
|
Launch Config File Maker |
Esc+C+F+M |
|
Attribute Display Options |
Esc+v+A |
|
Set Available Elements |
Esc+E+O+C |
|
New Element Options |
Esc+E+O+I |
Authoring enhancements
The following enhancements to the authoring feature have been introduced.
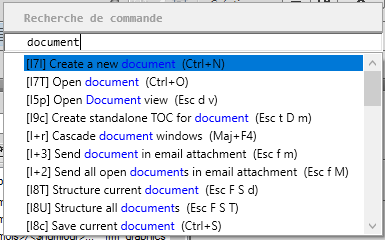
New command search and execute tool
FrameMaker has hundreds of menu commands. At times, even experienced users might find it a bit tedious to locate the required command in the menus. FrameMaker (2017 release) comes with the powerful search command feature. Using this feature, you can enter the name of the command that you are looking for and the search command tool returns the commands matching the search string. Once the required command is located, you can execute the command from the tool itself. The search command tool lists the commands and the corresponding shortcut keys to invoke the command.
Mini TOC auto-update
A mini TOC in your document gets automatically updated when you save or print that document. The other ways to update the mini TOC are through the main menu (Edit > Update Book), or the context menu.
For more information, see Generate a miniature table of contents.
Improved auto-spell checker
If you have enabled auto-spell check feature in FrameMaker, you see a red squiggly line under all words as you type. This behavior has now been improved. You will see the red squiggly line only after you have typed the complete word, and the word is not available in the dictionary. Also, the Hunspell dictionary has been updated to provide you better spell-checking functionality.
For more information, see Spelling Checker.
Farsi to Numeric command in Direction Toolbar
The Direction Toolbar has been enhanced by adding Farsi to Numeric and Numeric to Farsi conversion commands.

RTL markers moved to Insert menu
The RTL directional marker have been removed from the Directional Toolbar and placed under the Insert menu. You can insert directional marker from the main menu by choosing Insert > Directional Marks and selecting the desired directional marker.
Performance improvements
You will find the following performance improvements in FrameMaker (2017 release):
•A structured document with a large number of nested cross-references opens up much faster.
•While working with a document repository in a CMS, the behavior of dependent document has been improved. Now, if a dependent document is updated, every time you open the parent document, a latest version of the dependent document is also fetched from the repository.