|

Once a layout is selected for a letter, it is not possible
to change components in the layout. This restriction limits their
reuse and requires the creation of several layouts for letters with
only slight differences. However, using fragments which are bound
to target areas allows the letter to be changed at the time of authoring.
Fragments with different dimensions can be created and the appropriate
fragment can be bound to the target area. Fragment layouts also
allow you to customize some of the table properties: You
can increase the row and column count.
You can specify the header and footer text for additional
rows and columns.
You can define the ratio of table column width. At runtime
table columns are resized according to the defined ratio and available
space.
If a table is a place holder (contains only single blank
cell), you can define the type (target area/field) of new columns.
You can hide header and footer rows.
Before performing this procedure, create an XFA fragment using
LiveCycle Designer. The fragment can contain tables for organizing
fields and target areas. LiveCycle Designer allows creation of two
types of tables: static and dynamic. Static tables contain a fixed
number of rows. Static tables can contain target areas and fields.
These target area and fields cannot be bound to repeating DDEs.
The data bound to table cells determines the number of rows for
dynamic tables. A dynamic table can contain only fields and these
fields can be bound to only DDEs. DDEs can be repeating or non-repeating.
Consider the following points when designing tables: Tables can be customized at the time of fragment layout creation.
However customize option is enabled only when table's parent subform
is flowed.
For dynamic tables all the fields, repeatable row and table
use "use name" binding for data to merge properly.
For dynamic tables, all the repeating DDEs bound to the table
fields are part of same hierarchy. For non-repeating DDEs, there
is no such restriction.
At the time of merging fragment layout into parent target
area tables are resized according to available space, however resizing
takes place only when fragment layout does not contain any target
area or field directly inside top-level subform. Target area and
fields inside table are permitted.
You can create place holder tables. Place holder tables have
only a single blank cell. For placeholder tables, you can customize
following properties at the time of fragment creation:
row count
column count
header and footer for each column
type (target area/field) of each columns
width ratio for each column
For a non-placeholder
table, you can customize following properties:
You can nest fragments in a letter. This implies that you
can add a fragment within a fragment.
The Correspondence Management
solution supports up to four levels of nesting within a letter:
Letter->Fragment->Fragment->Fragment->Fragment
Upload a fragment layout to the Correspondence Management systemOpen the Manage Assets user interface. If you have
installed the solution template and sample users, you can go to
the sample portal at http://<server>:<port>/lc/cm/manageassets.html
Log in using your appropriate credentials (such as user name as
tgoldman and password as your password).
Click New > Fragment Layout or select a
fragment layout asset and click Edit.
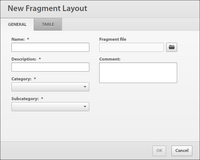
Specify the following information for the layout:
Name: Name that appears in the list in the Manage
Assets user interface.
Description: Description that appears in the list
in the Manage Assets user interface.
Category: Select a category for the layout. The System
Administrator defines the categories.
Subcategory: select a subcategory for the layout.
The System Administrator defines the subcategories.
Fragment File: Click the folder icon to browse and
select the fragment layout file. When assigned to a target area
in a letter template the fragment layout’s target areas are added
to the list of target areas in the left pane of the letter editor.
Comment: Comment that appears in the list in the Manage
Assets user interface.
Note: The
table tab is enabled if the Fragment layout contains at least one
table and the Fragment layout’s root subform is flowed.
Click the Table tab and specify the following information
for the layout:
Configuration for: Select the
table being configured. If the fragment layout contains single table,
the drop-down is disabled.
Static or Dynamic: This option is enabled
only for place holder tables (table containing single cell). For
non-placeholder tables, this field reflects the existing table's
type, which cannot be changed. For dynamic tables the Columns property
is disabled and its value is Field
Rows: select the number of rows for the layout. The
configured row count must be greater than or equal to the original
row count.
Columns: select the number of columns for the layout.
The configured column count must be greater than or equal to the
original column count.
Header and Footer: These check boxes are enabled if
existing tables have header/footers. Deselect these check boxes
to hide header/footer.
For each column following
details are required: Header: text to show for
the header
Footer: text to show for the footer
Type: type of additional column. Field or Target Area.
Type is enabled for static place holder tables. Type can be defined
at column level and not at cell level. All the cells in an extended
column would be of the same type. For a dynamic table, all the columns
are of Field type. For non-placeholder tables, you cannot define
the type of additional columns. In this case, type of additional
cells in extended column is same as the type of last column in that
row; and type of cell in additional row is same as type of last
cell in that column.
Width ratio: ratio of the table column widths.
Click OK.
|
|
|