Creating indexes
Create index entries
In a typical index, entries are generated from markers and are sorted alphabetically. Entries with the same text are merged into a single entry with several page references. You can add special building blocks to marker text to control the form of the index entry—for example, to specify that it’s a sub-entry or a cross-reference to another entry.
Index entries
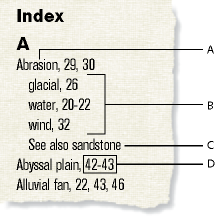
A. Main entry B. Subentries C. Cross-reference to another entry D. Page range
You can also create specialized indexes by using predefined marker types such as Subject or Author, or by using other marker types that you create.
note: Indexes support the Unicode text encoding standard.
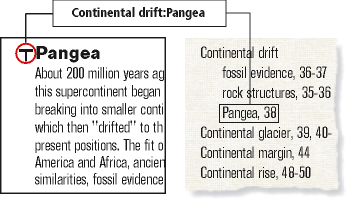
Index marker placed in the source document, and the formatted entry appearing in the index
Inserting an index marker
1)Click where you want to insert the marker or select the word that you want to include in the Index and click Insert from the Markers pod. You can insert markers only in text frames.
2)Choose a marker type from the pop-up menu. Typically, you’ll use the Index marker type. To create several indexes for a document—for example, a subject index and an author index—use a different marker type for each.
3)Enter the text of the index entry in the Marker pod. You can enter up to 255 characters (127 Japanese double-byte characters). You can also use any of the following building blocks in marker text to control the form of the index entry and its location in the index.
|
Building block |
Meaning |
|---|---|
|
: (colon) |
Separates levels in an entry |
|
; (semicolon) |
Separates entries in a marker |
|
[ ] (brackets) |
Specifies a special sort order for the entry |
|
<$startrange> |
Indicates the beginning of a page range |
|
<$endrange> |
Indicates the end of a page range |
|
<$nopage> |
Suppresses the page number in the entry |
|
<$singlepage> |
In a marker that contains several entries, restores the page number for an entry that follows a <$nopage> building block |
|
Character tag between angle brackets ( < > ) |
Changes the character format (for example, <Emphasis>) |
|
<Default Para Font> |
Restores the paragraph’s default font |
If you’re working in Japanese fonts, enter all these building blocks except the brackets ([ ]) using single-byte characters.
note: To enter a backslash or any special character used in these building blocks—colon, semicolon, bracket, or angle bracket—as regular characters, precede it with a backslash ( \ ).
4)Click New Marker. A marker symbol  appears when text symbols are visible.
Add, edit, or delete markers and marker types
Insert index marker elements (structured documents)
1)Click where you want to insert the marker.
2)Select a marker element in the Element Catalog and click Insert.
You can also use Special > Marker to insert an element. If more than one marker element is available, choose the one you want from the Element Tag pop-up menu in the dialog box.
3)To change the marker type, choose from the Marker Type pop-up menu. Changing to another type is not a format rule override, even if the element has a type preselected.
Consult your developer before changing a marker type. Your document may have a separate element defined for each marker type you’ll need.
You can generate an index from the predefined Index, Subject, and Author marker types. Some custom types may also be available.
4)Type the text of the index entry. You can enter up to 255 characters (127 Japanese characters). You can also use any of the following building blocks in marker text to control the form of the index entry and its location in the index.
|
Building block |
Meaning |
|---|---|
|
: (colon) |
Separates levels in an entry |
|
; (semicolon) |
Separates entries in a marker |
|
[ ] (brackets) |
Specifies a special sort order for the entry |
|
<$startrange> |
Indicates the beginning of a page range |
|
<$endrange> |
Indicates the end of a page range |
|
<$nopage> |
Suppresses the page number in the entry |
|
<$singlepage> |
Restores the page number for an entry that follows a <$nopage> building block in a marker that contains several entries |
|
Character tag between angle brackets ( < > ) |
Changes the character format (for example, <Emphasis>) |
|
<Default Para Font> |
Restores the paragraph’s default font |
note: To enter a backslash or any of the special characters used in these building blocks—bracket, colon, semicolon, or angle bracket—as a regular character, precede it with a backslash ( \ ).
5)Click New Marker. If text symbols are showing, a marker symbol appears in the document window. A bubble for the marker appears in the Structure View, with a text snippet that shows the beginning of the marker’s text.
6)If the Attributes for New Element dialog box appears, enter attribute values for the marker element and click Insert Element.
7)If no marker element is available at the location you want, you might use an invalid element. After inserting the element, talk to your developer about making the element valid at this location.
Insert an index marker without typing
1)To reduce or eliminate typing when creating index markers, do one of the following:
•Insert an empty marker or marker element (with no text in it) at the beginning of the word. When you generate the index, the text to the right of the marker, up to the first space, becomes the text of an entry.
•To use text that appears in the document as the marker text, simply select the text in the document. As long as the selected word or phrase doesn’t contain a marker, it automatically appears in the Marker Text box.
Place several entries in one marker
1)Type several entries in the marker, using a semicolon (;) between entries, as in the following examples.
|
Marker text |
Result in index |
|---|---|
|
Abrasion; Water erosion |
Abrasion 10 Water erosion 10 |
|
<$nopage>Erosion. See Abrasion;<$singlepage>Abrasion |
Abrasion 10 Erosion. See Abrasion |
In the second row of the example, the <$nopage> building block affects subsequent entries in the marker. To return to a single page number, <$singlepage> is included with the next entry in the marker.
You can type any number of spaces after the semicolon to improve readability. Initial spaces are ignored when compiling the index unless they’re special ones such as nonbreaking or em spaces. (If you’re working in Japanese fonts, only single-byte space characters are ignored.)
Create an index subentry
You can group several entries under one entry for a larger category of information by marking them as subentries. You can also create subentries to subentries.
Subentries
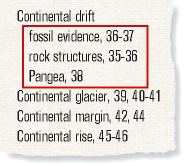
1)Separate the entry from the subentry with a colon (:). For example, to create the first subentry in the illustration, enter Continental drift:fossil evidence
A subentry is always preceded by the entry to which it is subordinate. If you need two subentry levels, place a colon between the subentry and the sub-subentry. For example, enter Continental drift:fossil evidence:dating of
Create a cross-reference in an index entry
Indexes often contain cross-reference entries to direct readers to related terms. This makes it unnecessary to duplicate the entries and page numbers for related terms that already appear in the index.
Cross-references
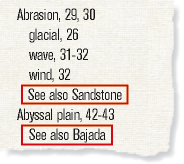
Cross-references can also appear as subentries (usually preceded with See also, as in the illustration). You can sort subentries so that they appear at the top or bottom of the list under the same main entry.
1)Insert a marker and use <$nopage> at the beginning of the marker text to prevent a page number from appearing with this entry. For example, to create the first cross-reference in the illustration, enter <$nopage>Abrasion. See also Sandstone
Use page ranges in index entries
You can use a page range such as 36–37 to mark information that spans several pages.
You can create a page range in an entry by manually inserting two markers to indicate the range, one at the beginning of the range and the other at the end. You can also have FrameMaker create page ranges for you automatically whenever the same marker text occurs on consecutive pages of a document. For example, instead of 3, 4, 5, the entry would automatically appear as a page range (3–5).
Manually create a page range for an index entry
1)Insert an index marker at the beginning of the information, with <$startrange> at the beginning of the marker text. For example, to create the first page number in a range, enter <$startrange>Continental drift:fossil evidence
2)Add an index marker (or marker element, if working with a structured document) at the end of the information, identical to the first except that you enter <$endrange> rather than <$startrange> at the beginning of the marker text. For example, to create the second page number in a range, enter <$endrange>Continental drift:fossil evidence
If both markers appear on the same page, the page range collapses to a single page number.
Automatically create page ranges in an index
1)Display the reference page that contains the special text flow for indexes.
2)Type the <$autorange> building block at the beginning of the paragraph whose tag begins with the marker type.
To collapse the entries generated from markers of type Index into page ranges when possible, edit the paragraph tag IndexIX to contain the following building blocks: <$autorange><$pagenum>