|

To customize the permissions list
for a file or folder, you must be an administrator, a limited administrator,
or a user with Manage permission for that library file or folder.
Note:
Administrators
set permissions for limited administrators in the Administration >
Users and Groups section of Connect Central. By default, limited administrators
can set permissions for content, but an administrator could choose
to revoke this ability.
-
Click the Content, Training, Meetings, Seminar
Rooms, or Event Management tab in Connect Central.
-
Navigate to the folder or file and click its name to
open it.
-
Click Set Permissions on the navigation bar.
-
Click Customization. (If the permissions for this item
have been modified before, the Customization button does not appear.
Proceed to the next step.)
The Available Users and Groups pane displays users and
groups for whom you can define permissions for the library item.
The Current Permissions pane displays users and groups who already
have permissions for the library item. You can change the existing
permissions if desired.
-
To add a user or group to the Current Permissions pane,
select the name in the Available Users And Groups list and click
Add.
View full size graphic
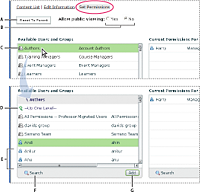
Setting permissions and navigating Available Users and Groups
-
A.
-
Click to set folder or file permissions to be the same
as the parent folder permissions
-
B.
-
Choose a
viewing permission
-
C.
-
Double-click
a group name to view the users in that group
-
D.
-
Double-click
the Up One Level icon to go up one folder level
-
E.
-
Users
-
F.
-
Click
the Search button to open a text box for searching
-
G.
-
Click
Add to move a selected user or group to the Current Permissions
list
-
To set the permissions for a user or group, select the
name in the Current Permissions list and click Permissions.
-
Select one of the following permissions from the pop-up
menu:
-
Manage
-
Users or groups with Manage permission for a folder or
file can view, delete, move, and edit the file or folder, view reports
for files in that folder, set permissions for the file or folder,
and create new folders. However, they cannot publish to that folder.
-
Denied
-
Users or groups with a Denied permission setting for
a folder or file cannot view, publish, or manage this folder or
file.
-
Publish
-
Users or groups with a Publish permission setting for
a folder or presentation can publish, update, and view presentations,
as well as view reports for files in that folder. However, these
users must also be members of the Built-in Author group, as well
as have Publish permission, to publish content to this folder.
-
View
-
Users or groups with a View permission setting for a
folder or file can view any content in the folder, or can view the
individual file.
View full size graphic
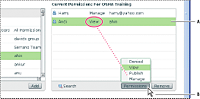
Current permission settings
-
A.
-
Selected name
-
B.
-
Click
the Permissions button to select a permission setting. The setting
is displayed next to the name.
-
To remove a user or group from the Current Permissions
list, select the name and click Remove.
-
To reset permissions for the entire library folder or
file to be the same as the permissions of the parent folder, click
Reset to Parent.
-
For Content library only: Select Yes for Allow Public
Viewing to make this folder publicly viewable, even if the parent
folder is not publicly viewable. Select No to make the folder inaccessible
to the public. Only Adobe Connect users with View, Manage, or Publish
permissions can view private content. To do so, they must first
log in with an Adobe Connect user name and password.
|
|
|

