|

Connect to video telephony streams
The Video Telephony pod lets hosts share video streams
with attendees, including any audio. When one-way communication
is sufficient for a presentation, a telephony stream can be preferable
to a two-way conference.
-
Choose Pods > Video Telephony.
-
Click Open Stream.
-
From the pop-up menu, choose the appropriate device.
The
list of available devices is established by your Adobe Connect administrator.
(See
Configure video telephony devices
.)
-
Click Connect.
The Video Telephony pod appears for
all attendees. When attendees hover the mouse over the pod, a volume
control appears for stream audio.
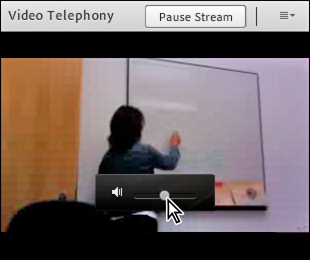
To display volume control, hover the mouse over Video Telephony
pod.
-
In the upper right of the pod, hosts can click Pause Stream,
or click the pod menu
 to
access Close Stream, Change Stream, or Mute Audio options.
to
access Close Stream, Change Stream, or Mute Audio options.
Enable participants to share webcam video
By default, only hosts and presenters can
broadcast video. However, hosts can enable participants to broadcast
by doing any of the following:
-
To enable video for
all participants, click the menu button
 to
the right of the microphone button, and choose Enable Video for
Participants.
to
the right of the microphone button, and choose Enable Video for
Participants.
-
To enable video for specific participants, select one or
more in the Attendees pod. Then choose any of the following from
the pop-up menu: Enable Video, Make Host, or Make Presenter.
Share webcam video
Hosts, presenters, and
participants with enhanced rights can simultaneously share video
from webcams connected to their computers.
Adjust video quality
If you are a host, presenter, or participant
with video rights, you can adjust the quality of your webcam video.
-
In the upper right of the Video pod, click the
menu icon
, and
choose Preferences.
-
Adjust the Video Quality setting to optimize the tradeoff
between image quality and bandwidth usage. For example, if shared
screens update slowly, choose a lower Video Quality setting.
This setting interacts with the meeting room bandwidth
set by the host. (See
Set meeting room bandwidth
.)
Share your video
-
Click the Start My Webcam button in
the main menu bar or Video pod.
In the Video pod, a preview image appears so you
can adjust camera position. If you want to use a different connected
camera, select it from the Video pod menu
.

To cancel video sharing, click outside the preview
image in the Video pod.
-
Click Start Sharing to broadcast your video to all participants.
-
To pause or stop video, hover the mouse over Video pod,
and click the Pause or Stop icons.
When video is paused, the last image broadcast from your
camera remains static in the Video pod until you click Play
 to
resume broadcasting. When video is stopped, the broadcast image
disappears entirely.
to
resume broadcasting. When video is stopped, the broadcast image
disappears entirely.
Hosts can pause or stop
video from any attendee.
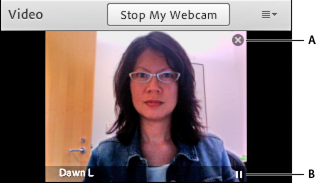
Stop (A) and Pause (B) icons in the Video pod
|
|
|


